

Adding Contacts
Creating a New Contact
1. Touch the
Home Key >
and touch the all
contacts tab
.
2. Touch
to add a new contact.
3. Enter the contact name, phone numbers,
email addresses, and other information.
4. Touch
DONE
to save the contact.
Importing Contacts in Batches
1. Touch the
Home Key >
.
2. Touch the
Menu Key > Import/export.
3. Select
COPY CONTACTS FROM
an account,
SIM cards or phone and then touch
Next
.
4. Select
COPY CONTACTS TO
an account,
SIM cards or phone and then touch
Next
.
5. Select a contact and then touch
OK
on the
top of the screen.
Sending a Message
1. Touch
Home Key >
.
2. Touch
to create a new message.
3. Enter the recipient(s) and message text. If
you want to send an MMS, add subject and
attachments.
4. Touch and then select a SIM card to send
the message.
Setting Up Email Accounts
Setting Up Gmail
1. Touch
in the home screen and select
Gmail
.
NOTE:
If another Gmail account is already
set up, touch the
Menu Key > Settings >
ADD ACCOUNT
.
2. Touch
Existing
to sign in to your existing
Google Account. If you have no Google Ac-
counts, touch
New
to create one.
3. Follow the instructions on the screen to set
up the account.
Setting Up Email
1. Touch
in the home screen and select
.
NOTE:
If another email account is already
set up, touch the
Menu Key > Settings >
ADD ACCOUNT
.
2. Enter the email address and password.
3. Touch
Next
and follow the on-screen instruc-
tions.
Setting Up Corporate Exchange Email
1. Touch
in the home screen and select
.
NOTE:
If another email account is already
set up, touch the
Menu Key > Settings >
ADD ACCOUNT
.
2. Enter the email address and password.
3. Touch
Manual setup > Exchange
.
4. If necessary, edit
Domain\Username
,
Pass-
word
, and
Server
information and then touch
Next
.
5. Configure the settings on the screen, such as
Days to sync
, and then touch
Next
.
6. If prompted, touch
OK
to activate the Email
app as a device administrator.
7. Identify your new account with a unique
name and then touch
Next
.
Contact your server administrator for more help.
Connecting With a Bluetooth
Headset
1. Turn on the Bluetooth headset and switch it
to pairing mode. Refer to the headset’s user
guide for more information.
2. Touch in the home screen and select
Set-
tings > Bluetooth
.
3. Slide the
ON/OFF
switch if Bluetooth is off.
When Bluetooth is on, the icon appears in
the status bar.
NOTE:
Your phone automatically scans for
and displays the IDs of all available Bluetooth
devices in range. You could touch
SEARCH
FOR DEVICES
if you wanted to scan again.
4. Touch the ID of the headset, or any other de-
vice you want to pair with your phone. Enter
a passcode if prompted.
5. If necessary, touch the ID of the paired head-
set to connect with it. Once connected, the
icon in the status bar turns blue.
TIP:
Touch the ID again to end the connection.
Installing Apps From the Google
Play Store
There are tens of thousands of games and ap-
plications in the Google Play Store for you to
download and install. You can send feedback or
comments on an application.
Before you begin, make sure that you have
signed in to your Google account.
NOTE:
The content you can access in the Play
Store depends on your region and your service
provider.
1. Touch the
Home Key > > Play Store
.
The first time you launch
Play Store
, accept
the Google Play Terms of Service.
2. Find the apps you need either by category or
by touching .
3. Touch the app to see detailed description.
4. Touch
INSTALL
(free apps) or the price (paid
apps). If the app is not free, you need to sign
in to your Google Wallet account and select a
payment method.
CAUTION:
Once installed, some apps
can access many functions or a significant
amount of your personal data. The Play
Store will show you what the app can access.
Touch
ACCEPT
to proceed, or touch the
Back Key
to cancel.
5. Wait for the app to be downloaded and in-
stalled automatically. Payment needs to be
authorized before paid apps start download-
ing.
The app is successfully installed when the
icon appears in the status bar. You can find the
new app by touching the
Home Key >
.
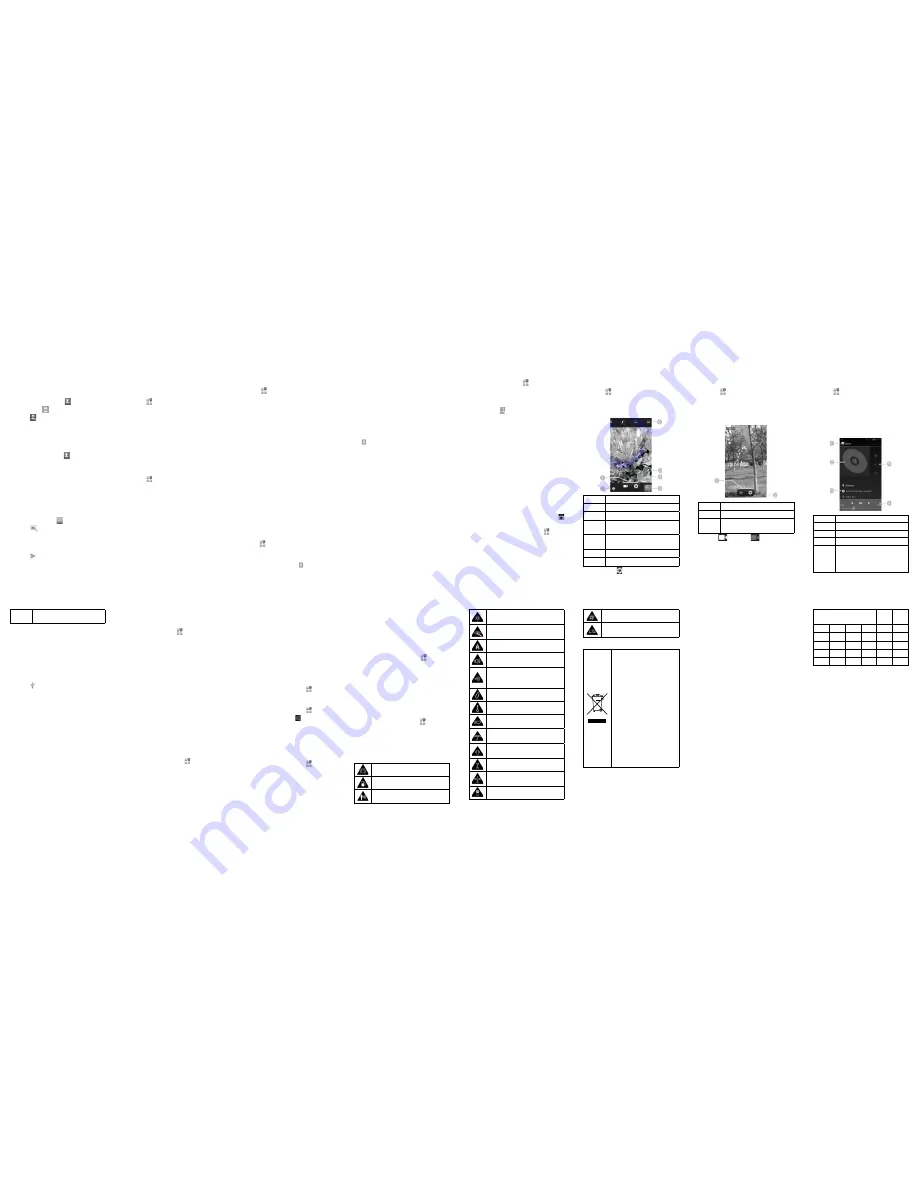
Taking a Photo
1. Touch
in the home screen and select
Camera
.
2. Aim the camera at the subject and make any
necessary adjustment.
Number
Function
1
Capture a photo.
2
Change the camera settings.
3
View photos and videos you have
captured.
4
Switch between the front camera
and the back camera.
5
Switch the flash.
6
Select the camera mode.
3. Lightly touch to take a photo.
Recording a Video
1. Touch
in the home screen and select
Camera
, or switch to the camcorder from the
camera screen.
2. Aim the camera at the subject and make any
necessary adjustment.
Number
Function
1
Start or stop recording a video.
2
View photos and videos you have
captured.
3. Touch
to start and
to stop recording.
TIP:
While the recording is in progress, you can
touch the preview screen to save the frame as a
photo.
Playing Music
1. Touch in the home screen and select
Music
.
2. Touch a category, such as Artists or Albums,
to find the song you want to play.
3. Touch the song to play it back. When the
song is playing, touch the album artwork to
display more options.
Number
Function
1
Touch to return to the library.
2
Album artwork.
3
Song and artist names.
4
Playback control. Skip songs,
pause and resume playback. Drag
the progress bar to jump to any
part of the song.
5
Touch to see the current playlist
(queue), Shuffle, or Repeat.
Connecting to PC
You can connect your phone to a computer with
a USB cable and transfer music, pictures, and
other files in either direction. Your device stores
these files in internal storage or on a removable
microSD card.
1. Touch and hold the status bar across the top
of the screen and flick down.
2. Touch
(Connected as [
current connection
mode
])
.
3. Choose one of the following options:
u
USB storage:
Transfer files between PC
and external SD card on Android devices.
u
Media device (MTP):
Transfer media
files on Windows, or using Android File
Transfer on Mac.
u
Camera (PTP):
Transfer photos using
camera software, and transfer any files
on computers that don’t support MTP.
u
Charge only:
Charge your phone via
USB.
u
Built-in CD-ROM:
Show a virtual CD-
ROM containing some useful software.
To disconnect the device from the computer, sim-
ply unplug the USB cable when you’re finished.
Connecting to the Internet
Connecting via Wi-Fi
1. Touch the
Home Key > > Settings > Wi-Fi
.
2. Slide the
ON/OFF
switch to ON if Wi-Fi is off.
Your phone automatically searches for Wi-Fi
networks in range and displays their names
and security settings. Your phone also con-
nects to previously linked networks when
they are in range.
3. Touch a network name to connect to it.
If the network is secured, enter a password or
other credentials. (Ask your network administra-
tor for details.)
Connecting via Mobile Network
To connect to the Internet via mobile network,
you can use the default Access Point Names
(APN). If you want to add a new APN, please
contact the service provider to get the necessary
information. Do not change the default settings
unless instructed by the service provider. Other-
wise the service might stop working.
1. Touch the
Home Key >
> Settings >
More… > Mobile networks > Access Point
Names
.
2. Select a SIM card.
3. Touch the
Menu Key > New APN
.
4. Touch each item to enter the information you
get from your service provider.
5. Touch the
Menu Key > Save
to complete.
Extending Battery Life
There are several things you can do to make
your battery last longer.
• Turn on Wi-Fi, Bluetooth, GPS, mobile data,
auto-sync only when you need to.
• Lower the screen brightness.
• Use Bluetooth tethering or USB tethering
(when you have a cable) instead of portable
Wi-Fi hotspot to share your phone’s data ser-
vice.
• From the home screen, touch
> Settings
> Apps
and close the apps you do not need
but still run in the background.
• From the home screen, touch
> Settings
> Audio profiles
. Touch to show the gen-
eral settings screen and uncheck
Vibrate on
touch
.
Freeing Up Memory Space
Use
Apps
to free up memory space and optimize
system speed.
1. From the home screen, touch
> Settings
> Apps
.
2. Touch the App and touch the
Force stop
but-
ton next to the application you do not need.
Managing the Phone Storage
Deleting Old Messages
You can manually delete old messages to free up
some storage space. You may also set up auto
deletion of the oldest messages when the limits
are reached.
1. From the home screen, touch
> Messag-
ing
.
2. Touch the
Menu Key > Settings
.
3. Touch
General
and then check
Delete old
messages
to enable auto deletion.
4. Touch
Text message limit
or
Multimedia
message limit
to set the maximum limit.
5. Touch
Set
.
Clearing Browser’s Local Content
1. From the home screen, touch
> Browser
.
2. Touch the
Menu Key > Settings > Privacy
& security
.
3. Touch
Clear cache
,
Clear history
, and
Clear all cookie data
.
Product Safety Information
Do not use hand-held while driving
Do not use while re-fuelling
For body-worn operation maintain a
separation of 15 mm
This device may produce a bright or
flashing light
Small parts may cause a choking haz-
ard
Do not dispose of it in a fire
This device may produce a loud
sound
To prevent possible hearing damage,
do not listen at high volume levels for
long periods.
Avoid contact with magnetic media
Avoid Extreme Temperatures
Keep away from pacemakers and
other personal medical devices
Avoid any contact with liquid, keep it
dry
Switch off when instructed in hospitals
and medical facilities
Do not attempt to disassemble
Switch off when instructed in aircrafts
and airports
Only use approved accessories
Switch off in explosive environments
Do not rely on this device for emer-
gency communications
Disposal of Your Old Appliance
1. When this crossed-out
wheeled bin symbol is at-
tached to a product, it means
the product is covered by the
European Directive 2012/19/
EU.
2. All electrical and electronic
products should be disposed
of separately from the mu-
nicipal waste stream via
designated collection facilities
appointed by the government
or the local authorities.
3. The correct disposal of your
old appliance will help prevent
potential negative conse-
quences for the environment
and human health.
For this product’s recycling information based
on WEEE directive, please send an e-mail to
[email protected]
SAR
Your mobile device is a radio transmitter and re-
ceiver. It is designed not to exceed the limits for
exposure to radio waves recommended by inter-
national guidelines. These guidelines were devel-
oped by the independent scientific organization
ICNIRP and include safety margins designed to
assure the protection of all persons, regardless
of age and health.
The guidelines use a unit of measurement known
as Specific Absorption Rate, or SAR. The SAR
limit for mobile devices is 2 W/kg and the highest
SAR value for this device when tested was 0.417
W/kg. As mobile devices offer a range of func-
tions, they can be used in other positions, such
as on the body.
As SAR is measured utilizing the device’s highest
transmitting power, the actual SAR of this device
while operating is typically below that indicated
above. This is due to automatic changes to the
power level of the device to ensure it only uses
the minimum power required to communicate
with the network.
This equipment may be
operated in:
AT
BE
CY
CZ
DK
EE
FI
FR
DE
GR
HU
IE
IT
LV
LT
LU
MT
NL
PL
PT
SK
SI
ES
SE
GB
IS
LI
NO
CH
BG
RO
TR
17
18
19
20
21
22
23
24
25
26
27
28
29
30
31
32


