


1080P HD Smart PTZ Camera User Manual
6
5.6
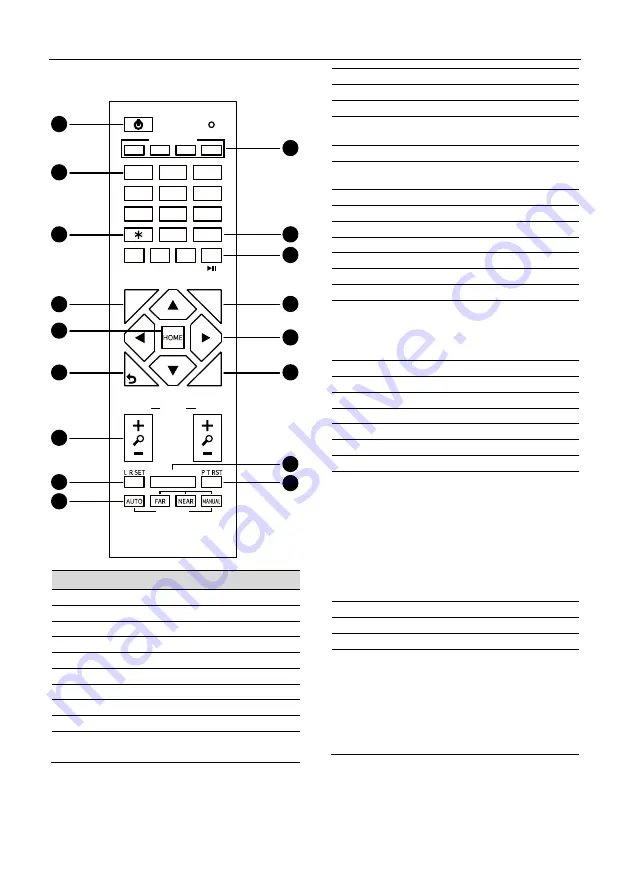
Remote Control
Key Description
1. Standby Key
Press to enter standby mode
2. Number Key
Press to set preset or call preset
3. *Key
Use with other keys
4. PRESET Key
Set preset: [PRESET] + Number key (0-9)
5. HOME Key
Confirm selection or press to turn PTZ back to
the middle position
6. Return Key
Press to return to the previous menu
7. ZOOM Key
SLOW: Zoom In [+] or Zoom Out [-] slowly
FAST: Zoom In [+] or Zoom Out [-] fast
8. L/R SET Key
Standard: Simultaneously press L/R SET + 1
Reverse: Simultaneously press L/R SET + 2
9. FOCUS Key
Auto/Manual/Far/Near focus
10. CAMERA SELECT Key
Press to select and control the camera
11. # Key
Use with other keys
12. IR Remote Control Key
[*]+[ ]+[F1]: Address 1
[*]+[ ]+[F2]: Address 2
[*]+[ ]+[F3]: Address 3
[*]+[ ]+[F4]: Address 4
13. RESET Key
Clear preset position: [RESET] + Number key (0-9)
14. PTZ Control Key
PTZ moved according to the arrow indicates
15. MENU Key
Press to enter or exit OSD Menu
16. BACKLIGHT Key
Backlight ON/OFF: Press repeatedly to enable or
disable the backlight compensation.
NOTE:
Effective only in auto exposure mode.
If there is a light behind the subject, the
subject will become dark, press the
backlight key to enable the backlight
compensation. Press again to disable this
function.
17. P/T RST (PTZ Reset) Key
PTZ starts to self-test after pressed it
Shortcut Set
[*]+[ ]+[1]: OSD menu default English
[*]+[ ]+[3]: OSD menu default Chinese
[*]+[ ]+[4]: Display current IP address
[*]+[ ]+[6]: Quickly recover the default
[*]+[ ]+[8]: View the camera version
[*]+[ ]+[9]: Quickly set up inversion
[*]+[ ]+[MANUAL]: Restore default IP address
0
9
8
7
6
5
4
3
2
1
#
1
2
4
3
F2
F3
F4
PRESET
CAMERA SELECT
STD
REV
RESET
MENU
SLOW
BACKLIGHT
FOCUS
ZOOM
FAST
F1
/
/
1
9
2
3
4
5
6
7
8
10
11
12
13
14
15
16
17


