

Thank you very much for choosing our Android Smart TV Box. In order
to make your new device more convenient
and proficient, we provide you
with this user Guide. Please read this guide carefully before using Android
Smart
TV Box, and keep it properly for a future reference.
Package Contents
Assemblies
Quantity
Android TV Box
Power adaptor
Remote control
HDMI cable
User manual
1
1
1
1
1
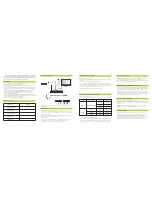
Connection diagram
1)Power on:
Power off:
2)Home Screen
Connect
the
power
adaptor
into Android
TV
BOX
at
power
off
mode
,
the
indicator light turns red
.
Press
the
Power
button
on
the
remote
control
or press
the
box
front
Power
button
,
the
unit
will
turn
on
with
a
blue
light
.
When the system is running, press the Power button. To turn your
Android TV BOX Off go to power off mode.
When you turn your Android TV BOX on, the Home screen appears. This is
the starting point to access all the features on your system. It displays
application icons, widgets, shortcuts and other features.
HDTV
Green
Blue
Red
Red
White
Yellow
Signal
Y
Pb
Pr
Audio-L
Audio-R
Video
Cable Android TV BOX
YPbPr
Φ
3.5 Earphone plug
CVBS
Red
White
Yellow
1)WiFi:When WiFi signal is available, use Wireless&Network settings to
configure and manage connections to networks by using WiFi.
2)RJ45 Ethernet:Plug the network cable into the RJ45 port of your Android TV
BOX.Use Ethernet settings to turn on the Ethernet.
Please follow the steps below.
1)Connect one end of the HDMI cable to your Smart TV BOX, the other end to
your HDTV.
2)Turn your Android TV BOX and your HDTV on.
3)Use the HDTV’s remote control to select the correct inputs of your HDTV.
4)Some HDTV cannot display the entire picture, so you need to setup the screen
ratio of your HDTV as automatic. Follow these steps: Seting->Display->Display
position->Press arrow buttons to select the ratio type.
5)Note that different HDTV may have different settings.
1.Power on/off
2.HDMI Connecting to HDTV
Please follow the steps below.
1)Connect one end of the YpbPr to your Android TV BOX,the other to your HDTV.
3.YPbPr or CVBS Connecting to HDTV
2)Turn on your Android TV BOX and HDTV.
3)Use your HDTV's remote control to select the correct inputs of your HDTV.
4)Note that the different HDTV may have different settings. The ratio type of
YPbPr output is up to 1080i. The ratio type of CVBS output is 480i and 576i.
4.Connectting to Network
You can safely insert the USB device or SD card into your android TV BOX
when the unit is on or off. Gently insert card into the SD card slot or the USB
device into the USB jack. “Preparing SD card”or “Preparing USB device”will
be displayed on the status bar for one second. You can safely remove the SD
card from your android TV BOX any time when the unit is turned off. If you
need to remove the SD card or the USB device while your android TV BOX is on,
you must unmount the storage card or the USB device.
Android application can be installed by 2 methods.
Method 1:
Download application's APK file from network using PC, save it in
a USB external memory or in an SD card, and then plug the device into android
TV BOX.
Click file browsers to find the application's APK file to select and install.
Method 2:
Install android application using google play store directly.
5.
Using USB Device and SD/MMC/MS Card
6.
Android Application install
Click”Privacy”in the setting screen to open the privacy settings screen.
Factory data reset: Erase all of your personal data from internal storage,
including information about your Google account, any other accounts, your
system and application settings, as well as downloaded applications.
Resetting your Android TV BOX does not erase any software updates you've
downloaded or any files in your SD card, such as music or photos.
7.
Privacy Setting
*
Support Android 4.0 operating system with ARM Cortex A9.
*
Fashion aluminum housing with LED display.
*
Support many IPTV(Interactive Personality TV) programmes to connect with
your own website.
*
Support three main HD formats:VC-1,H.264,MPEG-2 and many others normal
formats,such as MPEG-1
、
MPEG-2
、
MPEG-4
、
DIVX
、
REALMEDIA and
so on.
*
Video formats include AVI, MPG, VOB, RMVB, MKV, M2TS, TS and so on.
*
Photo formats include JPEG, BMP, and PNG without size limitation.
*
Audio formats include MP3
、
WMA
、
WAV
、
AC3
、
DTS
、
AAC and so on.
*
Support SD/SDHC/MMC/MS cards.
*
Support 4 USB 2.0 host connectors with maximum output current of 1.5A/5V.
*
Support standard RJ45 cable network connection and wireless network connection.
*
Support infrared remote controller operation.
*
Low consumption,stand-by mode: consumption < 0.1 W
Key Features
Note: Remote Control can switch between
"
cursor
"
and
"
IR
"
by
pushing
RC
cursor key
.


