background image


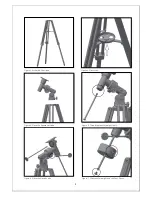
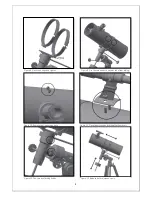
Figure 8. Place tube rings and tighten. 

Figure 9. Use the two knobs to prevent tube from sliding. 

Figure 10. Remove the finderscope nuts. 

Figure 12. The two axis locking knobs. 

Figure 11. Place finderscope and thread the thumbnuts 

Figure 13. Balance both telescope’s axis. 

Summary of Contents for Gravity 150 EQ

Page 1: ...1 Instruction Manual Gravity 150 EQ English version 8 2014 Rev A...

Page 2: ...Different accessories combinations give different results such as different image magnifications or correct image for example But all this will be explained in detail in the next pages 3 Assembly Sta...

Page 3: ...Figure 2 Assemble the tripod Figure 3 Place tray Figure 4 Place the Equatorial Head Figure 5 Thread the counterweight shaft Figure 6 Place the Hand Knobs Figure 7 Slide counterweight and the Foot Save...

Page 4: ...tighten Figure 9 Use the two knobs to prevent tube from sliding Figure 10 Remove the finderscope nuts Figure 12 The two axis locking knobs Figure 11 Place finderscope and thread the thumbnuts Figure 1...

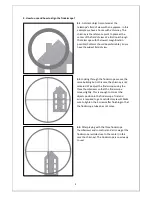
Page 5: ...oking through the finderscope we see the same building but in this case the chimney is not centered We adjust the finderscope using the three thumbscrews so that the finderscope moves slightly This is...

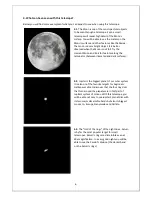
Page 6: ...ator between illumated and dark surfaces 4 2 Jupiter is the biggest planet of our solar system It is also on of the favorite targets for beginners Galileo was able to discover that the four tiny dots...

Page 7: ...Telescope focal length is 1400mm PL25 eyepiece focal length is 25mm 1400 25 56 This means that the PL25 eyepiece provides a 56x power magnification This seems low but try it you will see a a bright i...

Page 8: ...rd to get high quality pictures with this telescope If you have a smartphone you can shoot the Moon or some terrestrial objects Search online for digiscoping and afocal photography Q The stars only ap...

Reviews: