background image

21

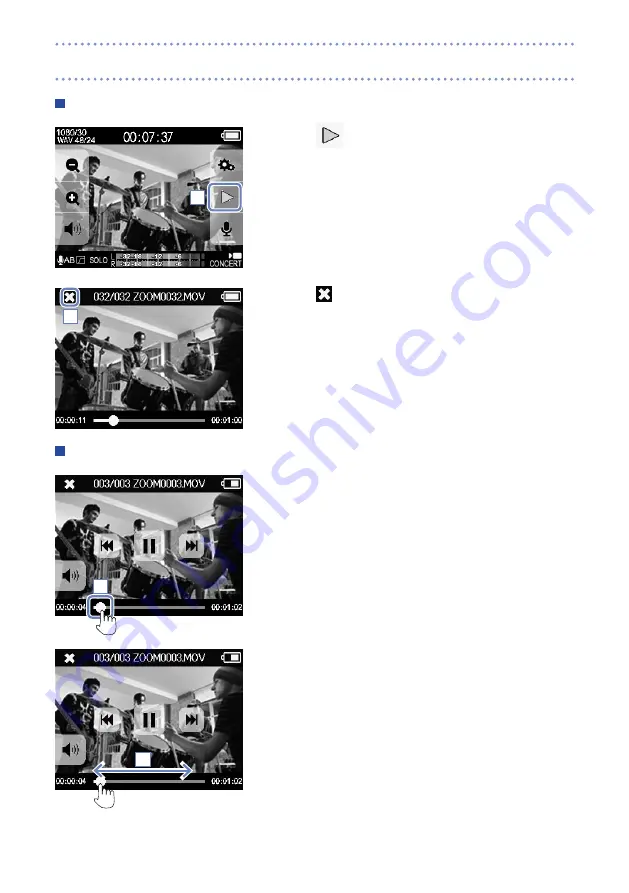
 Playing a file

1.

  Touch 


 on the Main screen.

2.

 Touch 

 to stop playback.

This reopens the Main screen.

 Changing the playback position

1.

  Touch the playback position bar.

2.

 Slide it to the position you want.

3.

 Remove your finger from the screen.

Playback will start from that position.

1

2

1

2

Playing recordings

Summary of Contents for Q4n

Page 1: ...User Guide Safety and Operation Precautions must be read before using this unit 2015 ZOOM CORPORATION Copying or reproduction of this User Guide in part or in whole without per mission is prohibited...

Page 2: ...ng the playback position 21 Playing a different file 22 Setting the sound 23 Reducing noise Lo Cut 23 Auto Gain 24 Recording mode settings 25 Setting the mode 25 Mode explanations 25 Camera settings 2...

Page 3: ...arts and their functions Left side LCD panel AB XY mic Top REC button Input volume control AB XY mic POWER button REC LED Bottom SERIAL NO Tripod mounting threads SD card slot cover Strap attachment h...

Page 4: ...4 Front Lens REC LED Back Mic slider USB port Headphones jack External input jack HDMI port Charging LED Right side Battery cover Parts and their functions continued...

Page 5: ...a medium distance for ex ample solo performances chamber music live rehearsals and field recordings A B technique This technique uses two spread apart directional mics Features Providing a wide sense...

Page 6: ...is fixed in place The X Y technique will become active and the mic indicator on the LCD will change to XY If the mics are not recognized as being in the X Y position they will be used as an A B pair W...

Page 7: ...7 Using the A B mic technique 1 Slide the mic slider on the back up until it locks This raises the mics Mic overview continued...

Page 8: ...of the 2 Insert the SD card into the SD card slot To remove the card push it further into the slot and then pull it out Do not remove the SD card during recording Doing so could damage the data CAUTI...

Page 9: ...otate the screen so you can check what is being recorded when filming yourself 1 Rotate the screen in the direction of the arrow 2 Rotate the screen in the opposite direction to return it to its origi...

Page 10: ...tting Upside down setting Open Menu screen Open input settings Open Playback Screen Open output volume adjustment When recording recording time In recording standby shows available recording time Audi...

Page 11: ...nning select previous file Select next file When paused Playback position bar Touch to change playback position File name Remaining battery charge Output volume adjustment File length Return to Main s...

Page 12: ...en system settings P 39 Using the menu 1 Touch the icon for the function you want to use 2 Select the item you want to set When settings have multiple pages touch and to change pages If an item has a...

Page 13: ...The surrounding temperature should be between 5 C and 35 C 41 F and 95 F when charging At other temperatures the battery could become hot damaged or weakened Do not leave the cable connected for long...

Page 14: ...the power on 1 Press and hold on the top The REC LED will light red and then green Turning the power off 1 Press and hold on the top After Goodbye See You appears the power turns off Turning the power...

Page 15: ...g date and time to files 1 Touch on the Menu screen 2 Touch Set Date Time in the submenu 3 Touch and to select the item to change and touch and to set the current date and time 4 After completing the...

Page 16: ...tting After it completes Done will appear and the SD Card menu will reopen 2 3 4 After purchasing a new SD card always format it using the to maximize performance All data previously saved on the SD c...

Page 17: ...he peak indicator does not light even when loud sounds are input Raise level Lower level 5 4 3 2 1 0 6 7 8 9 10 Peak indicators 5 4 3 2 1 0 6 7 8 9 10 In addition to the peak indicators the REC LED al...

Page 18: ...f view to one of five levels 1 Touch and on the Main screen Narrow the angle of view This trims down to the central subject Widen the angle of view This records a wider range 1 The angle of view can b...

Page 19: ...the transfer speed to the card is not fast enough during video recording Low Speed Card ap pears on the screen and recording might stop To avoid this we recommend using cards that are Class 10 or fas...

Page 20: ...io equipment to the headphones jack on the back of the 2 To adjust the monitoring volume touch on the dis play The Volume pop up appears on the screen 3 Touch and or slide the bar on the pop up to adj...

Page 21: ...h to stop playback This reopens the Main screen Changing the playback position 1 Touch the playback position bar 2 Slide it to the position you want 3 Remove your finger from the screen Playback will...

Page 22: ...s for some time Touch the LCD to show the buttons again The can only play videos that it recorded By connecting an HDMI cable sold separately to the HDMI OUT video can be output to an external device...

Page 23: ...s the INPUT SETTING screen 2 Touch Lo Cut on the INPUT SETTING screen and change the setting Setting Explanation Off This disables the lo cut filter On This enables the lo cut filter 3 After completin...

Page 24: ...Gain settings and main applications Setting Main applications Off This disables Auto Gain Adjust the recording level manually Concert This is suitable for recording band performances concerts and othe...

Page 25: ...30 24Mbps 2304 1296 30 Record video with a resolution higher than Full HD Use when you want to record at high resolution Large HD 1080 30 24Mbps 1920 1080 30 This is suitable for all kinds of video re...

Page 26: ...ency kHz and bit rate the better the audio quality Large WAV 96kHz 16bit WAV 48kHz 24bit WAV 48kHz 16bit WAV 44 1kHz 24bit WAV 44 1kHz 16bit AAC 320kbps Record in a compressed AAC format when you need...

Page 27: ...Night Adjustments are made for night and other dark situations Concert Low Light Suitable adjustments are made for small concert halls and other dim lighting conditions Dance Club Suitable adjustment...

Page 28: ...leting the setting touch to close the sub menu Self Timer self timer settings Setting Explanation Off Self timer not used 3 sec Start recording 3 seconds after pressing 5 sec Start recording 5 seconds...

Page 29: ...Menu screen 2 Touch Upside Down in the submenu 3 Touch the setting value in the submenu 4 After completing the setting touch to close the sub menu Upside Down reverse vertical orientation when recordi...

Page 30: ...Touch on the Menu screen This opens the FILE list screen If there are many files touch and to change pages Playing files from the list 1 Touch the thumbnail for the file you want to play The touched...

Page 31: ...uch on the FILE list screen The screen title will change to FILE INFORMATION 2 Touch a file to show its information Information about the selected file will appear 3 After checking the information tou...

Page 32: ...on the file thumbnails 2 Touch a file to add a check to its box marking it for dele tion Touch to play the last selected file which is framed in green 3 Touch 4 TouchYes on the confirmation screen Th...

Page 33: ...uires plug in power to the exter nal input jack 2 Touch on the Main screen This opens the INPUT SETTING screen 3 Touch Plug in Power on the INPUT SETTING screen and change the setting to On 4 After co...

Page 34: ...TV using an HDMI cable sold separately 2 Start video playback on the The has an HDMI Type D Micro connector Be sure to use a High Speed HDMI category 2 cable that has an HDMI Type D Micro connector on...

Page 35: ...vice 4 Touch the function you want to use on the confirmation screen 5 Use a USB cable to connect a computer or an iPad When the is recognized it will be ready to use 6 To end a USB connection conduct...

Page 36: ...t the USB cable If connected to an iPad simply disconnect it Using as a USB mic computer iPad The can be used as a USB mic to input sound to a computer or iPad 1 Select the as the audio source in the...

Page 37: ...you can set an audio delay time so that it matches the timing of the video 1 Touch on the screen 2 In the submenu touch and to adjust the audio de lay time The delay time can be set from 0 1000 ms 2 T...

Page 38: ...Menu screen 2 Touch the setting value in the submenu 3 Touch to return to the Menu screen This will close the submenu Setting Explanation Unlock The screen rotates to match the LCD orienta tion Lock T...

Page 39: ...turn off automatically if not used for a certain amount of time This setting has no effect during recording or when an AC adapter is connected Select Off or 2 5 or 10 minutes Play Mode Set whether al...

Page 40: ...slot 3 While pressing and holding press to start the unit Keep pressing the buttons until the firmware update screen opens 4 TouchYes 5 When updating completes press for at least one sec ond to shut...

Page 41: ...u The recorded sound cannot be heard or is very quiet Confirm that the mic is oriented correctly Check the input level settings P 17 If a music player or other device is connected to the external inp...

Page 42: ...Supports plug in power Output connectors Combined line headphones stereo mini jack HDMI microType D Built in speaker 400 mW 8 mono speaker USB Mini B type Operation as mass storage Class USB 2 0 High...

Page 43: ...the case or modify the product CAUTION Product handling Do not drop bump or apply excessive force to the unit Be careful not to allow foreign objects or liquids to enter the unit Operating environment...

Page 44: ...becomes broken or malfunctions immediately disconnect the AC adapter turn the power off and discon nect other cables Contact the store where you bought the unit or ZOOM service with the following info...

Page 45: ...the battery with coins hairpins or other metal objects Do not allow the battery to come in contact with any liquid including water seawater milk soft drinks or soapy water Do not charge or use a batte...

Page 46: ...NSE IS GRANTED OR SHALL BE IMPLIED FOR ANY OTHER USE ADDITIONAL INFOR MATION MAY BE OBTAINED FROM MPEG LA L L C SEE HTTP WWW MPEGLA COM FCC regulation warning for U S A This equipment has been tested...

Page 47: ...47 MEMO...

Page 48: ...Z2I 2420 02 ZOOM CORPORATION 4 4 3 Kanda Surugadai Chiyoda ku Tokyo 101 0062 Japan http www zoom co jp...

Reviews: