background image


14

S

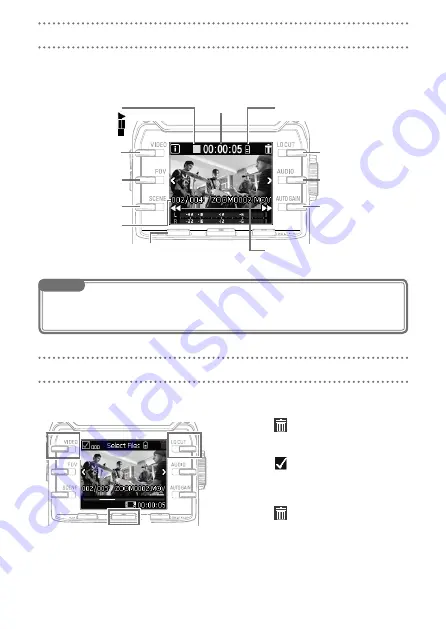
 Using the Playback Screen

On this screen, you can control playback, check file information and switch and delete files.

Open Playback Screen
Start playback
Pause playback (press during playback)

Remaining playback 

time

Status indicator

  Playing:

  Paused:

  Stopped:

Check file

information

Select previous

file

Move playback

position back

Current file/total

number of files

Deleting files

Select next file

Move playback 
position forward

Remaining battery level

File name

NOTE

The 


Q

 can only play videos that it recorded.

During playback, press 


2

 once to return to the beginning of the file. Press 

2

 twice to jump to 

the previous file.

Deleting files

Press the following buttons when the Playback Screen is open to delete a file.

Select 

1. 

.

This opens the Deletion Screen.

Select 

2. 

.

A check is added to the box at the left 
above the file thumbnail.

Select 

3. 

.

On  the  Confirmation  Screen,  press 

4. 

r

 and select “YES 

R

”.

This deletes the checked file.
Press 

c

 and select “NO 

X

” to 

cancel.

Playing recordings

2

1,3

4

Summary of Contents for Q2N

Page 1: ...User Guide Safety and Operation Precautions must be read before using this unit 2016 ZOOM CORPORATION Copying or reprinting this User Guide in part or in whole without permission is prohibited ...

Page 2: ... system settings 15 S Using the Setting Screen 15 Connections with external input jacks 16 S Mic that supports plug in power 16 Headphones line and HDMI output 17 S Headphones line output 17 S HDMI output 17 USB connections 18 S Connecting by USB 18 S Using as a web camera computer 18 S Using as a card reader computer iOS device 19 S Using as a USB mic computer iOS device 19 Updating the firmware ...

Page 3: ...rations Do not open the case or modify the product CAUTION S Product handling Do not drop bump or apply excessive force to the unit Be careful not to allow foreign objects or liquids to enter the unit S Battery handling Install batteries with the correct orienta tions Use the specified batteries Do not use new and old batteries together Do not use batteries of different brands or types together Re...

Page 4: ...r trademark of Cisco Systems Inc USA The SD SDHC and SDXC logos are trademarks HDMI High Definition Multime dia Interface and are trademarks of HDMI Licensing LLC Other product names registered trademarks and company names in this document are the property of their respective companies Recording from copyrighted sources includ ing CDs records tapes live performances video works and broadcasts with...

Page 5: ...5 S Front Built in XY mic Lens REC LED S Back VIDEO button POWER PLAY button REC button SETTING EXIT button FOV button SCENE button LO CUT button AUDIO button AUTO GAIN button Parts and their functions ...

Page 6: ...e control Left side Right side USB port A ZOOM AD 17 AC adapter sold separately can also be connected here S Bottom Battery SD card cover Tripod mounting threads NOTE Remove the battery SD card cover and load batteries and an SD card as shown in the illustration below Use alkaline batteries or rechargeable NiMH batteries AA batteries microSD card ...

Page 7: ...ING EXIT Features Providing a three dimensional sound with natural depth and width this technique is ideal for recording when you want to capture a specific sound source that is nearby or at a medium distance This is suitable for situations that include solo performances chamber music live rehearsals and field recording ...

Page 8: ...ng the power on Press 111 p The REC LED on the front will light red and then green STurning the power off Press and hold 111 p After Goodbye See You appears the power turns off Turning the power on and off 1 1 ...

Page 9: ...S Setting the date and time If the date and time are set the recorder can add the recording date and time to files When the Recording Screen is open 111 press c to open the Setting Screen Press 222 to open the date and time Setting Screen Use the buttons to set the current 333 date and time 3 3 2 1 3 1 2 After purchasing a new SD card always format it using the Q to maximize performance All data p...

Page 10: ... lower the level Adjust the level so that the peak indica tors do not light even when loud sounds are input Peak indicators Level meters Raise level Lower level NOTE In addition to the peak indicators the REC LED on the front also blinks when loud sounds are input Set AUTO GAIN to adjust the recording level automatically P 13 ...

Page 11: ...11 Recording S Recording operations Press 111 r This starts video recording Press 222 r again to stop video re cording NOTE During video recording the REC LED on the front lights red 1 2 ...

Page 12: ...second Explanation 1080 30 VIDEO 1920 1080 30 This is good for all types of video recording 1080 24 CINEMA 1920 1080 24 This records with the frame rate used for filming movies This is good for recording movies and music videos 720 30 VIDEO 1280 720 30 This provides a good balance between recording time and video quality 720 24 CINEMA 1280 720 24 This records with the frame rate used for filming m...

Page 13: ...e lighting changes drastically REHEARSAL STUDIO Adjustments are optimized for recording and rehearsal studio conditions GARAGE Adjustments are optimized for band performances in garages LO CUT low cut filter setting to reduce wind vocal pops and other noise Setting Explanation OFF This disables the lo cut filter 80Hz These set the cutoff frequency 120Hz 160Hz AUDIO audio quality setting Setting Ex...

Page 14: ...le Move playback position forward Remaining battery level File name NOTE The Q can only play videos that it recorded During playback press 2 once to return to the beginning of the file Press 2 twice to jump to the previous file Deleting files Press the following buttons when the Playback Screen is open to delete a file Select 111 This opens the Deletion Screen Select 222 A check is added to the bo...

Page 15: ...t this when using a mic that supports plug in power P 16 SD Format Format an SD card P 9 Battery Type Set the battery type Select Alkaline or Ni MH Power Save Set the amount of time until the screen is dimmed automatically if not used This setting has no effect during playback or when an AC adapter is connected Select Off 1 3 or 5 minutes Auto Power Off Set the amount of time until the power turns...

Page 16: ...r This starts video recording S Mic that supports plug in power Enable plug in power for mics that support it When the Recording Screen is open 111 press c to open the Setting Screen Select Plugin Power and set it to On 222 Connections with external input jacks EXT IN 2 1 2 1 NOTE The built in mics are disabled when an external device is connected to the external input jack ...

Page 17: ... Use an HDMI cable to connect with an HDMI TV to show Q video recordings on it in high definition Connect the HDMI cable commercial 111 ly available to the HDMI jack Press 222 p to play the video or audio Headphones line and HDMI output 2 1 2 1 Some TVs do not support some audio formats so correct playback might not always be possible When recording video connecting or disconnecting an HDMI cable ...

Page 18: ... An iPad Camera Connection Kit or Lightning to USB Camera Adapter sold separately is necessary to connect an iOS device S Using as a web camera computer The Q can be used as a web camera to input audio and video to a computer On the computer open the applica 111 tion with which you want to use it as a camera and select the Q Delay setting If the application does not have a lip syn chronization fun...

Page 19: ...ng as a USB mic computer iOS device You can use the Q as a USB mic to input audio to a computer or iOS device On the computer or iOS device open 111 the application with which you want to use it as a mic and select the Q Use the 222 Q recording operations Direct monitoring setting The input sound can be monitored directly when used as a USB mic Select to turn it ON OFF NOTE When connected to a com...

Page 20: ...ile pressing and holding r to turn the power on Keep pressing the buttons until the firm ware update screen opens On the Confirmation Screen press 444 r and select YES R On the Final Confirmation Screen 555 press r and select YES R After updating the Completion Screen opens Press 666 p for at least one second to shut down Updating the firmware 3 4 5 6 Do not turn the power off during an update Upg...

Page 21: ...age Explanation and response No SD card is loaded Load an SD card Recording stopped because writing to the SD was not fast enough Use a recommended SD card that has been formatted by the Q For a list of recommended SD cards visit www zoom co jp The SD card has become full Delete unnecessary data or replace it with a new SD card S Alert Messages that appear when the Playback Screen is open Message ...

Page 22: ...tus and volume setting of the connected device Confirm that the output volume is not set low uThe recorded sound cannot be heard or is very quiet Check the input level settings P 10 If a CD player or other device is connected to an input jack raise the output level of that device u Recording audio video is not possible Check the amount of remaining recording time on the Recording Screen P 12 ...

Page 23: ...tereo mini jack Input gain 39 dB Input impedance 2 kΩ or more Supports plug in power Output connector Combined line headphone stereo mini jack HDMI microType D Built in speaker 400 mW 8 Ω mono speaker Recording media micro SD Class 10 or higher 128 GB maximum USB micro USB Operation as mass storage Class USB 2 0 High Speed Operation as audio interface Class USB 1 0 Full Speed Resolution 44 1 kHz s...

Page 24: ...Z2I 2811 01 ZOOM CORPORATION 4 4 3 Kandasurugadai Chiyoda ku Tokyo 101 0062 Japan http www zoom co jp ...

Reviews: