Zoom MRS-1266 Operation Manual Download Page 92

Reference [Rhythm]

ZOOM MRS-1266

92

N

OTE

If you delete the rhythm pattern data that is recorded at the 

beginning of the rhythm song, there will be silence until the 

next location at which rhythm pattern data is input. 


To delete a specific measure 

Use the cursor left/right keys to move to the beginning of the

measure that you want to delete. Repeatedly press the cursor

up key to call up the indication “EV

”. Then press the

[DELETE/ERASE] key and then the [ENTER] key. The

current measure will be deleted, and subsequent rhythm

pattern data will be moved forward. If you delete the first

measure of a two-measure rhythm pattern, the second

measure will remain, and the display will change to

PTN”. 


 FAST input 

The FAST (Formula Assisted Song Translator) method uses

simple formulas to specify rhythm pattern playback from

start to end. The keys and pads of the rhythm section can be

used for numeric input, as described below. 

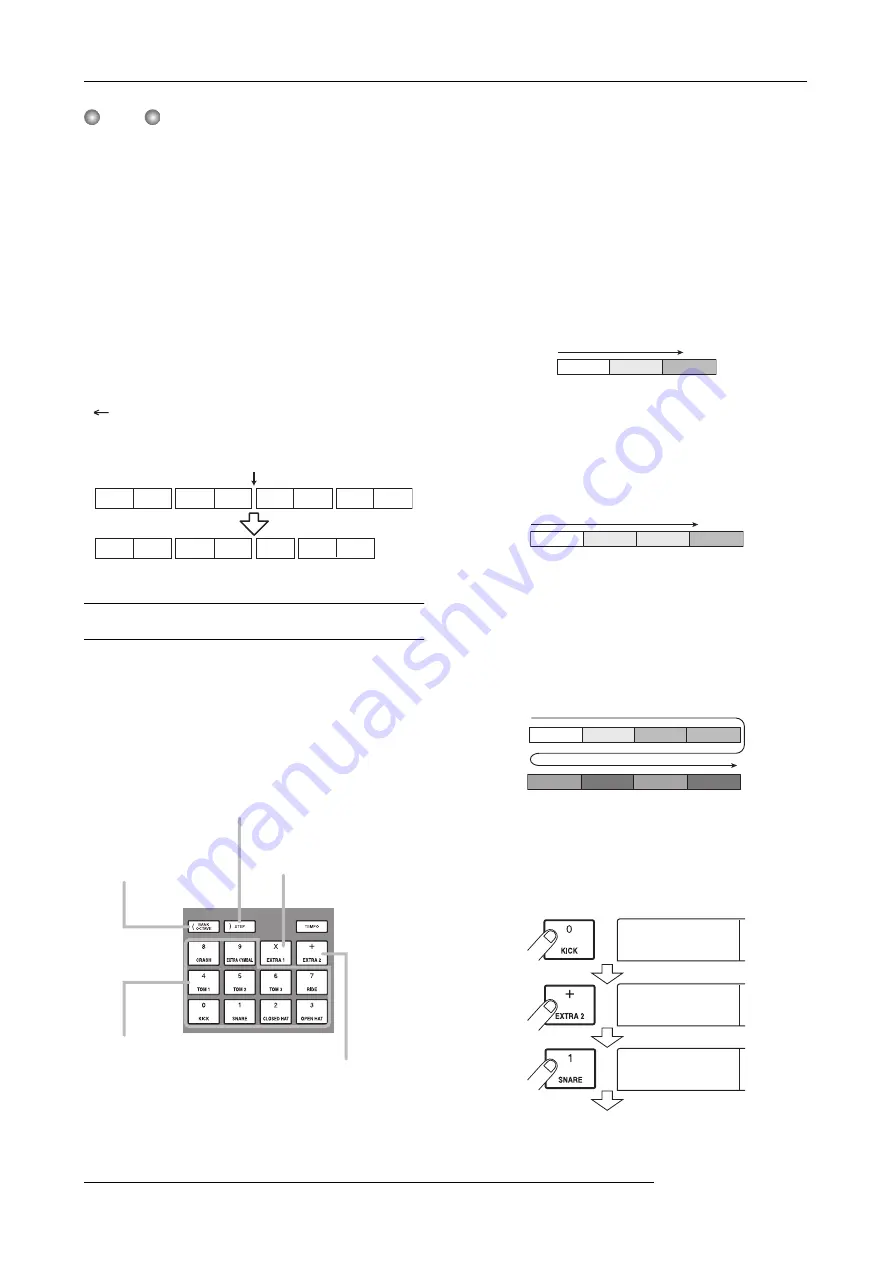
The basic rules for creating a rhythm pattern sequence are as

follows. 


Select the pattern 

Use pads 0 - 9 to select a pattern number from 0 - 510. The

display shows the pattern number. 


Line up patterns 

Use the “+” symbol to line up rhythm patterns. For example,

entering 

0 + 1 + 2

 will result in the following play sequence. 


Repeat patterns 

Use the “x” symbol to specify pattern repetitions. “x” takes

precedence over “+”. For example, entering 

0 + 1 x 2 + 2

 will

result in the following play sequence. 


Repeat multiple patterns 

Use the “(“ and “)” symbols to link a group of patterns for

repetition. Formulas enclosed in brackets take precedence

over other formulas. For example, entering

 0 + 1 x 2  + 2 +

(3 + 4) x 2

 will result in the following play sequence. 


An example for creating the rhythm pattern sequence 0 

 1

 1 

 2 

 3 

 2 


3


4  is shown below. 


Delete

PATTERN A

PATTERN B

PATTERN C

PATTERN D

PATTERN D

PATTERN A

PATTERN B

[(] key 

Enters the opening bracket 
"(" used for linking several 
phrases. 

Pads 0 - 9

Specify phrase numbers and 
repetition count. 

[)] key 

Enters the closing bracket ")" 
used for linking several phrases. 

[x] pad

Enters the "x" that specifies the 
repetition of a phrase. 

[+] pad 

Enters the "+" for lining 
up phrases. 

0

1

2

0

1

1

2

0

1

1

2

3

4

3

4

0

0+1

0+1

0+

0+

Summary of Contents for MRS-1266

Page 1: ...1 Operation Manual ZOOM Corporation Reproduction of this manual in whole or in part by any means is prohibited ...

Page 2: ...acquiring a proper AC adapter Environment Avoid using your MRS 1266 in environments where it will be exposed to Extreme temperature High humidity or moisture Excessive dust or sand Excessive vibration or shock Handling The MRS 1266 is a precision instrument Do not exert undue pressure on the keys and other controls Also take care not to drop the unit and do not subject it to shock or excessive pre...

Page 3: ...uld be taken to minimize the risk of damage Cleaning Use a soft dry cloth to clean the MRS 1266 If necessary slightly moisten the cloth Do not use abrasive cleanser wax or solvents such as paint thinner or cleaning alcohol since these may dull the finish or damage the surface Backup The data of MRS 1266 can be lost because of malfunction or incorrect operation Backup your data Copyrights Except fo...

Page 4: ...pecified region Punch in out function 40 Using manual punch in out 40 Using auto punch in out 41 Recording several tracks on a master track Mixdown function 42 About the master track 42 Mixdown steps 43 Playing the master track 44 Combining multiple tracks on another track Bounce function 45 How bounce works 45 Making bounce settings 45 Executing bounce recording 46 Recording on 6 tracks simultane...

Page 5: ...res 97 Transposing the entire rhythm song 98 Copying a rhythm song 98 Erasing the rhythm song 99 Assigning a name to a rhythm song 99 Creating an original rhythm pattern 100 Preparations 100 Real time input 101 Step input 105 Setting the rhythm pattern chord information 108 Editing a rhythm pattern 109 Adjusting the volume balance of drum and bass 109 Copying a rhythm pattern 110 Editing the name ...

Page 6: ...F into a project 150 Selecting the SMF output destination 150 SMF playback 152 Reference Other Functions 153 Changing the function of the foot switch 153 Using the tuner function 154 Preventing digital copying of a master tape or master disc 155 Switching the level meter display type 156 Assigning a signal to the SUB OUT jack 156 Hard disk maintenance 157 Basic maintenance procedure 157 Test resto...

Page 7: ...ding high impedance sources In normal operation two inputs are selected for recording on the audio tracks A special 6TR REC mode allows simultaneous recording on six channels This is great for drum multi track or for band recording The output array includes analog and digital optical STEREO OUT connectors a PHONES output and a STEREO SUB OUT that can carry the signal from a specified input track o...

Page 8: ...s A saved scene can be recalled manually at any time or can be switched automatically at a desired point in a song Versatile effects The MRS 1266 provides an insert effects that can be inserted into a specified signal route and a send return effects that are used via the mixer send return loop The effects can be used in a variety of ways from modifying the tone while recording a track to spatial p...

Page 9: ... section for output via the stereo output jacks and for mixdown on dedicated master tracks Effect section Processes input signals or signals of the mixer section The MRS 1266 has two types of effects an insert effect that is inserted in a specific signal path and a send return effect that uses the send return loop of the mixer section CD R RW drive section Lets you burn an audio CD using the conte...

Page 10: ...ange rhythm patterns in the desired order of playback and program chords and tempo to create the rhythm accompaniment for an entire song This is called a rhythm song Up to 10 rhythm songs can be created among which one is selected for playback HINT If desired rhythm patterns and rhythm songs can be pro cessed with the insert effect and bounced on the audio tracks Mixer section The signals from tra...

Page 11: ...ely after input jack is selected When the setting is changed to 2 only a selected track or drum bass sound is processed by the effect When the setting is changed to 3 the final stereo mix can be processed This setting is suitable for processing the signal of the entire song during mixdown Send return effect This effect is internally connected to the send return loop of the mixer section There are ...

Page 12: ...y BYPASS key INPUT SOURCE key PRE AMP DRIVE key EQUALIZER key MODULATION DELAY key TOTAL key COMPRESSOR key ALGORITHM keys MODULE keys MASTERING key TUNER key CHORUS DELAY key REVERB key INPUT controls 1 6 DUAL key GUITAR BASS key LINE key EFFECT key RHYTHM key RECORDER key UTILITY TRACK EDIT key PROJECT key Input section Display section Effect section Top panel In this manual the names of faders ...

Page 13: ...BANK OCTAVE key EQ HIGH key EQ LOW key CHORUS DELAY SEND key REVERB SEND key PAN key V TAKE key REW T key PLAY R key FF Y key REC O key Dial HDD indicator Cursor keys ENTER key BACK UP key AUDIO key AUTO PUNCH IN OUT key A B REPEAT key SCENE key EXIT key MARKER U I keys MARK key BOUNCE key CLEAR key STORE key EDIT key CAPTURE SWAP key SOLO key ZERO U key STOP P key Rhythm section Fader section Con...

Page 14: ...connector MASTER OUTPUT jacks INPUT 5 UNBALANCE jack INPUT 6 UNBALANCE jack DIGITAL OUTPUT jack PHANTOM ON OFF switch DC 12V jack Input output section CD R RW drive bay STEREO SUB OUT level control STEREO SUB OUT jack MASTER PHONES level control MASTER PHONES jack EXP PEDAL jack FOOT SW jack GUITAR BASS INPUT 1 2 jacks Input output section Rear panel Front panel ...

Page 15: ... connecting stereo output devices such as a synthesizer or CD player connect the L output of the external device to the odd jack and the R output to the even jack To supply 48V phantom power to a condenser mic set the PHANTOM ON OFF switch on the rear panel to ON Phantom power will be supplied to both INPUT 1 2 XLR connectors AC adaptor Synthesizer or sampler etc Audio system audio components or a...

Page 16: ...nd is intended as a headphone jack The output level can be adjusted with the knob at the right of the jack The STEREO SUB OUT jack normally carries the same signal as the MASTER OUTPUT jacks You can therefore also use it as a second headphone jack By changing an internal setting the jack can be made to carry only the signal of a specified track input or drum bass channel In any case the output lev...

Page 17: ...the bottom of the MRS 1266 and remove the bottom plate Take care not to lose the screws since they will be required again for assembly 3 Remove the drive bay blank panel from the front side of the unit Installing the CD R RW Drive To install the separately available CD R RW drive into the MRS 1266 model without preinstalled CD R RW drive use the attachment parts packed in the carton Keep them to u...

Page 18: ...rive 5 Position the CD R RW drive in the bay and carefully push it all the way in 6 Attach the bottom plate using the two supplied pan head screws and those removed in step 2 NOTE Make sure to use the optional CD R RW drive CD 01 Zoom Corporation does not accept any responsibil ity whatsoever for any kind of damage arising from the use of the other type of drive whether they be di rect or indirect...

Page 19: ...cting the demo song On the MRS 1266 song data are managed in units called projects A project encompasses recorded audio data rhythm patterns and rhythm songs of the rhythm section internal effect patches effect programs and other information When you load a project the complete state in which that song was saved will be reproduced To load the demo song project from the hard disk proceed as follows...

Page 20: ...switch individual tracks on or off press the respective status key 6 To stop the demo song press the STOP P key Turning power off shutdown Whenever you want to turn the MRS 1266 off be sure to follow the procedure described below 1 Turn power to the audio system off 2 Press the POWER switch on the rear panel of the MRS 1266 If a unprotected project was being used the state of this project is autom...

Page 21: ...ished song Step 1 Creating a new project On the MRS 1266 song data are managed in units called projects A project encompasses the following infor mation All recorder section data All mixer section settings All rhythm section settings All internal effect settings Other information scene mark MIDI etc 1 Press the PROJECT key in the display section The menu for loading and copying projects appears 2 ...

Page 22: ...e are called rhythm patterns For each project you can use up to 511 rhythm patterns More than 400 rhythm patterns are preprogrammed in the unit The rhythm patterns can run in synchronization with the recorder to use as guide rhythm By arranging rhythm patterns in the desired order and programming chord and tempo information you can create the accompaniment for an entire song This is called a rhyth...

Page 23: ... key stops flashing and stays constantly lit The rhythm section is no longer linked to the recorder section and can be operated independently referred to as rhythm machine mode When the rhythm section is in this condition rhythm patterns and rhythm songs can be programmed and edited 4 Press the REC O key The REC O key lights up and rhythm patterns chords and other information can be input into the...

Page 24: ...repeatedly until the counter shows 009 1 By pressing the cursor left or right key you can move the current position in the rhythm song in steps of one measure When you reach the end of the rhythm song in this case 9 1 the indication EOS appears on the display HINT For measures where no rhythm pattern information is input the display shows to the left of PTN This means that the immediately precedin...

Page 25: ...e the next rhythm pattern information is input Deleting a specific measure Use the cursor left right keys to call up the measure to delete Then press the cursor up key repeatedly to bring up the indication EV and press the DELETE ERASE key The indication DELETE appears Press the ENTER key to carry out the deletion Subsequent measures are moved up by one count HINT Another way to build a song is to...

Page 26: ... in steps 2 5 It is not mandatory to enter chord information at the same point as rhythm pattern information You can change the chord also midway in a rhythm pattern or midway in a measure While specifying chord information you can move the current position in one of the following ways Moving in steps of one measure Pressing the cursor left right keys moves back and forth to the start point of mea...

Page 27: ...on ROOT for editing root information or CHORD for editing chord information on the display Then change the setting with the dial NOTE When you change the root chord information the new information will apply up to the next point where root chord information is input Take care not to enter wrong information Deleting the entered root or chord type Use the cursor left right keys to call up the root c...

Page 28: ...ack on the front panel and INPUT 2 jack on the rear panel the front panel jack has priority Among balanced and unbalanced connectors on the rear panel the unbalanced jack phone jack marked UNBAL ANCE has priority 2 Press the ON OFF key of the input to which the instrument or microphone is connected so that the key lights up The ON OFF key serves to activate and deactivate an input While the key is...

Page 29: ...an algorithm for the insert effect An algorithm is a combination of effect modules individual effects that the insert effect lets you use simultaneously Insert effect patches are organized according to their algorithm First select an algorithm and then select an effect There are five algorithms as follows DUAL An algorithm suitable for simultaneous recording of vocals and guitar or for two guitars...

Page 30: ... follows If you want to record a stereo source select the recording tracks by one of the following methods Recording on stereo tracks tracks 9 10 Press the status key for tracks 9 10 until the key is lit in red The signal from the jack with the lower number is recorded on track 9 and the other signal on track 10 Stereo recording on tracks 1 8 Press the status keys for tracks 1 2 3 4 5 6 or 7 8 sim...

Page 31: ...hed recording press the STOP P key The REC O key and PLAY R key will go out and recording will stop 6 To listen to the recorded content press the ZERO U key to return to the beginning of the song and press the PLAY R key The track will be played back together with the rhythm song If you want to re do the recording repeat steps 2 6 7 If you are satisfied with the recorded content press the status k...

Page 32: ...e so that the key lights up in red 3 Operate the fader of the selected track to adjust the monitor level of the input signal If necessary press the PLAY R key and operate the DRUM BASS faders and the fader of the already recorded track to adjust the volume balance of the rhythm song and the track 4 Press the ZERO U key to return to the beginning of the song 5 To start recording hold down the REC O...

Page 33: ...rhythm section and the various track signals are sent to the corresponding faders which function as built in mixer The assignment of signals to faders is as shown in the following diagram The level meter in the lower part of the display shows the level of each track and of the drum and bass sound after passing through the faders The meter also shows the MASTER L and R level reflecting the setting ...

Page 34: ...y 10 Use the cursor up down keys to select the EQ parameter that you want to adjust and turn the dial to modify the setting The available parameters and their ranges are as follows EQ HIGH key pressed EQ HI G Adjusts boost cut in high frequency range 12 0 12 dB EQ HI F Adjusts turnover frequency for high frequency boost cut 500 18000 Hz EQ LOW key pressed EQ LO G Adjusts boost cut in low frequency...

Page 35: ...REVERB key is pressed 2 Turn the dial to select a patch 3 When you have finished selecting the patch press the EXIT key The unit returns to the main screen If desired press the CHORUS DELAY key next and select a chorus delay patch Adjusting the send level 4 Press the CHORUS DELAY SEND key or the REVERB SEND key in the track parameter section Press the REVERB SEND key if you want to adjust the reve...

Page 36: ...ess the EXIT key The unit returns to the main screen Selecting a patch for the insert effect 4 Press the MASTERING key in the effect section The MASTERING algorithm will be selected for the insert effect The currently selected patch is shown on the display 5 Turn the dial to select the desired patch 6 Press the PLAY R key to play back the song The entire song will pass through the insert effect im...

Page 37: ...in green the master track can be played back At this time the other status keys DRUM BASS 1 8 9 10 are automatically muted 6 Press the ZERO U key to return to the beginning of the song and press the PLAY R key The master track is played back To stop playback press the STOP P key 7 To return to MRS 1266 operation repeatedly press the MASTER status key until it is out Muting of other tracks and soun...

Page 38: ...ack recorded unrecorded V takes blinks synchronously 2 Use the cursor left right keys to select a track HINT You can also select the track with the status keys 1 8 9 10 MASTER For tracks 9 10 the track is toggled between 9 and 10 with each push of the status key 3 Turn the dial to select the V take HINT For tracks 9 10 you can select a different V take for each track 4 Repeat steps 2 3 as necessar...

Page 39: ...it You can also select the track with the status keys 1 8 9 10 MASTER NOTE If you select a V take on which nothing is recorded the indication NO DATA appears and the name cannot be edited 3 Press the EDIT key The first character of the V take name flashes This indicates that you can change this character 4 Use the cursor left right keys to move the flashing position to the character you want to ch...

Page 40: ...266 provides two ways to do this You can use the panel keys or a foot switch sold separately to punch in out manually manual punch in out or cause punch in out to occur automatically at previously specified points auto punch in out Using manual punch in out This section describes how to perform manual punch in out to re record a region of a previously recorded track using the panel keys or a foot ...

Page 41: ... point at which you want to punch in and press the AUTO PUNCH IN OUT key The AUTO PUNCH IN OUT key flashes This sets the In point at which recording will begin 4 Locate the point at which you want to punch out and press the AUTO PUNCH IN OUT key once more This sets the Out point at which recording will end The AUTO PUNCH IN OUT button will change from flashing to solidly lit This indicates that th...

Page 42: ... several tracks on a master track Mixdown function This section explains how to play recorded tracks and rhythm section sounds and record them as a stereo mix on a master track mixdown About the master track The master track is a set of stereo tracks that is separate from the normal tracks 1 10 The most common use of the master track is as a target track for mixdown The contents of the master trac...

Page 43: ... screen press the MASTER status key several times until the key is lit in red The master track is now ready for recording While the key is lit in red the other tracks as well as the rhythm section and effects operate normally HINT The signal recorded on the master track is the signal coming from the MASTER fader This is the same signal that is sup plied at the OUTPUT jacks 6 Set the recorder to pl...

Page 44: ... key is lit in green the transport keys except for the REC O key operate normally 2 Press the ZERO U key to return to the beginning of the song and then press the PLAY R key Playback of the master track starts You can use the MASTER fader to adjust the playback volume 3 To stop playback press the STOP P key 4 To cancel the master track playback mode press the MASTER status key so that the key goes...

Page 45: ...he recording track s will also play back 1 From the main screen press the UTILITY TRACK EDIT key The indication UTILITY TR EDIT appears on the display 2 Use the cursor left right keys to bring up the indication UTILITY BOUNCE on the display and press the ENTER key 3 Use the cursor left right keys to bring up the indication BOUNCE RECTRACK on the display and press the ENTER key The current setting ...

Page 46: ...0 is selected as recording destination p 45 3 From the main screen press the status keys of tracks 9 10 repeatedly so that the keys are lit in red Tracks 9 10 are now ready for recording 4 Press the BOUNCE key The BOUNCE key lights up and the Bounce function is turned on Other tracks and effects function normally 5 Set the recorder to playback and adjust the mixing balance of the various tracks Th...

Page 47: ... signal to a track After adjusting the level of the signals from the INPUT 1 6 jacks or the GUITAR BASS INPUT 1 2 jacks the signals are sent to tracks 1 6 in the recorder section 1 Verify that the instruments or microphones to be recorded are connected to the INPUT 1 6 jacks or GUITAR BASS INPUT 1 2 jacks 2 Press the 6TRACK RECORDING key in the input section The key lights up and the MRS 1266 swit...

Page 48: ...PLAY R key while holding down the REC O key Recording on the tracks starts 9 When recording is complete press the STOP P key If you want to return to normal recording press the 6TRACK RECORDING key The key goes out and the 6TR REC mode is canceled Recording the drum bass sound Rhythm recording The MRS 1266 allows you to record the drum bass sound of the rhythm section onto any track This function ...

Page 49: ...cks 11 When recording is complete press the STOP P key Rhythm recording ends If you want to return to normal recording select MASTER on the screen of step 3 Assigning marks within a song Marker function You can assign up to 100 marks in a song at any desired location and jump to a mark by pressing a key or by specifying the desired mark number This is convenient when you want to repeatedly locate ...

Page 50: ...the mark number to locate 1 From the main screen press the cursor left key once The indication MARKER flashes in the upper right of the display 2 Turn the dial to select the desired mark number As soon as the number is changed the unit jumps to that number Deleting a mark Here s how to delete a mark that you assigned 1 Locate the mark that you want to delete The mark number displayed in the MARKER...

Page 51: ...n point B will be specified NOTE If you specify a point B that is located earlier than point A the region from points B A will be played repeatedly 3 If you wish to redo the A B point setting press the A B REPEAT key so that it goes out and then repeat the procedure from step 1 4 To begin repeat playback press the PLAY R key Repeat playback will begin when you press the PLAY R key while the A B RE...

Page 52: ...seconds or ticks 5 If you want to use the preview function to hear the region before the current location press the REW T key To hear the region after the current location press the FF Y key If you press the REW T key a region of 0 7 seconds prior to the current location will play ending at the current location If you press the FF Y key a region of 0 7 seconds following the current location will p...

Page 53: ...lect FRM scrub playback will begin from the current location this is the default setting HINT Any change you make to the scrub settings will take effect immediately 4 If you want to use the new scrub playback settings to find a location use the cursor left right keys to move the flashing area to the unit displayed on the counter MS for time display or TICK for measure display 5 Turn the dial to th...

Page 54: ...he duration of a specified range of audio data without changing the pitch 4 Press the ENTER key The screen for selecting the track and V take for editing appears The display shown below is an example for selecting the copy command in step 3 5 Turn the dial to select the track number 1 10 and use the cursor up down keys to select the V take number 1 10 On this screen the stereo tracks 9 10 are trea...

Page 55: ...point The point can be specified in hours minutes seconds When a value is specified the measure beat counter reflects the new location If you move the flashing section to the MARKER field on the display you can specify a mark by turning the dial In this case the mark position becomes the editing start point When you specify the point where there is no recorded data an symbol will appear on the dis...

Page 56: ...the ENTER key The display changes as follows This screen lets you specify the move range start point 2 Use the cursor left right keys to move the flashing section of the counter and turn the dial to specify the move start point You can also specify the point as a mark 3 Press the ENTER key The display changes to Move Src END 4 Use the same procedure as in step 2 to specify the move range end point...

Page 57: ...at this point the specified range will be played 5 Press the ENTER key The indication Erase SURE appears on the display 6 To execute the erase operation press the ENTER key By using the EXIT key instead of the ENTER key you can move back to previous screens When the erase is executed the indication Erase COMPLETE appears on the display and the unit returns to the track edit menu Trimming a specifi...

Page 58: ...The fade in out command does not simply alter the track volume Rather it rewrites the waveform data and is therefore not reversible once executed If you want to retain the condition before editing use the capture function for that track p 63 1 Refer to steps 1 6 of Basic editing steps to select the track V take for fade in or fade out and press the ENTER key The display changes as follows This scr...

Page 59: ...ng steps to select the track V take for reversing and press the ENTER key The display changes as follows This screen lets you specify the start point for reversing 2 Use the cursor left right keys to move the flashing section of the counter and turn the dial to specify the reversing start point You can also specify the point as a mark 3 Press the ENTER key The display changes to Rvrs Src END 4 Use...

Page 60: ...stretch compress The setting range is 50 150 Tempo BPM Sets the tempo beats per minute after time stretch compress using the tempo set in the rhythm song as reference The default value is the tempo set at the beginning of the current rhythm song 3 Use the cursor left right keys to select the unit for making the time stretch compress setting The flashing section moves 4 Turn the dial to make the ti...

Page 61: ...ase the indication shows M 1 and the MASTER status key is lit 3 Press the UTILITY TRACK EDIT key in the display section A menu for editing audio data in track units appears on the display 4 Repeatedly press the UTILITY TRACK EDIT key to call up the desired command The following editing commands are available ERASE Erase the audio data on a specified track V take COPY Copy the audio data of a speci...

Page 62: ...left right keys and the dial to select the destination V take and press the ENTER key The indication COPY SURE appears on the display 3 To execute the copy operation press the ENTER key once more To cancel the operation press the EXIT key After the copy operation is completed the unit returns to the V take editing menu Moving a V take You can move the audio data of a specified V take to any other ...

Page 63: ...wap You can capture the audio data of any track and temporarily store them on the hard disk Later you can swap the captured data with the current data of the track This lets you for example save the state of a track before an editing operation If the result of the operation is not as desired you can then easily restore the track to its previous state NOTE Captured track data will be erased from th...

Page 64: ...INT By repeating steps 1 4 you can capture multiple tracks Swapping track data and captured data You can swap the current data of a track with the captured data 1 From the main screen press the CAPTURE SWAP key in the control section 2 Use the status keys or the dial to select a track that was previously captured When you select a captured track the indication SWAP appears on the display HINT If y...

Page 65: ... not conform to the ISO9660 standard Level 1 The MRS 1266 does not recognize the files recorded on a disc that the session is left open 3 Phrase from another project You can load any phrase from a project stored on the internal hard disk of the MRS 1266 In this case specifying a range is not possible HINT It is not possible to directly load an audio track from an audio CD as a phrase You must firs...

Page 66: ...Use the cursor left right keys to select one of the following and press the ENTER key TAKE Import a specified range of audio data from any track V take in the currently loaded project WAV AIFF Import an audio file WAV AIFF from a CD ROM or CD R RW disc inserted in the CD R RW drive or from the internal hard disk PHRASE Import a phrase from the phrase pool of another project saved on the hard disk ...

Page 67: ...ion to the MARKER field on the display you can specify a mark by turning the dial In this case the mark position becomes the import start point NOTE By holding down the STOP P key and pressing the PLAY R key you can perform scrub playback of the V take of the specified track p 52 The playback range of the phrase loop can be fine adjusted also after importing Therefore it suffices if you make a rou...

Page 68: ...ches for WAV AIFF files on the specified device When files are found their names are listed on the display 4 Turn the dial to select the audio file to import When accessing a disc in the CD R RW drive which has audio files in a certain folder select the folder name with the dial When you press the ENTER key in this condition the files inside the selected folder are displayed Use the EXIT key to re...

Page 69: ...fy parameters such as playback range and number of measures The following parameters can be adjusted for each phrase individually START END This parameter determines the playback start point and end point of the phrase in time units In the default condition the parameter is set to the start and end of the imported data This parameter can be used for example to extract only a part of a drum loop im...

Page 70: ...utes seconds and milliseconds END You can adjust the phrase end point in minutes seconds and milliseconds NAME You can specify a name for the phrase LVL You can adjust the phrase playback level in the range of 24 dB 6 Use the dial and the cursor left right keys to adjust the setting value Adjusting MEAS TIMSIG LVL Turn the dial to set the numerical value Adjusting START END Use the cursor left rig...

Page 71: ...n the copy process is completed the display reverts to the condition of step 2 Creating a phrase loop Phrases stored in the phrase pool can be selected and lined up in any desired sequence and with any number of repetitions The result can be written to a track V take as a phrase loop When being written to the track V take the phrase loop is stored in the same format as regular audio data so that t...

Page 72: ...r left right keys to move the input position the line scrolls on both sides accordingly After entering an equation it can be edited as follows Inserting numbers or symbols Use the cursor left right keys to move the cursor flashing segment to the desired insert position And press the desired pad Deleting numbers or symbols Use the cursor left right keys to move the cursor flashing segment to the de...

Page 73: ...ial further to the right brings up the following screen When this screen is shown turning the dial to the right selects tracks in odd numbered even numbered pairs 1 2 3 4 5 6 7 8 9 10 or the master track In this case the currently selected V take for the two tracks or the master track becomes the writing target NOTE If the phrase is monaural and the write target track is stereo the same data will ...

Page 74: ...e a blank until the measure where playback switches to the next phrase ADJUST BAR LEN When you select this setting the phrase length is adjusted so that the measures of the rhythm song and the phrase are matched Pitch will not change NOTE When selecting ADJUST BAR or ADJUST BAR LEN verify that the MEAS X parameter for each phrase is set to a suitable number of measures If the setting is inappropri...

Page 75: ... 2 jacks set various parameters such as pan and send levels to the send return effects and assign the signals to the recorder tracks The parameters that can be adjusted in the input mixer are listed in the following table Track mixer The track mixer serves to process the playback signals of the recorder tracks 1 8 9 10 and the sound of the drum kit bass program of the rhythm section and mix these ...

Page 76: ...r panel the unbalanced jack phone jack marked UNBAL ANCE has priority 2 Press the ON OFF key of the input to which the instrument or microphone is connected so that the key lights up The ON OFF key serves to activate and deactivate an input While the key is lit the input is active Normally up to two keys can be activated simultaneously To activate two inputs press both ON OFF keys together HINT If...

Page 77: ...ropriate The precise setting of the REC LEVEL control parameter can be checked by pressing the track parameter section PAN key ON OFF key operated in step 2 cursor down key 8 Press the status key for the recording destination track 1 8 9 10 so that the key is lit in red The track is now ready for recording The input signal from the input mixer will be sent to the recording track You can select rec...

Page 78: ... is pressed a screen such as shown below appears 4 Press the desired ON OFF key in the input section The input mixer INPUT is selected as target for setting the send level 5 Turn the dial to select the effect depth Higher values result in more effect depth stronger effect The range and default values for the parameters are shown below CHORUS DELAY SEND 0 100 default 0 REVERB SEND 0 100 default 0 H...

Page 79: ...For each channel you can adjust the volume panning stereo position between L R channels and EQ equalizer 1 To adjust the volume of a track or the drum bass sound operate the respective fader 2 To adjust the panning position of a track or the drum bass sound press the PAN key in the track parameter section and then press the status key for the desired track or for the drum bass sound A screen for a...

Page 80: ...s press the EXIT key The unit returns to the main screen Adjusting depth of send return effect This section explains how to adjust the effect depth by setting the volume that is sent from each channel to the send return effects chorus delay reverb Raising the send level will produce a deeper effect 1 Press the CHORUS DELAY key or REVERB key to select a patch for the send return effect The display ...

Page 81: ...ess the PAN key in the track parameter section 2 Press the status key 1 8 for one of the two channels that you want to stereo link 3 Press the cursor down key three times The ST LINK stereo link parameter screen appears 4 Turn the dial to switch the setting ON Stereo linking will be enabled for the selected channel and the adjacent odd numbered even numbered channel To defeat stereo link turn this...

Page 82: ...called either manually or automatically when desired This is convenient when you want to compare various mixes or when you want to automate mix operations A scene contains the following data Track parameters except for currently selected V take number Insert effect patch number input source Send return effect chorus delay reverb patch number The state of all status keys play mute Fader settings Up...

Page 83: ...electing a scene you can edit the name of the scene Switching scenes automatically By assigning a scene to a mark p 49 that was placed at a desired location in the song you can cause scenes to switch automatically This is convenient when you want to change the mix or the effect settings as the song progresses 1 Move to the point in the song where you want to change the mix and press the MARK key i...

Page 84: ...even if that scene is recalled The following groups of parameters can be specified and made active or inactive For example after you have programmed a sequence of automatic scene changes you may want to disable the TRACK PARAMETER group and set only the EQ and panning parameters manually for each track 1 Press the SCENE key in the control section and then press the UTILITY TRACK EDIT key in the di...

Page 85: ...pective keys are lit and when the group is disabled the keys are flashing HINT You can also use the cursor up down keys to enable or dis able all groups together 4 When the setting is complete press the EXIT key The unit returns to the scene menu 5 To return to the main screen press the EXIT key The parameter group on off status is stored as part of the project ...

Page 86: ...26 different bass sounds built into the MRS 1266 and use the front panel pads 1 12 to play a scale or use it as a sound generator for accompaniment The output signal from the drum kit stereo and the output signal from the bass program mono are internally connected to the DRUM channel and BASS channel of the mixer section For each you can independently adjust the volume pan balance and EQ and apply...

Page 87: ...izing the recorder section and rhythm section With the default settings of the MRS 1266 the rhythm section will operate in synchronization with the recorder section When you operate the transport section to start the recorder section running the rhythm pattern or rhythm song will also begin playing If desired the rhythm section can be disconnected from the recorder section and used as an independe...

Page 88: ...ORDER key goes out and the RHYTHM key lights up 4 If you want to mute the performance of the drum track or bass track press the DRUM status key or BASS status key The respective status key goes out and the performance of the corresponding track will be muted To defeat muting press the same status key once more 5 To stop playback press the STOP P key The rhythm pattern will stop 6 To return to the ...

Page 89: ...lized and the unit returns to the main screen Creating a rhythm song The MRS 1266 allows you to save up to 10 rhythm songs per project Out of these one is selected for editing or playing One rhythm song can have up to 999 measures of rhythm patterns After entering patterns chord and tempo information is added to complete the song Selecting a rhythm song First select a rhythm song in which to enter...

Page 90: ...ys HINT When an item other than EV is selected and no informa tion is input for the current position the arrow is shown before the item name for example PTN This indicates that information input at a preceding point is still valid When PTN is selected the name and number of the pattern input at the current point are displayed Because an empty rhythm song does not yet contain any information the sy...

Page 91: ...hm section is stopped To edit an input rhythm pattern perform the following steps while the REC O key is lit To re select a pattern that you input Use the cursor left right keys to move to the desired rhythm pattern data and turn the dial to select a new pattern If you go to a point where no pattern information is input display shows PTN you can add rhythm pattern information to that point NOTE Ke...

Page 92: ...ern sequence are as follows Select the pattern Use pads 0 9 to select a pattern number from 0 510 The display shows the pattern number Line up patterns Use the symbol to line up rhythm patterns For example entering 0 1 2 will result in the following play sequence Repeat patterns Use the x symbol to specify pattern repetitions x takes precedence over For example entering 0 1 x 2 2 will result in th...

Page 93: ... pads to enter the formulas for creating the rhythm song The formula input principles are explained on page 92 If you make a mistake during input correct it as follows Inserting a number symbol Use the cursor left right keys to move to the position where you want to insert a new number symbol And then press the new number symbol Deleting a number symbol Use the cursor left right keys to move to th...

Page 94: ... not lit press it repeatedly until it lights up Use the cursor left right keys to move the current position to the start of the rhythm song 2 Press the REC O key The REC O key lights up and input of rhythm pattern number chord and other information for the rhythm song becomes possible 3 Use the cursor up down keys to call up the indication ROOT When inputting chord data into the rhythm song you wi...

Page 95: ...hen you use method 3 the symbol such as Pt or TS displayed at the right of EV will indicate the type of data that is input at the current location For details refer to p 96 8 Input the remaining chord data in the same way Chord data that you input can be edited in the following ways To change the root chord Move to the location at which the chord data is input use the cursor up down keys to switch...

Page 96: ... way If you make a mistake or want to change the information the events can be edited in the following ways To change an event setting Display the event you want to change and turn the dial to alter the setting To delete event information Display the event you want to delete and press the DELETE ERASE key When an event was deleted the preceding event of the same type will remain active until the n...

Page 97: ...s program For details refer to p 89 Changing the drum kit bass program Editing a rhythm song This section explains how to edit a rhythm song that you created Copying a specific region of mea sures Part of a rhythm song can be copied in measures and inserted into another location This is convenient when you want to repeat a portion of a rhythm song 1 From the main screen press the SONG key so that ...

Page 98: ...ng edit menu appears 4 Use the cursor left right keys to bring up the indication EDIT Transpos on the display and press the ENTER key The current transpose setting 6 0 6 will be shown in the display below the indication TRANSP The default setting is 0 no transpose operation 5 Turn the dial to change the transpose setting and press the ENTER key The indication SURE appears on the display 6 Press th...

Page 99: ... on the display NOTE Once you erase the rhythm song it cannot be recovered Use this operation with care 5 Press the ENTER key to erase the rhythm song or press the EXIT key to cancel If you press the ENTER key the rhythm song will be erased and the display returns to the rhythm song screen Assigning a name to a rhythm song You can edit the name of any rhythm song as follows 1 From the main screen ...

Page 100: ...ions Before starting to record you must select a rhythm pattern number for input and set the quantize value shortest unit for recording number of measures and beats drum kit bass program number etc 1 From the main screen press the PATTERN key so that the key lights up The rhythm section goes into rhythm pattern mode 2 Press the RHYTHM key The RHYTHM key lights up and creating and editing a rhythm ...

Page 101: ...ange is 1 4 8 4 10 To set the length number of measures of the rhythm pattern use the cursor left right keys to select the indication EDIT BarLen and press the ENTER key The current length of the pattern is shown as number of measures 11 Turn the dial to select the desired setting and press the EXIT key 12 Press the EXIT key twice The display returns to the screen of step 3 Real time input For rea...

Page 102: ...input a pattern in real time by using a MIDI controller connected to the MRS 1266 s MIDI IN connector For a list of pads and correspond ing note numbers refer to the appendix at the end of this manual p 180 7 To edit the drum track during real time input proceed as follows To erase the performance of a specific pad While holding down the DELETE ERASE key press the pad whose sound you want to erase...

Page 103: ...the pads The tonic corresponds to the note played by pad 1 When you change the tonic the other notes also are shifted accordingly default E When you change the register value all pads are shifted by one octave up or down default 1 4 Press the EXIT key The unit returns to the rhythm pattern screen The register and tonic settings will remain the same even if you change screens or modes HINT If neces...

Page 104: ... While holding down the DELETE ERASE key press the pad whose sound you want erase While you are holding down both keys the performance of the corresponding pad is erased from the rhythm pattern To erase the performance of all pads While holding down the DELETE ERASE key press the BASS status key While you are holding down both keys the performance of all pads is erased from the bass track 8 When y...

Page 105: ...empty rhythm pattern number 2 Press the DRUM key and select a drum track 3 Press the REC O key The display changes as follows and step input becomes possible On the first line of the display Q xx shows the quantize value Possible values for xx 4 32 Hi In the bottom right of the display the current position is shown in measures beats ticks 4 Use the cursor up down keys to select the quantize value ...

Page 106: ...e step length as necessary to enter the desired rhythm pattern When you reach the end of the pattern the unit automatically returns to the first measure letting you enter more instrument sounds 8 To edit the drum track after step input proceed as follows To erase the performance of a specific pad When you advance the record position with the STEP key the pad that is input at the current position l...

Page 107: ...key and select a bass track 3 Press the REC O key The display changes as follows and step input becomes possible The first line of the display shows the quantize value and the second line the duration value 4 Use the cursor up down keys to select the quantize value 5 Turn the dial to select the duration value as listed below The duration is specified as D x yy i e as multiples of a quarter note De...

Page 108: ... is input at the current position lights up By holding down the DELETE ERASE key and pressing the lit pad you can erase the sound of that pad The pad goes out and the playing information is erased from the rhythm pattern NOTE When searching for a note to erase set the quantize value to the same value as the smallest value used during recording or to a smaller value 10 When you have finished step i...

Page 109: ...ing a rhythm pattern This section explains how to edit an existing rhythm pattern Adjusting the volume balance of drum and bass The volume of the drum kit and bass program can be adjusted with the DRUM and BASS faders in the mixer section If necessary the volume levels of the drum kit and bass program can also be individually programmed for each rhythm pattern 1 From the main screen press the PATT...

Page 110: ...ess the EXIT key When you press the ENTER key the copy will be executed and the display returns to the rhythm pattern selection screen with the copy destination rhythm pattern as the selected pattern If the copy destination rhythm pattern contains any information this will be overwritten 6 To return to the main screen press the EXIT key several times Editing the name of a rhythm pattern This secti...

Page 111: ...eral times Creating your own drum kit If desired you can create your own original drum kit by assigning sounds with specific settings for volume pitch panning etc to the pads and giving the kit a unique name It is also possible to copy an existing drum kit and edit only a part of it The drum kit can then be saved on the hard disk as part of the project Changing the sound and settings for each pad ...

Page 112: ...nnot produce sound at the same time For example if you assign an open hi hat sound and closed hi hat sound to two pads in the same group the open hi hat sound will cease when you play the closed hi hat sound resulting in realistic action HINT Pad group numbers are common for PL and MN For exam ple pads assigned to PL1 and to MN1 belong to the same group REV SEND Reverb send Sets the reverb send le...

Page 113: ...ed 6 When the name has been input press the EXIT key The name is updated and the screen returns to the condition of step 1 7 To return to the main screen press the EXIT key several times Copying a kit You can copy a drum kit to another kit number This is useful if you want to create variations of a drum kit 1 Press the DRUM key in the rhythm section with the RHYTHM key lit and then press the KIT P...

Page 114: ...t affect the entire rhythm section such as adjusting the pad sensitivity or adjusting the volume of the metronome Basic procedure The basic procedure for editing the rhythm section settings is the same for most items as described below HINT You can use the same procedure in either Rhythm pattern mode or Rhythm Song mode 1 From the main screen press the SONG key or the PATTERN key If you have press...

Page 115: ...2 A two measure pre count is heard PAD The pre count is off and recording will begin at the instant you tap a pad Changing the metronome volume You can change the volume of the metronome that is heard when you record a rhythm pattern in real time Select ClickVol from the rhythm utility menu and press the ENTER key Then turn the dial to choose the settings 0 15 Adjusting the sensitivity of the pads...

Page 116: ... with the PATTERN key 2 Press the RHYTHM key RHYTHM key lights up 3 Press the DRUM MIXER key DRUM MIXER key lights up and the currently selected pad bank pad number and the level value are indicated on the display 4 Use the faders to adjust the level of the respective pad while playing a rhythm song rhythm pattern The label under each fader shows which pad is controlled by it When you operate a fa...

Page 117: ...fader you can use the effect to process the final mix before recording on the master track Send return effects The send return effects are internally connected to the send return loop of the mixer section The MRS 1266 has two send return effects reverb REVERB and chorus delay CHORUS DELAY and these can be used simultaneously The send levels of the input mixer or track mixer adjust the effect depth...

Page 118: ...rithm comprises three types Mic Mic for two microphones G B Mic for guitar bass and microphone and Gtr Bass for guitar and bass An algorithm suitable for simultaneous recording of vocals and guitar or for two guitars or bass guitars GUITAR BASS An algorithm suitable for recording guitar bass MIC An algorithm suitable for vocals or microphone recording LINE An algorithm suitable mainly for recordin...

Page 119: ...When the insert position has been selected press the EXIT key The unit returns to the main screen HINT When the insert effect is placed in a position other than the input mixer the INPUT SOURCE will be lit at the main screen Selecting the patch for the insert ef fect This section explains how to select the patch for the insert effect 1 Press the EFFECT key in the display section The key lights up ...

Page 120: ...ut signal channels 1 or 2 channels and the input output type of the insert effect M S indicates mono input stereo output S S indicates stereo input output Dual indicates mono input output x 2 HINT When no recording track is selected the output signal of the insert effect is sent to a point directly before the MASTER fader and mixed with the track mixer signal When inserted into the input mixer Rec...

Page 121: ... DELAY effect module provides twelve effect types such as chorus flanger and phaser and you can select and use any one of these When you change the effect type the effect parameters will also change This section explains how to edit the effect type and effect parameters for the currently selected patch Track Track Track Track Track Track Track Track Track Recorder Trac EFFECT INPUT M S EFFECT S S ...

Page 122: ...y The first line of the display will indicate EDIT This means that the patch can now be edited 4 From the MODULE keys press the key for the effect module that you want to edit When editing a patch use the MODULE keys to select the module for editing The table below shows how the MODULE keys correspond to the various effect modules HINT The lit out condition of the COMPRESSOR PRE AMP DRIVE EQUALIZE...

Page 123: ...st If you want to keep the results of your editing refer to the following section Storing an insert effect patch A patch that you have edited can be stored in any location of the same algorithm You can also store an existing patch in another location to create a copy of that patch 1 Press the EFFECT key in the display section and then press the EDIT key The currently selected patch can now be edit...

Page 124: ...e insert effect only to the monitor signal Normally when the insert effect is placed into the input mixer the signal processed by the effect will be recorded on the track If necessary however you can apply the insert effect only to the monitor signal and record the unprocessed input signal on the track For example when recording the unprocessed sound of a vocal performance the vocalist may be more...

Page 125: ...ch have an effect type that determines the type of effect and various parameters that let you adjust the character of the effect Settings for the effect type and parameters together with a name are collectively called send return effect patches A newly created project contains 20 different reverb patches and 20 different chorus delay patches You can instantly switch reverb or chorus delay settings...

Page 126: ...dicate EDIT and a screen will appear in which you can edit the patch When the EDIT key is pressed the effect type selected for that send return effect is shown 4 If you want to change the effect type turn the dial When the effect type is changed the effect parameters will also change accordingly HINT If the contents of a patch have been edited the EDIT indi cator in the upper part of the display w...

Page 127: ...ved on the hard disk as part of the project Patch data included in an already existing project can be loaded into the current project p 128 Editing the name of a send return effect patch This section explains how to edit the name of the patch that is currently selected for a send return effect 1 Press the EFFECT key in the display section and then press the REVERB key or CHORUS DELAY key If necess...

Page 128: ...hes that you wish to keep 2 Press the UTILITY TRACK EDIT key The indication UTILITY Import appears on the display 3 Press the ENTER key In this condition you can select the project from which to import 4 Turn the dial to select the import source project and press the ENTER key The indication Import SURE appears on the display 5 To carry out the import process press the ENTER key once more To cance...

Page 129: ...can use the master track trimming function p 57 About CD R RW discs For creating an audio CD you can select either CD R or CD RW discs as media The features of the two disc types are described below CD R This media type allows only one time recording or adding of data Once data have been written they cannot be changed or erased CD R discs are available in 650 MB and 700 MB capacities To write a V ...

Page 130: ...o CD menu appears 5 Use the cursor left right keys to bring up the indication AUDIO CD BURN CD on the display 6 Press the ENTER key The duration of the source master track appears on the display in hours H minutes M seconds S and milliseconds MS 7 To check the available write time on the inserted disc press the cursor down key The remaining disc time is shown in the lower part of the display 8 To ...

Page 131: ... written in a single operation NOTE Before starting the procedure described below use the trimming function on the master track to make sure that it does not include unwanted blank portions at the beginning and end 1 Insert a CD R RW disc into the CD R RW drive To newly write audio data use a blank CD R RW disc or a CD RW disc that has been completely erased To add audio data use a CD R RW disc th...

Page 132: ...To stop playback press the STOP P key To change projects in an album Use the cursor left right keys to select the track number for which you want to change the project and use the dial to select another project To delete a project from an album Use the cursor left right keys to select the track number whose project you want to delete and press the EDIT key The indication DELETE SURE appears on the...

Page 133: ...ng an audio CD To play an audio CD inserted in the CD R CD RW drive proceed as follows This method can also be used to audition a CD R CD RW disc which has not been finalized yet HINT A CD R CD RW disc which has not been finalized can only be played with this method 1 Insert an audio CD in the CD R RW drive 2 From the main screen press the AUDIO key in the control section The audio CD menu appears...

Page 134: ...s and front panel MASTER PHONES jack Default setting A Analog playback The audio signal of the CD is reproduced via the headphone outputs of the CD R RW drive 7 To start playback of the audio CD press the PLAY R key Playback of the selected track starts When the track is finished playback continues with the next track During audio CD playback all faders except for the MASTER fader as well as the E...

Page 135: ...fault setting Information from all areas of the disc is erased This takes longer than the QUICK erase operation but all contents of the disc are reliably erased This method is recommended Required time is max 74 minutes for a 650 MB disc and 80 minutes for a 700 MB disc QUICK Only the track information on the CD RW disc is erased This requires less time than the NORMAL erase operation 5 Press the ...

Page 136: ...the ENTER key The display indicates the total number of tracks on the CD R RW disc The counter indicates the total playing time of all tracks on the disc including pauses in hours H minutes M and seconds S 5 Press the ENTER key The indication FINALIZE SURE appears on the display 6 To carry out the finalizing process press the ENTER key once more To cancel the operation press the EXIT key When you ...

Page 137: ...rm steps 2 5 of Playing an audio CD and select the desired track of the CD 3 Press the REC O key 4 Turn the dial to select the track for recording the data Only odd numbered even numbered pairs of mono tracks 1 2 3 4 5 6 7 8 the stereo track 9 10 or the master track MASTER can be selected 5 Press the ENTER key The recording destination is selected and the indication READ CD SURE appears on the dis...

Page 138: ...not possible to operate on multiple projects simultaneously Project operations This section explains operations such as loading or saving a project The procedure is the same for most project operations The basic procedure is as follows Basic procedure 1 From the main screen press the PROJECT key The project menu appears on the display allowing you to select the desired project operation HINT When ...

Page 139: ... Basic procedure to bring up the indication PROJECT NEW on the display Then press the ENTER key The project to create is shown on the display The lowest free project number is automatically selected and a default name of PRJxxx where xxx is a project number in the range of 000 999 will be assigned 2 If necessary edit the project name To edit the name use the cursor left right keys to move the flas...

Page 140: ... 2 Turn the dial to select the copy source project and press the ENTER key The screen for selecting the copy destination project appears on the display 3 Turn the dial to select the copy destination project number and press the ENTER key The indication SURE appears on the display 4 Press the ENTER key to copy the project or press the EXIT key to cancel When copying is completed the unit returns to...

Page 141: ...t the currently loaded project or turn previously enabled protection off When protect is ON the following operations will be impossible Deleting a project Editing or recording on the recorder Changing the V take Editing a patch including module on off Recording or editing a rhythm pattern or rhythm song Deleting or saving the project Saving deleting scenes making marker settings etc 1 Refer to ste...

Page 142: ...R key This selects the project that will be backed up The display now shows the space required for the backup in MB megabytes 5 Press the ENTER key The name of the directory to be used for backup appears A directory also called folder is a hierarchical unit that will be created on the backup media when the backup is executed All data for one project are stored in the same directory When the backup...

Page 143: ...d label of the disc 10 To return to the main screen press the EXIT key several times Saving all projects to CD R RW disc You can save all projects on the hard disk to CD R RW media for backup If the total size of all projects is larger than the capacity of one CD R RW disc the backup will automatically extend over multiple volumes with lower numbered projects being placed on lower numbered discs N...

Page 144: ...his press the EXIT key while the indication CHANGE DISCxxx where xxx is the disc num ber is shown The indication will change to ALL SAVE CAN CEL Press the ENTER key to terminate the process NOTE When a full backup spans several discs restoring a single project requires you to first insert the discs on which it is saved Be sure to note the disc number and the projects saved on the disc on the case ...

Page 145: ...pears on the display 7 To execute the load operation press the ENTER key To cancel press the EXIT key instead When you press the ENTER key the project data are read from the disc and loaded to the hard disk When the operation is finished the display indication changes to LOAD COMPLETE If the backup spans multiple discs the disc will be automatically ejected the data have been loaded and a message ...

Page 146: ... can send Note On Off messages from the MRS 1266 when hitting the pads or when playing a rhythm song rhythm pattern These can be used to play an external MIDI sound source Send sync information The MRS 1266 can output MIDI Timing Clock Song Position Pointer and Start Stop Continue messages to synchronize operation with an external MIDI device Playback and other transport operations as well as loca...

Page 147: ...SS CH Set the MIDI channel of the bass track SPP Turn Song Position Pointer transmission on off COMMAND Turn Start Stop Continue message transmission on off CLOCK Turn Timing Clock transmission on off PRG CHG Turn Program Change transmission on off 5 Press the ENTER key to display the setting of the selected item and turn the dial to change the setting For details on each item refer to the followi...

Page 148: ...tion message Timing Clock will be transmitted Refer to steps 1 4 of Basic procedure to bring up the indication CLOCK on the display Then turn the dial to select one of the following settings ON Transmission on MIDI Timing Clock will be transmitted when the MRS 1266 is running default setting OFF Transmission off Timing Clock will not be transmitted Timing Clock will be output according to the temp...

Page 149: ...ly these messages are used in conjunction with Timing Clock Refer to steps 1 4 of Basic procedure to bring up the indication COMMAND on the display Then turn the dial to select one of the following settings ON Transmission on The appropriate Start Stop Continue message will be transmitted when the MRS 1266 stops or begins running default setting OFF Transmission off Start Stop Continue messages wi...

Page 150: ...SMF into the CD R RW drive 2 From the main screen press the UTILITY TRACK EDIT key in the display section The utility menu appears 3 Use the cursor left right keys to bring up the indication UTILITY SMF on the display and press the ENTER key The following screen appears 4 Press the ENTER key The names of SMFs in the CD R RW disc are shown 5 Turn the dial to select the SMF to import NOTE If the des...

Page 151: ...it bass program only for the SMF you must first select an empty rhythm song rhythm pattern If the SMF contains Program Change Control Change Pitch Bend messages the drum kit bass program will re spond to these in the same way as to messages received via the MIDI IN connector Pitch Bend messages affect only the bass program 1 From the main screen press the UTILITY TRACK EDIT key in the display sect...

Page 152: ...ys to bring up the indication UTILITY SMF on the display and press the ENTER key The indication SMF IMPORT appears on the display 3 Use the cursor left right keys to bring up the indication SMF FILE SEL on the display 4 Press the ENTER key The display changes as follows allowing you to select an imported SMF for playback 5 Turn the dial to select the SMF and press the EXIT key The file is selected...

Page 153: ... key The system utility menu for making various system settings appears 3 Use the cursor left right keys to bring up the indication UTILITY FOOT SW on the display and press the ENTER key The function currently assigned to the foot switch will be displayed 4 Turn the dial to select PLY_STP or PUNCH IO The settings are as follows PLY_STP Each push of the foot switch toggles between play and stop of ...

Page 154: ...abled 3 Play the note that you want to tune and tune your instrument so that the desired note name C C D D E appears on the display 4 When the desired note name appears watch the and symbols on the display and make fine adjustments to the tuning 5 If you want to change the reference pitch of the tuner turn the dial The reference pitch of the tuner is set to center A 440 Hz by default The reference...

Page 155: ...ursor left right keys to bring up the indication UTILITY D PRTCT on the display and press the ENTER key The current setting for digital copying will be displayed OFF Digital copying from your master tape to another digital recorder is permitted default setting ON SCMS Serial Copy Management System data will be added to the digital signal that is output from the DIGITAL jack It will not be possible...

Page 156: ...ting 5 To return to the main screen press the EXIT key several times Assigning a signal to the SUB OUT jack With the default settings of the MRS 1266 the STEREO SUB OUT jack on the front panel carries the signal after the MASTER fader Therefore it can be used as an extra headphone jack If required you can assign a signal to the jack so that it carries only the signal from a specific input track or...

Page 157: ...ard disk and how to perform other hard disk maintenance functions Basic maintenance procedure The procedure for hard disk maintenance is the same for most operations The basic procedure is as follows 1 Turn power to the MRS 1266 off While holding down the CLEAR key turn power on again The MRS 1266 starts up in ROM utility mode which serves for performing special functions 2 Press the MARK key in t...

Page 158: ...ff while ScanDisk is running Otherwise the hard disk may be destroyed 4 When ScanDisk is completed press the EXIT key The unit returns to the condition of step 1 Overwriting the system file data Factory Initialize This action overwrites the operating files such as system file Projects created by the user are not affected by this operation Try this command when the unit operates unstably after the ...

Page 159: ...ER Restore the entire hard disk to the default condition All data created by the user will be erased Factory Initialize VER UP p 158 1 Insert the CD ROM disc into the CD R RW drive and then push the POWER switch to turn the MRS 1266 on 2 Use the cursor left right key to select RECOVER returning to the default or VER UP Factory Initialize and press the ENTER key Indication Sure appears on the displ...

Page 160: ...urce principle 16 bit linear PCM Drum kits 127 Drum sound sources 36 per drum kit 12 pads x 3 banks Bass sound sources 26 5 octaves each Number of pads 12 with velocity sensing Resolution 48 PPQN Beat range 1 4 8 4 Number of factory preset patterns over 400 rewritable Maximum number of patterns 511 per song rewritable Maximum number of measures 999 per rhythm song 99 per rhythm pattern Number of n...

Page 161: ...If it is raised temporarily turn it down and then up again The indication STOP RECORDER is shown on the display and operation is not possible The current operation is not possible while the recorder is operating Press the STOP P key to stop the recorder Problems during recording Cannot record on a track Make sure that you have selected a recording track Check whether you have run out of free space...

Page 162: ...is not possible to record or edit a rhythm pattern or rhythm song Press the RHYTHM key to make the key light If the display indicates FULL this means that you have used up the rhythm section memory Please delete unneeded rhythm patterns Sounds recorded in the rhythm pattern do not play Sounds that exceed the maximum polyphony will not be played Either delete some of the other notes that have alrea...

Page 163: ...se the tuner The tuner cannot be used if the insert effect is inserted in a location other than the input mixer Change the insert location to the input mixer Cannot create a new project or copy a project If the display indicates FULL this means that 1 000 projects already exist and no further projects can be created Delete unwanted projects Cannot record on an external recorder connected to the OU...

Page 164: ...at models a British style combo amp Crunch sound that models a British style vacuum tube stack amp Drive sound that models a British style vacuum tube stack amp Models a vacuum tube combo amp characterized by long sustain High gain drive sound that models a vacuum tube stack amp Model of a vacuum tube stack amp characterized by fat bass and delicate distortion Drive sound that models a high gain a...

Page 165: ...reme high frequency range Adjusts boost cut in the high frequency range Adjusts boost cut in the medium high frequency range Adjusts boost cut in the medium low frequency range Adjusts boost cut in the low frequency range Adjusts the module output level PRESENCE HIGH HIGH MID LOW MID LOW LEVEL PRESENCE This a 5 band equalizer 5BAND EQ HIGH HIGH MID LOWÅ MID LOW LEVEL 5BAND EQ MODULE PARAMETER 1 PA...

Page 166: ...cPRE BassSim CABINET GAIN GAIN GAIN GAIN GAIN GAIN GAIN GAIN GAIN GAIN GAIN GAIN GAIN GAIN GAIN GAIN GAIN GAIN GAIN GAIN TOP COLOR TONE CABINET TONE TONE TONE TONE TONE TONE TONE TONE TONE TONE TONE TONE TONE TONE TONE TONE TONE TONE TONE TONE BODY TONE LEVEL SPEAKER LEVEL LEVEL LEVEL LEVEL LEVEL LEVEL LEVEL LEVEL LEVEL LEVEL LEVEL LEVEL LEVEL LEVEL LEVEL LEVEL LEVEL LEVEL LEVEL LEVEL LEVEL LEVEL ...

Page 167: ...L PDL MIN VOL You can use an expression pedal to control the volume VOL PDL MODULE RATE RATE RATE RATE FREQ POSITION TONE RATE DEPTH TONE WET LVL FB MIX FB COLOR CLIP LEVEL RESO BALANCE BALANCE LowBoost MIX DRY LVL MIX RTM SENS 0 10 1 30 0 30 TYPE FLANGER 10 10 TYPE DELAY 0 10 AF bF 1 4 0 10 TYPE PDL WAH 1 50 TYPE EXCITER 1 5 1 8 OFF On bPF LPF 1 10 10 10 12 0 24 0 0 10 0 30 0 10 1 10 TYPE WIDE 1 ...

Page 168: ... a pronounced character and modulation to the sound An effect that adds a swooshing modulation to the sound An effect that cyclically varies the volume An effect that modifies the pitch of the original sound An effect that produces a metallic resonance An effect that gives the sound more focus and spatial definition Simulates the effect of air on the room resonance giving the sound spatial depth A...

Page 169: ... which the limiter will begin to apply Specifies the time from when the input signal falls below the threshold until compression ends Range Parameter name SENS ATTACK LEVEL THRSHOLD RELEASE Explanation of COMP LIM MODULE parameters Explanation of parameter 50 16000 50 16000 OFF 24 6 OFF 24 6 OFF 24 6 Specifies the frequency at which the Lo Mid bands will be divided Specifies the frequency at which...

Page 170: ...ARAMETER 8 MIX_LOW 3BAND COMP Lo Fi MODULE MASTERING ALGORITHM A module that lets you set the input level of the comp module PARAMETER 1 TYPE NORMLZR GAIN NORMALIZE MODULE GAIN PARAMETER 1 PARAMETER 2 PARAMETER 3 PARAMETER 4 TYPE 3BandEQ HIGH MID LOW LEVEL EQ MODULE PARAMETER 1 TYPE ZNR THRSHOLD ZNR MODULE 50 16000 50 16000 0 15 0 15 0 15 OFF 24 6 OFF 24 6 OFF 24 6 0 10 1 10 0 10 0 10 0 30 0 30 Sp...

Page 171: ...ULE PRE DLY REV TIME EQ_HIGH EQ_LOW E R MIX EFX LVL PARAMETER 1 PARAMETER 2 PARAMETER 3 PARAMETER 4 PARAMETER 5 PARAMETER 6 TYPE HALL ROOM REV TIME REV TIME EQ_HIGH EQ_HIGH EQ_LOW EQ_LOW E R MIX E R MIX EFX LVL EFX LVL REVERB MODULE A stereo chorus that produces clear sound and a wonderfully spacious feeling A delay effect of up to 1000 mSec A doubling effect of up to 100 mSec Mn St 0 10 1 30 1 30...

Page 172: ...tic bands and wood bass Fully acoustic sound with compression and clear wood bass sound Jazz based sound emphasizing strumming technique Modern funk sound for hard cutting guitar and clear slap bass Precision bass sound that makes arpeggios stand out PATCH NAME Comment Mic Mic G B Mic Gtr Bass Application No 0 1 2 3 4 5 6 7 8 9 10 11 12 13 14 15 16 17 18 19 20 21 22 23 24 25 26 27 28 29 30 49 EMPT...

Page 173: ...nd suitable for finger picking Basic sound suitable for strummed backing Natural compression sound Clean sound suitable for jazz Funky cutting sound Clean sound of American made vintage tube amp Rockabilly sound with short delay Clean sound suitable for direct line recording Cutting sound suitable for ballads L A studio style big chorus sound Tremolo sound suitable for rhythm blues Clean flanging ...

Page 174: ...lti recording Adds a child voice to female vocal or a female voice to male vocals Patch with emphasized attack Vocal gimmick effect in the psychedelic style Delay for vocals useful when cutting shouts or sound No 0 1 2 3 4 5 6 7 8 9 10 11 12 13 14 15 16 17 18 19 20 21 22 23 24 25 26 27 28 29 30 49 EMPTY MIC ALGORITHM PATCH NAME Comment Syn Lead OrganPha OrgaRock EP Chor ClavFlg Concert Honkey Powe...

Page 175: ...astering for club sound Mixdown effect for a hi fi finish For mixes with a big and powerful low range Add a live feel to the overall mix Mastering that adds an overall warm feeling Mastering with an overall hard feel Mastering with 1930 s sound Lo fi mastering Mastering for background music Mastering for making a rock style mix sound live Lo fi mastering with slight distortion in mid and upper ran...

Page 176: ...ano or synthesizer Chorus with low modulation for guitar or piano backing No 0 1 2 3 4 5 6 7 8 9 10 11 12 13 14 15 19 CHORUS DELAY EMPTY PATCH NAME Comment TightHal BrgtRoom SoftHall LargeHal SmallHal LiveHous TrStudio DarkRoom VcxRev Tunnel BigRoom PowerSt BritHall BudoKan Ballade Hall reverb with a hard tonal quality Room reverb with a hard tonal quality Hall reverb with a mild tonal quality Sim...

Page 177: ...076 077 078 079 080 081 082 083 084 085 086 087 088 089 090 091 092 093 094 095 096 097 098 099 INDUST02 POP 01 POP 02 POP 03 POP 04 POP 05 POP 06 POP 07 POP 08 POP 09 POP 10 POP 11 POP 12T POP 13 POP 14 POP 15 POP 16 R nB 01 R nB 02 R nB 03 R nB 04 R nB 05 R nB 06 R nB 07 R nB 08 R nB 09 R nB 10 R nB 11 R nB 12 FUNK 01 FUNK 02 FUNK 03 FUNK 04 FUNK 05 FUNK 06 FUNK 07 FUNK 08 FUNK 09 FUNK 10 FUNK 1...

Page 178: ...1 282 283 284 285 286 287 288 289 290 291 292 293 294 295 296 297 298 299 300 301 INTRO 01 INTRO 02 INTRO 03 INTRO 04 INTRO 05 INTRO 06 INTRO 07 INTRO 08 INTRO 09 INTRO 10 INTRO 11 INTRO 12 INTRO 13 INTRO 14 INTRO 15 INTRO 16 INTRO 17 INTRO 18 COUNT ROCK F1 ROCK F2 ROCK F3 ROCK F4 ROCK F5 ROCK F6 ROCK F7 ROCK F8 ROCK F9 HROCK F1 HROCK F2 HROCK F3 HROCK F4 METAL F1 METAL F2 THRAS F1 THRAS F2 FUSE F...

Page 179: ...n 2 Techno Beat variation 3 General Drum Room General Drum Power General Drum Electronic General Drum Analog General Drum Brush Latin Special Percussions Live Rock Mastering Studio Mastering Funk Trap Mastering Epic Rock Mastering Ballad Mastering Modern Mastering Power benddown Special Effect Sounds 1 Special Effect Sounds 2 default Kit number MIDI program change number Drum kit No 34 38 are reco...

Page 180: ...me Click Metronome Bell Kick Drum 2 Kick Drum 1 Side Stick Snare Drum 1 Hand Clap Snare Drum 2 Low Tom2 Closed Hi Hat Low Tom 1 Pedal Hi Hat Mid Tom 2 Open Hi Hat Mid Tom 1 High Tom 2 Crash Cymbal 1 Hi Tom 1 Ride Cymbal 1 Chinese Cymbal Ride Bell Tambourine Splash Cymbal Cowbell Crash Cymbal 2 Vibraslap Ride Cymbal 2 High Bongo Low Bongo Mute High Conga Open High Conga Low Conga High Timbale Low T...

Page 181: ...rb Snare 1 Reverb Snare 2 Room Snare Power Snare Electric Snare Brush Short Brush Long Brush Slap Bend Down Live Tom 1 Name No Display 201 202 203 204 205 206 207 208 209 210 211 212 213 214 215 216 217 218 219 220 221 222 223 224 225 226 227 228 229 230 231 232 233 234 235 236 237 238 239 240 241 300 301 302 303 304 305 306 307 308 309 TMLive2 TMLive3 TMStdio1 TMStdio2 TMStdio3 TMDry1 TMDry2 TMDr...

Page 182: ...elocity Bend Down Clap Analog Claves DIGI ANA Snap Click Noise High Q Slap Scratch Push Scratch Pull Sticks Square Click Metronome Click Metronome Bell Tambourine Vibraslap High Bongo Low Bongo Mute High Conga Open High Conga 1 Open High Conga 2 Low Conga Name No Display 616 617 618 619 620 621 622 623 624 625 626 627 628 629 630 631 632 633 634 635 636 637 638 700 701 702 703 704 705 706 707 708 ...

Page 183: ...2 1A Sg 02 1B Sg 02 2A Sg 02 2B Sg 03 1A Sg 03 1B Sg 04 1A Sg 04 1B Sg 04 1C Sg 04 2A Sg 04 2B Sg 04 2C Rhythm Songs Drum loop1 Drum loop2 Drum Fill1 Drum variation1 Drum Fill2 Drum variation2 Drum end Drum intro Drum loop1 Drum loop2 Drum break Drum variation1 Drum Fill Drum variation2 Drum loop1 Drum loop2 Drum loop1 Drum loop2 Drum loop3 Drum loop4 Drum loop5 Percussion loop1 Percussion loop2 P...

Page 184: ... 1D Bass Guitar Analog FX loops Old Funk loop1 Old Funk loop2 Old School Bass loop1 Old School Bass loop2 Old House Bass loop Pops Bass loop Funk Bass loop1 Funk Bass loop2 Dark Bass loop1 1 Dark Bass loop1 2 Funk Bass loop1 1 Funk Bass loop1 2 Acoustic Guitar loop on Amaj Acoustic Guitar loop on Amin Erectric Guitar loop on Cmin RockBilly Guitar loop on Amin Funk Guitar loop on A7 9 Funk Guitar l...

Page 185: ...ROJxxx folder Contains the individual data for each project The following files are located in this folder TRACKx_x DAT Audio data for each track V take PHRASExx PH Audio data for each phrase mono or stereo left channel PHRASExx PHR Audio data for each phrase stereo right channel LOOPxx TXT Formula data entered when creating phrase loops PRJDATA INI Project settings data DRUMKITS ZDR Drum kit data...

Page 186: ... Change pp program number EnH ll hh Pitch Bend Change hhll pitch bend value NOTE n MIDI Channel Number 0 F 1 Note On messages can be recorded into a rhythm pattern 2 Transmitted Messages Status 1st 2nd Description 8nH kk 40H Note Off kk note number 9nH kk 00H Note Off kk note number 9nH kk vv Note On kk note number vv velocity BnH 07H vv Channel Volume vv volume value BnH 7BH 00H All Notes Off CnH...

Page 187: ...oice Velocity Note ON o o Note OFF x x After Key s x x Touch Ch s x x Pitch Bend x o 7 7 Volume Control 11 Expression Change 120 All Sounds Off 121 Reset All Ctrls Prog o o 0 127 Change True System Exclusive x x System Song Pos o x Song Sel x x Common Tune x x System Clock o x Real Time Commands o x Aux Local ON OFF x x All Notes OFF o o Mes Active Sense x x sages Reset x x Notes Mode 1 OMNI ON PO...

Page 188: ...rojects on CD R RW disc 143 CD R RW drive operation problems 162 CD R RW drive Installation 17 CD RW disc Erasing a CD RW disc 135 CHORD 90 96 Chord information 94 Deleting 27 Input 25 Chord type 94 Changing 27 Chorus delay 125 Chromatic 103 Chromatic scale 103 Closing bracket 72 92 Compression expansion Specified range of data 60 Connections 15 16 Control Change 146 Control section 13 Copying Kit...

Page 189: ... section 14 Insert effect 11 117 Changing the insert position 119 36 Editing a patch 121 Editing a patch name 123 Selecting a patch 29 36 119 Signal flow 120 L Level meters 156 Loading Project 139 Project from CD R RW disc 144 Locate function 40 M Major 103 Major scale 103 Manual punch in out 40 Mark 49 Marker function Clearing a mark 50 Locating a mark 50 Master track 42 Playback 44 Recording 36 ...

Page 190: ...roject on CD R RW disc 139 Project Creating a new project 21 PTN 90 Ptn 96 Punch in out function Manual punch in out 40 Punch in out Auto punch in out 41 Q Quantize 107 QUICK 135 R Real time input 101 Rear panel 14 Connections 15 Recorder section 9 Recording level 28 Recording operation problems 161 Recording Overdubbing 32 Recording on first track 28 Repeat playback 51 Reverb 125 Reverse Specifie...

Page 191: ...RW disc 143 Single project on CD R RW disc 49 Storing a patch 123 Using effects only on monitor signal 124 Sub out jack 156 T Tempo 90 96 Tempo Changing the rhythm song tempo 88 Tick 105 Timing Clock 146 148 TimSig 90 96 Top panel 12 Track 9 Track editing 54 Capturing a track 63 Compression expansion of a specified range of data 60 Copying a specified data range 55 Copying a V take 62 Data rewriti...

Page 192: ...ZOOM CORPORATION NOAH Bldg 2 10 2 Miyanishi cho Fuchu shi Tokyo 183 0022 Japan PHONE 81 42 369 7116 FAX 81 42 369 7115 Web Site http www zoom co jp MRS 1266 5000 3 ...

Reviews: