Zoom Hard'Vision 22CHV Operation Manual Download Page 6


ENGLISH


The following main menu options are available:


• 

Luminance


• 

Image Setup


• 

Color Setup


• 

OSD Setup


• 

Reset


• 

Extra


Set menu language


The menu may be preset to English.


For easy use of the self-explanatory menu, it is 

advantageous to set it to the respective native 

language. Proceed as follows:


1.  With the monitor turned on, press the multi- 

selector switch to the right.


2.  Select the 

OSD Setup 

item by pressing the 

multi-selector up / down. Confirm the selection 

by pressing the multifunction switch to the right.


3.  The first point is 

Language

. Press the 

multifunction switch to the right to enter the 

language selection menu.


4.  Select the desired language by pressing the 

multi-function switch up / down. Confirm the 

selection by pressing the multifunction switch 

to the right.


5.  The desired language is now set. To exit the 

menu, press the multifunction switch several 

times to the left.


Reset settings to factory settings


1.  With the monitor turned on, press the


multifunction switch to the right.


2.  Select the 

Reset 

menu item by pressing the 

multifunction switch to right. Confirm the 

selection by pressing the multifunction switch 

to the right.


3.  If necessary, select 

Reset 

by pressing the 

multi-function switch up / down. Press the 

multifunction switch to the right to confirm the 

reset. All previously made individual settings 

have now been reset and the menu is closed.


Select input


1.  With the monitor turned on, push the 

multifunction switch to the left.


2. 

Select the desired input,

 HDMI 

or 

VGA


by pressing the multifunction switch left.


3.  Confirm the selection by pressing the 

multifunction switch to the right.


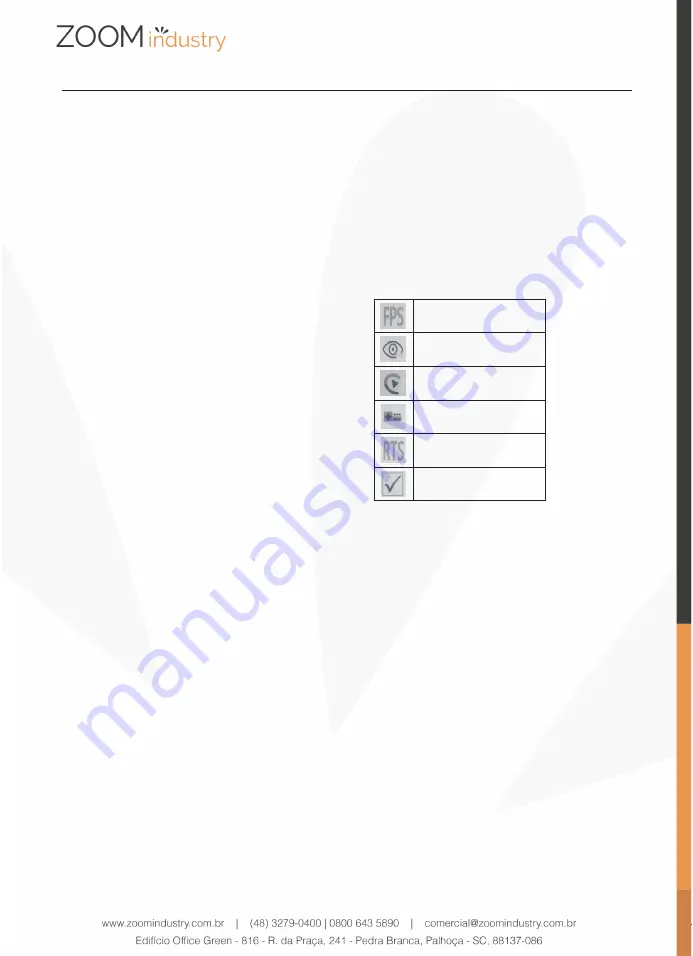
Set picture characteristic


1.  With the monitor turned on, press the multi- 

selector switch up until the desired characteristic 

has been set. You can choose from:


FPS Gaming


Low blue light mode


Movie mode


Reading mode


RTS Gaming mode


Standard mode


2.  Confirm the selection by pressing the 

multifunction switch to the left or wait a few 

seconds until the symbol disappears.


Cleaning and Care


• Always unplug the power supply from the power 

outlet before cleaning.


• Caution! Water must not enter the device.


• Clean the housing with a slightly damp cloth. 

Clean the display with special screen cleaning 

cloths. Always check the instructions of the 

cleaning agent. Certain agents might not be 

suitable for cleaning this product.


• Do not use any sharp, abrasive or aggressive 

cleaning agents.


• Do not use any chemicals (e.g. gas, alcohol) 

to clean the housing.


Summary of Contents for Hard'Vision 22CHV

Page 1: ...22CHV...

Page 2: ...rticularly humid climates Do not move the product from cold into warm places and vice versa Condensation can cause damage to the product and electrical parts Do not use attachments or accessories othe...

Page 3: ...ended to keep the original packaging for storage If you wish to dispose of the original packaging please device the disconnect device shall remain readily observe applicable legal provisions Should yo...

Page 4: ...essive sound pressure levels from ear buds and headphones can cause hearing damage Listening to loud music for extended periods of time may lead to hearing impairment Keep the volume at reasonable lev...

Page 5: ...4 ENGLISH...

Page 6: ...itch to the right 3 If necessary select Reset by pressing the multi function switch up down Press the multifunction switch to the right to confirm the reset All previously made individual settings hav...

Page 7: ...n at the address provided The out of use product will return to ZOOMindustry to provide the appropriate final destination Troubleshooting If there are any problems during operation please refer to the...

Page 8: ...tude N o utilize nos tr picos nem em climas particularmente h midos N o mova o produto de locais frios para quentes e vice versa A condensa o pode causar danos ao produto e pe as el ctricas N o utiliz...

Page 9: ...ermanecer prontamenteoper vel Desligue o cabo de for a da tomada O produto poder n o funcionarcorretamente nem reagir ao funcionamento de qualquer controle devido descarga eletrost tica Desligue o pro...

Page 10: ...C do adaptador el trico na tomada DC na parte posterior do monitor Liga o HDMI ou VGA Ligue os conectores apropriados na parte posterior do monitor ao seu computador ou outros dispositivos adequados u...

Page 11: ...tifun es para a direita O menu principal abre Aperte o interruptor multifun es para cima ou para baixo para selecionar o submenu pretendido Para confirmar a sua sele o aperte novamente o interruptor m...

Page 12: ...11 PORTUGU S...

Page 13: ...o interruptor multifun es para a esquerda 2 Selecione a entrada pretendida HDMI ou VGA pressionando o interruptor multifun es para cima para baixo 3 Confirme a sele o pressionando o interruptor multi...

Page 14: ...stry que providenciar a destina o final adequada Solu o de Problemas Se houver algum problema durante o funcionamento consulte a tabela seguinte Se os problemas n o puderem ser resolvidos como indicad...

Reviews: