Zoom Handy Recorder H4 Operation Manual Download Page 62


ZOOM H4


62


Effects


This section describes the operation of the effect section integrated in the H4.


About Effects


The H4 incorporates an effect section that can be

inserted immediately after the inputs to process

the signal before it is sent to recorder tracks for

recording.

The effect section of the H4 consists of several

single effects such as compressor, preamp, etc.

Each of these separate effects is called an “effect

module”.

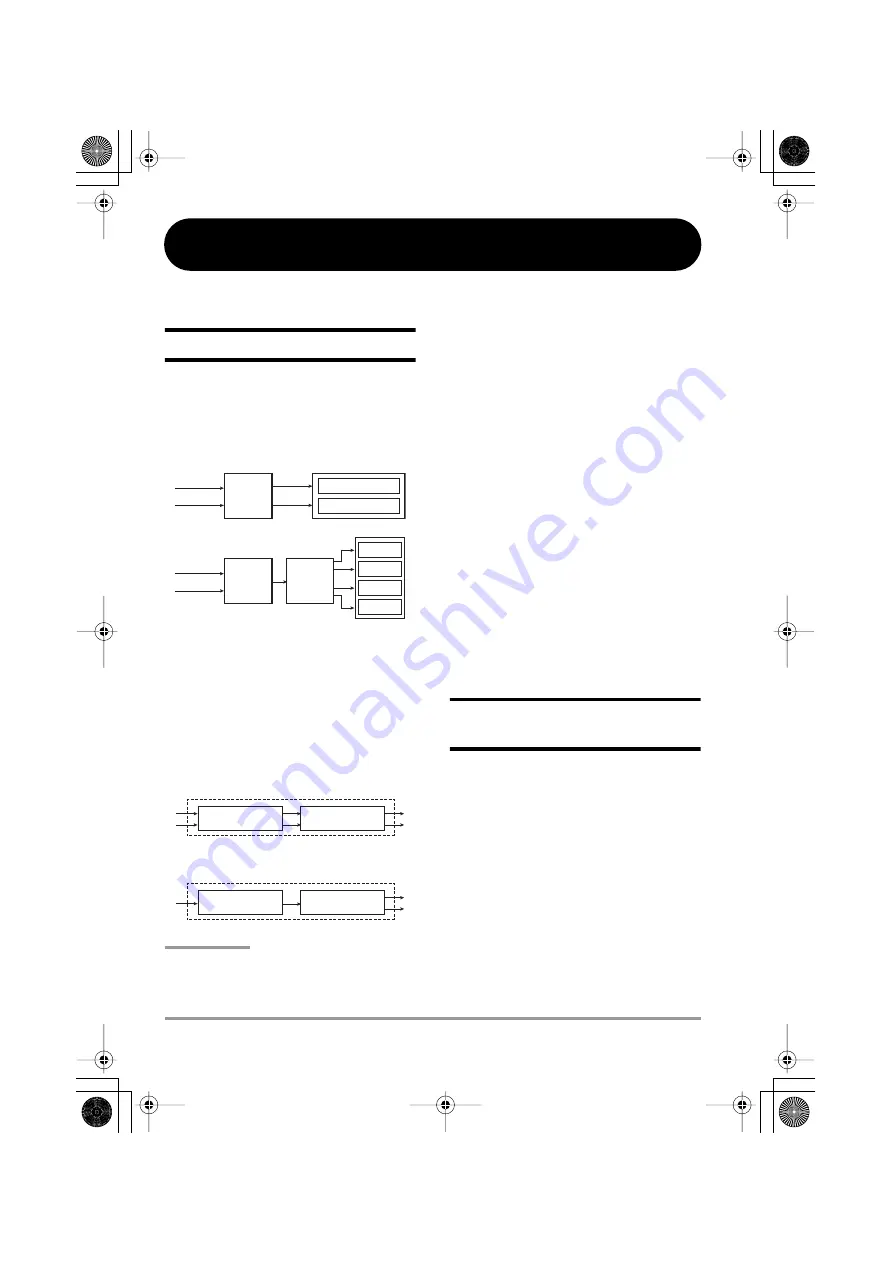
Depending on the operation mode of the H4, the

effect module configuration is as follows.


NOTE


• In stereo mode, the MIC MODEL module is only 

used when the built-in stereo mic is selected as 

input source.

• When two input sources are assigned in 4-track 

mode, the signal is mixed down to mono in the 
input mixer before being input to the effect 
section.


E a c h   e f f e c t   m o d u l e   h a s   a n   e l e m e n t   t h a t

determines the general style of the effect (effect

type) and elements that determines the intensity

and operation of the effect (effect parameters).

By selecting the effect type and adjusting the

effect parameters, you can control what the effect

d o e s   a n d   a c h i e v e   a   w i d e   r a n g e   o f   s o u n d

characteristics.

Operation and handling of effects differs in

stereo mode and 4-track mode. For details, see

the sections “Using effects in stereo mode”

(below) and “Using effects in 4-track mode” (


p. 64).


Using effects in stereo 


mode


This section explains how to use effects in stereo

mode.

In stereo mode, effects are used with stereo

input/stereo output. The stereo signal supplied

from the built-in stereo mic or the [INPUT 1]/

[INPUT 2] jacks can be processed by the effect

section.

Out of the two effect modules, the MIC MODEL

module can only be used when the built-in stereo

mic is selected as input source.

When the H4 is in the default condition, the

Recorder

Input 1

Input 2

Input 1

Input 2

Stereo mode

4-track mode

L stereo track

R stereo track

Recorder

Track 1

Input 
mixer

Effect 
section

Effect 
section

Track 2

Track 3

Track 4

Stereo mode module configuration
(Stereo input 

 Stereo output) 

MIC MODEL

COMP/LIMIT

4-track mode module configuration
(Mono input 

 Stereo output)  

PREAMP

EFX

H4_E.book 62 ページ 2006年9月1日 金曜日 午後7時56分

Summary of Contents for Handy Recorder H4

Page 1: ...Operation Manual ZOOM Corporation Reproduction of this manual in whole or in part by any means is prohibited English H4_E book 1...

Page 2: ...onments where it will be exposed to Extreme temperatures Heat sources such as radiators or stoves High humidity or moisture Excessive dust or sand Excessive vibration or shock Handling Never place obj...

Page 3: ...nce 27 Mixing 27 Bounce 28 Stereo Mode 30 What is stereo mode 30 Switching to stereo mode 30 Recording in stereo mode 31 Select input source 31 Adjust recording level 31 Automatic adjustment of record...

Page 4: ...ng the USB function 80 Using the H4 as audio interface for a computer 80 Using the H4 as an SD card reader 82 SD card operations 83 Checking available space on the SD card 83 Initializing an SD card 8...

Page 5: ...omputer for further processing or burning onto an audio CD Two types of effects built in The H4 comes with two built in effect modules The PREAMP module simulates the characteristics of famous guitar...

Page 6: ...e allows simultaneous recording of 2 tracks and simultaneous playback of 4 tracks This lets you do things such as creating a backing of drum machine and bass and then produce a guitar or vocal overlay...

Page 7: ...ns depend on the operation mode In stereo mode the two effect modules MIC MODEL and COMP LIMIT can be used The MIC MODEL module can be used only if the built in stereo mic is selected as input source...

Page 8: ...panel LINE OUTPUT jack Top panel Built in stereo mic REC key ACCESS indicator MODE indicator Rear panel INPUT 1 jack INPUT 2 jack Display TRACK 1 4 keys MENU key PHONES jack PHONES LEVEL knob DC IN ja...

Page 9: ...h SD CARD slot Battery compartment cover Opening the battery compartment cover 1 Slide the section with your index finger to release the lock 1 2 3 2 2 With the lock released grasp the cover with your...

Page 10: ...empted while no SD card is inserted the indication No Card appears About SD Cards When the H4 is connected to a computer via the USB port it can be used as audio interface or SD card reader for the co...

Page 11: ...ing system 2 Insert the SD card into the SD CARD slot p 10 3 Set the POWER switch on the H4 to On NOTE If the indication No Card appears at startup the H4 has not detected an SD card Verify that an SD...

Page 12: ...s drum vibrations etc You should therefore place the H4 on a table or a chair or use a tripod with the supplied adapter Recording steps 1 Turn power to the H4 on 2 The MODE indicator lights up Verify...

Page 13: ...ay stays just below 0 MIC GAIN switch setting HINT You can fine adjust the recording level manually or automatically p 31 33 NOTE If the level meter does not register at all when the unit is pointed t...

Page 14: ...tment The input sensitivity adjustment controls the input level to the analog section to ensure that the signal from the built in stereo mic or the INPUT 1 INPUT 2 jacks can be handled by the H4 at an...

Page 15: ...y selected for an operation 3 Move the jog dial up down to bring the cursor to the AUTO GAIN item then press the jog dial inwards The jog dial on the right side panel allows the following two actions...

Page 16: ...ue to sudden volume peaks and to keep even low sounds at a suitable level The sound character of the built in stereo mic can be altered using a number of mic simulation effects This section describes...

Page 17: ...e MENU key HINT In stereo mode you only need to select an effect type There is no provision for adjusting detailed parameters For details about the effects available in stereo mode see the reference s...

Page 18: ...ge 73 Selecting a file for playback In stereo mode one stereo file WAV or MP3 format is created for each recording operation These files are stored on the SD card in the dedicated STEREO folder To sel...

Page 19: ...after effect processing Step 3 Add more tracks While listening to the recorded track record the second and subsequent tracks Step 4 Mixing and bounce Create a stereo mix while adjusting the level and...

Page 20: ...new project is shown HINT You can change the name of the project at this point p 55 or you can change it later p 56 4 To create the new project move the jog dial up down to bring the cursor to the OK...

Page 21: ...the top of the MENU key 7 Move the jog dial up down to bring the cursor to LEVEL Then press the jog dial The LEVEL menu for setting the metronome level appears 8 Move the jog dial up down to set the...

Page 22: ...1 4 Each push of the key cycles through the following three status settings For example when you press the TRACK 1 key so that it is lit in red the display changes as follows HINT To record two differ...

Page 23: ...a the LINE OUTPUT jack PHONES jack 4 If two input sources IN1 2 have been selected move the jog dial up down to bring the cursor to the input source for which to adjust the recording level 5 Press the...

Page 24: ...set to off in 4 track mode 1 At the 4 track mode top screen press the bottom INPUT MENU of the MENU key The INPUT menu appears 2 Bring the cursor to the EFFECT item and press the jog dial The screen f...

Page 25: ...hown as the patch name a blank patch is selected This will have no effect on the sound 6 To return to the 4 track mode top screen repeatedly press the center of the MENU key HINT If you have switched...

Page 26: ...using the built in stereo mic p 12 2 Select the input source and recording track as described in the section Selecting the input source recording track p 21 of Step 2 Recording the first track 3 Adjus...

Page 27: ...unce Mixing You can adjust the volume and panning for recorded tracks as follows 1 Verify that the TRACK 1 4 keys are lit in green At this stage the metronome should normally be set to OFF p 77 2 At t...

Page 28: ...the level check is complete press the top of the MENU key to stop the recorder Bounce When the downmix is complete you are ready to write the result to a stereo file bounce The file can then be sent...

Page 29: ...rocessing is shown on the display The file created by bouncing is saved in the same PROJxxx folder as the other files recorded for the current project xxx 000 999 HINT To check the bounce result using...

Page 30: ...on modes of the H4 are stereo mode and 4 track mode When power to the H4 is turned on it will be in the mode that was selected the last time the unit was used The currently selected mode is shown by t...

Page 31: ...key The INPUT menu for making various input related settings appears 2 Move the jog dial up down to bring the cursor to SOURCE then press the jog dial The input source can now be selected 3 Move the...

Page 32: ...linked NOTE If the auto gain function p 33 is on the recording level cannot be adjusted manually Steps 5 and 6 cannot be carried out 5 To adjust the recording level move the jog dial up or down The re...

Page 33: ...ction for automatically adjusting the recording level auto gain function is available This is convenient to start recording straight away 1 Connect the microphone and instruments as required and set t...

Page 34: ...screen appears NOTE In 4 track mode the recording format is fixed to WAV 44 1 kHz 16 bit The main menu in 4 track mode therefore does not have a RECORDING FORMAT item The available sampling rate and...

Page 35: ...he respective format and sampling rate selected If required change also the bit rate Record Recording in stereo mode is performed as follows 1 At the stereo mode top screen press the REC key The REC k...

Page 36: ...de top screen Playback in stereo mode This section explains the steps required for playback of a file recorded in stereo mode Selecting a file for playback In stereo mode each recording session will p...

Page 37: ...as follows space 0123456789 ABCDEFGHIJKLMNOPQRSTUVWX YZ _ abcdefghijklmnopqrstuvwxyz Locating a point in a recording Locate This section describes how to move to any counter position in a recording 1...

Page 38: ...l The A B button changes from flashing to reverse indication and that point is set as the A B repeat end point point B NOTE To redo the point A B setting bring the cursor to the A B button and press t...

Page 39: ...shown below NOTE In 4 track mode recordings songs are managed in units called projects p 54 The recording format in 4 track mode is fixed to WAV 44 1 kHz 16 bit The top screen of the 4 track mode is s...

Page 40: ...allows starting a recording also partway through a track and a function called punch in out p 43 that overwrites only a specified section is also supported Always New mode In this mode a new file is...

Page 41: ...mode 1 At the 4 track mode top screen press one of the TRACK 1 4 keys repeatedly until the key is lit in red to select the track on which to record 2 To start recording press the REC key so that the k...

Page 42: ...kHz 16 bit can be included in a 4 track mode project and assigned to tracks 1 2 or 3 4 p 74 2 Use the TRACK 1 4 keys to select the track to which you want to assign a file The selected track number a...

Page 43: ...the A B repeat function is not available during recording as in stereo mode Re recording only a specified region punch in out function Punch in out is a function that lets you re record just a specifi...

Page 44: ...s that you pressed in step 1 repeatedly so that the key is lit in red The input signal can now be monitored The number of the track selected as recording target is shown in reverse 3 Locate the intend...

Page 45: ...onstantly lit 9 To stop playback press the top of the MENU key The recorder stops 10 To cancel auto punch in out bring the cursor to the A PUNCH button and press the jog dial The button returns to the...

Page 46: ...the MENU key to stop the recorder 3 Move the jog dial up down to bring the cursor to the BOUNCE button Then press the jog dial The BOUNCE screen for controlling the bounce function appears 4 To select...

Page 47: ...The file created by bouncing is saved in the same location as the other files recorded for the current project To check the bounce result assign the file to a track p 42 HINT If you select the CANCEL...

Page 48: ...ng selections are available HINT When MIC or IN1 2 is selected the input mixer will receive two signals The built in stereo mic always feeds the two L R channels as a set It is not possible to combine...

Page 49: ...eing shown the cursor is not shown 7 Move the jog dial up down to adjust the recording level The recording level setting can be checked on the display To record with optimum sound quality the input si...

Page 50: ...also selected as recording target Unless you disable the stereo link setting it is not possible to select only one track When there is one input source The signal of the source is sent to the selected...

Page 51: ...track is selected as recording target or bring up the screen for adjusting the recording level Alternatively you can set the monitor function to ON on the INPUT menu In this case the input signal wil...

Page 52: ...ial up down to adjust the level The volume level can be adjusted in the range from 0 to 127 6 To adjust the pan balance setting press the jog dial once more and then move the jog dial up down When you...

Page 53: ...cursor to STEREO LINK Then press the jog dial The STEREO LINK screen appears 3 Move the jog dial up down to bring the cursor to 1 2 tracks 1 and 2 or 3 4 tracks 3 and 4 Then press the jog dial The st...

Page 54: ...currently loaded project It is not possible to handle multiple projects simultaneously Basic project operations Most project operations follow a basic pattern This is described below 1 Verify that the...

Page 55: ...e first character is underlined In this condition you can change the project name The following characters are available Note that these are slightly different from the characters available for the fi...

Page 56: ...The name of the selected project is shown 3 Move the jog dial up down to bring the cursor to the project name Then press the jog dial The cursor disappears and the first character is underlined In thi...

Page 57: ...ct name Then press the jog dial The cursor disappears and the first character is underlined In this condition you can change the project name For details on how to change the name see page 47 For info...

Page 58: ...from being deleted and no new recordings can be made When a project is write protected the following actions are not possible Recording Deleting the project Deleting the file s Changing file assignme...

Page 59: ...n press the bottom of the MENU key The INPUT menu for making various input related settings appears 3 Move the jog dial up down to bring the cursor to TUNER Then press the jog dial The tuner function...

Page 60: ...the MENU key repeatedly to return to the 4 track mode top screen Using other tuner types The H4 allows various other tuning types besides chromatic tuning including standard tuning for guitar and bas...

Page 61: ...indicated string as an open string and perform tuning 8 To switch to another string number proceed as follows 1 Move the jog dial up down to bring the cursor to the STRING button and then press the j...

Page 62: ...t effect parameters By selecting the effect type and adjusting the effect parameters you can control what the effect does and achieve a wide range of sound characteristics Operation and handling of ef...

Page 63: ...pe is set to LIMIT Limiter HINT The COMP LIMIT module allows only selection of the effect type 4 To accept the COMP LIMIT module setting press the jog dial 5 If the built in stereo mic is selected as...

Page 64: ...nnected and on whether one or two tracks are used as recording targets Selecting a patch In 4 track mode effect types and effect parameters are adjusted for each module and the result can be stored as...

Page 65: ...the 4 track mode top screen press the bottom INPUT MENU of the MENU key The INPUT menu appears 2 Bring the cursor to the EFFECT item and press the jog dial The EFFECT menu appears If the effect sectio...

Page 66: ...odule see the reference section at the end of this manual 7 To adjust the effect parameters proceed as follows 1 Bring the cursor to the target item other than ON OFF and TYPE and then press the jog d...

Page 67: ...again If you select another patch in this condition the changes will be lost You can also select the CANCEL button to close the message and cancel the store process You can then continue editing 13 To...

Page 68: ...can import a patch from another project into the currently selected project p 69 Assigning a name to a patch You can change the name of the currently selected patch 1 At the 4 track mode top screen p...

Page 69: ...from another project into the current project NOTE When you execute the import process existing patches in the current project will be overwritten Take care not to accidentally erase patches that you...

Page 70: ...ed as import source and then press the jog dial 3 Bring the cursor to the OK button and press the jog dial 4 Repeat steps 1 3 to select the import target patch Then bring the cursor to the OK button a...

Page 71: ...k mode a separate folder is created for the current project and the files are saved in that folder See below HINT In 4 track mode it is possible to import files from another project or files recorded...

Page 72: ...n to the 4 track mode top screen repeatedly press the center of the MENU key Renaming a file To change the name of a recorded file in the current project folder or in the stereo mode folder proceed as...

Page 73: ...d as follows NOTE Once deleted a file cannot be restored Use this function with care 1 Refer to steps 1 3 of Basic file operations and bring the cursor to DELETE Then press the jog dial A list of file...

Page 74: ...ton instead of the OK button the copy process is canceled and the display returns to the condition of step 1 NOTE If a file with the same name already exists in the current project folder a message ap...

Page 75: ...e name as the file to be imported already exists in the current project a message such as shown below appears To change the file name before importing proceed as follows 1 Move the jog dial up down to...

Page 76: ...ws 1 Refer to steps 1 3 of Basic file operations and bring the cursor to SIZE Then press the jog dial A list of files stored in the folder for the current project or in the stereo mode folder appears...

Page 77: ...OFF no click sound PRE COUNT Determines whether pre count beats are played before recording Available settings are OFF no pre count 1 8 1 8 pre count beats and SP SPECIAL When SP SPECIAL is selected t...

Page 78: ...ings of the H4 appears 2 Move the jog dial up down to bring the cursor to DISPLAY and then press the jog dial The DISPLAY setting screen appears Setting items available from this screen are as follows...

Page 79: ...INPUT 1 INPUT 2 jacks provide a 48 V phantom power supply NOTE Some external equipment may not operate with a 24 V phantom power supply However because it reduces current consumption compared to the 4...

Page 80: ...terface are as follows Compatible operating system Windows XP MacOS X 10 2 or later Bit rate 16 bit Sampling rate 44 1 kHz 48 kHz selectable When the H4 has been recognized by the computer as an audio...

Page 81: ...e the sampling rate proceed as follows 1 Move the jog dial up down to bring the cursor to the SAMPLE item and then press the jog dial 2 Move the jog dial up down to select 44 1 kHz or 48 kHz and then...

Page 82: ...ppears on the display When you select the OK button the connection to the computer is terminated and the screen that was shown before establishing the connection appears again If you select the CANCEL...

Page 83: ...ion at the computer first If the H4 is being powered via the USB port pressing the center of the MENU key repeatedly will cause the display to return to the screen that was shown when the H4 started u...

Page 84: ...or miscellaneous settings of the H4 appears 2 Move the jog dial up down to bring the cursor to CARD and then press the jog dial The CARD menu screen for various SD card operations appears 3 Move the j...

Page 85: ...the H4 as an SD card reader p 82 3 Insert the SD card into the H4 Then turn on power to the H4 while holding down the bottom INPUT MENU of the MENU key The H4 starts up with the following screen 4 To...

Page 86: ...t Effects Insert Modules 2 Types 53 Patches 60 Tuner Chromatic Guitar Bass Open A D E G DADGAD Metronome Metronome sound sources 5 Variable beat 1 4 8 4 6 8 unaccentuated Tempo 40 0 250 0 BPM A D conv...

Page 87: ...Gain mic switch L 6 dB M 20 dB H 30 dB Phantom power supply 48V 24V OFF Master output Mini stereo phone jack Output load impedance 10 kilohms or more Rated output level 10 dBm Headphone output Mini s...

Page 88: ...input signal can only be monitored if a track is set to recording standby or if the recorder is in the recording standby condition Cannot record on a track Verify that REC key and key for recording ta...

Page 89: ...t types have the same parameters 1 CABINET 0 2 2 GAIN 0 100 Adjusts the intensity of the speaker cabinet sound Adjusts the preamp gain distortion depth 3 BASS 12 12 4 MIDDLE 12 12 Adjusts boost cut in...

Page 90: ...the middle range 5 TREBLE 12 12 6 BALANCE 0 100 Adjusts boost cut in the high range Sets the mixing balance between the signal before input and after passing the module Higher values result in a high...

Page 91: ...the compression ratio of the limiter 3 RELEASE 1 10 4 LEVEL 2 100 Adjusts the speed of the limiter release after the signal falls below the threshold level Adjusts the level of the signal after passin...

Page 92: ...l sound and effect sound Adjusts the level of the signal after passing the EFX module SLOW ATK This effect softens the attack rate of each note resulting in a violin playing style sound 1 POSITION Bef...

Page 93: ...like a talking modulator 1 RANGE 1 10 2 RESONANCE 0 10 Adjusts the frequency range in which the effect operates Adjusts the resonance characteristic of the effect 3 SENSE 10 1 1 10 4 BALANCE 0 100 Adj...

Page 94: ...e level of effect sound mixed to the original sound RVS DELAY This is a reverse delay with a long delay time of up to 2500 milliseconds 1 TIME 10 2500ms See Table on page 93 2 FEEDBACK 0 100 Adjusts t...

Page 95: ...mes are used only to illustrate sonic characteristics and do not indicate any affiliation with ZOOM CORPORATION SM57 Simulates the Shure SM57 dynamic microphone MD421 Simulates the Sennheiser MD421 dy...

Page 96: ...ison sound adds a one octave lower component TS FD_CMB PITCH 11 MS Crunch Marshall Bluesbreaker crunch sound that closely tracks your picking UK BLUES RACK COMP 12 Full Crunch Simulation of the versat...

Page 97: ...nd for solo vocals VO MICPRE CHORUS 38 Flange Vocal Flanger sound for soothing pop music vocals VO MICPRE FLANGER 39 Light Vocal Effect sound for bright and articulate vocals FLAT MPRE ROOM 40 Spring...

Page 98: ...B Battery powered operation 11 Bit rate 34 Bounce 4 track mode 28 45 C Chromatic tuner 59 COMP LIMIT module 63 95 Connections 10 D Display 78 E Effect types and parameters 4 track mode 89 Effects 7 16...

Page 99: ...reating a new project 20 55 Deleting a project 57 Protecting a project 58 Selecting a project 55 Punch in out 4 track mode 43 R Recorded files 71 Recording stereo mode 17 31 35 Recording format select...

Page 100: ...nd used in accordance with the instructions may cause harmful interference to radio communications However there is no guarantee that interference will not occur in a particular installation If this e...

Reviews: