ZMODO ZMD-DC-SBN6 User Manual Download Page 12

11

"Alarm output" / "hard disk capacity" / "number of the client connection" / "system time."
           Indicateshard diskbeing ok.The number indicatesthe percentage of the total capacity of the hard disk.
           Indicates“Hard disk error” Or “No hard disk”.
           Indicatesclient connection. The number shows client linking number
           Indicates“No client connection”
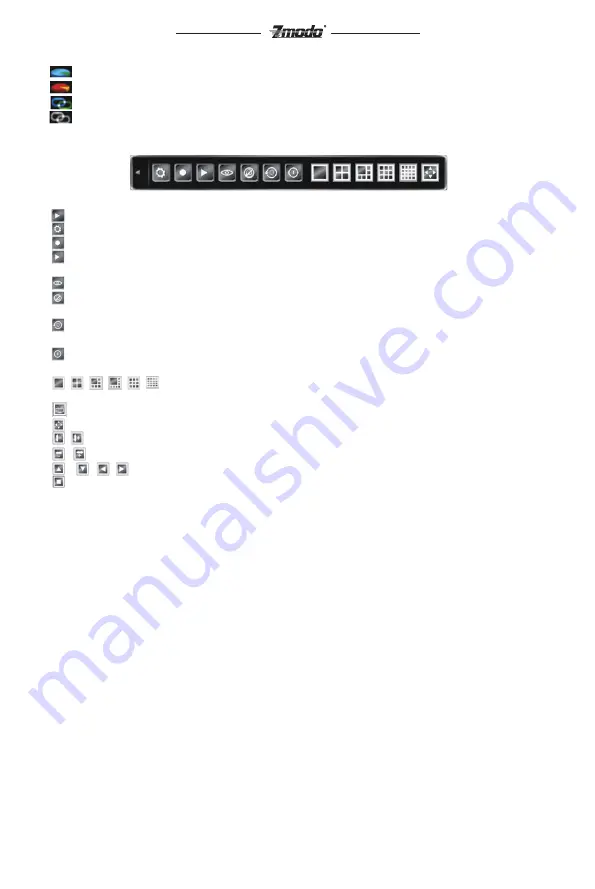
2) Tool Bar

Right click mouse or press [OK] button in preview mode, the Tool Bar shown as below will appear:

FigIV 1 System toobar

        : Hide the tool bar.

        :  System configuration. Please see IV.2 Menu Structure for details.

        : Manual record. Please see IV.3.1 Manual record for details. 

        : Search, playback and backup record files, please see IV.6 Video Playback and IV.7 Videl Backup for 

details.

        : PTZ operation. Please see IV.5 PTZ Control for details.

        : Click to cancel alarm notification. Click this button will pop a message to show the present alarm 

information. 

        : Fast playback.User can enter 10, 20, 30, or 60 seconds before position to start playback and can also 

jump to a specified time in the video.

        : Power off.Click this button will pop a message of“confirm password”. User has to enter Admin 

password to shut down.


、  


:

To set the preview mode of “Single splits view” ,”4 splits view”,”6 splits view” “8 

splits view” “9splits view” “16 splits view”.

         :Fast switch TV and VGA. Menu will not be available on the current screen, only a preview image.

         :To adjust the screen, 8 pixels per unit. 

        :

To reduce or increase screen in vertical direction.


To reduce or increase screen in horizontal direction.


、  


、  


To move the screen up, down, left, right.


To zoom out the screen to largest and show in central.


Note1

When mouse moves to the tool bar icon, the indication information will come out to help users to 

understand.


Note2

When video source is PAL, screen display range max is 720*576

When NTSC, screen display 

max 720*480.

     Note3:

 Switch display menu between VGA and TV by selecting

ESC

->

1

->

ESC

(sequence 

must be pressed within 3 seconds) on the remote control or Front panel.

3 Record

Record type contains manual record and schedule record. The priority of manual record is higher than 
schedule. If the record schedule is conflict with manual record, the manual record will be processed firstly 
until the manual record being canceled.
Record types include “common recording” / “alarm triggered recording” / “motion detection triggered 
recording” / “alarm | motion detection triggered recording”. Each of them is indicated with grid of different 
color, and each color indicates a particular record status. Please see Fig IV-2record schedule for details.
Record resolution: The device support "CIF" / "HALF D1" / "D1"format.
Record quality: “Best 768Kbps” / “High 640Kbps” / “Better 512Kbps” / “Common 384Kbps”. And “User setting” 
can help user to set one bit rate up to 2048Kbps.
Record frame rate: if the current selection is PAL, the frame rate options are “All” / “12” / “6” / “3” / “1” / 
“Customized”. If the current selection is NTSC, the frame rate options are “All”/ “15” / “7” / “3” / “1” 
/“Customized”. Default is “All”, 25 fps for PAL and 30 fps for NTSC.
Record Resource: “Video” for video only or “Video and Audio”  for recording video and audio.


、 、 、

Summary of Contents for ZMD-DC-SBN6

Page 1: ...User Manual 4CH 8CH H 264 Standalone NVR NVR User Manual For further help please visit www zmodo com User Manual 16CH H 264 Standalone DVR DVR User Manual For further help please visit www zmodo com...

Page 2: ...cement our company must receive payment and is not liable for any payment to the consumer All resulting loses will be the consumer s responsibility In cases of use causing the product s malfunction or...

Page 3: ...isplay Area 10 2 system status bar 10 3 Tool Bar 11 3 Record 11 1 Manual Record 12 2 Record Schedule 12 4 Camera Control 12 1 PTZ Control 12 2 Motion Detection Settings 12 3 Mask Setting 13 5 Playback...

Page 4: ...ord 20 4 Advanced Setting of Video 20 Chapter Five Appendix 21 1 Specifications 21 2 Methods of Calculating HDD Capacity 22 1 Calculate the maximum capacity of the build in hard disk 22 2 Calculate th...

Page 5: ...ed The schedule record types include timing motion detection alarm motion detection alarm SATA harddisk supported Backup and clip record files through USB flash disk portable USB HDD and USB CD DVD RW...

Page 6: ...channel selection in preview mode 3 One key channel selection in play mode 1 Press it to switch from single split to multi splits view mode or reverse in preview and playback mode 2 Press it to enter...

Page 7: ...te 1 Press it to confirm operations in menu mode 2 Press it to select record type in setting schedule 3 Press it to change status of the current motion detection block Switch from single screen and mu...

Page 8: ...5 15V The green angle pins of signal cable are supplied for access of PTZ and alarming devices Please follow these steps to connect 1 Pull out the angle pins that inserted in the alarm input and outp...

Page 9: ...uality Record Frame Rate Record Source OSD Setting Record Resolution Sub Code Camera CH PTZ Protocol PTZ Baudrate PTZ ID Color Setting Motion Detection Mosaic Motion Handling Video Lost Handling Chann...

Page 10: ...e enter Tool Bar System System Setting Time Setting to set date and time Video Standard Please enter Tool Bar System System Setting Video Standard to set video standard PAL SECAME and NTSC are support...

Page 11: ...y switched by tool bar Please refer to 4 2 3 Tool Bar Image Parameters Setting Please enter Tool Bar System Video Color Setting to set brightness contrast hue and saturation It will take effect instan...

Page 12: ...l direction To reduce or increase screen in horizontal direction To move the screen up down left right To zoom out the screen to largest and show in central Note1 When mouse moves to the tool bar icon...

Page 13: ...m recording is selected the alarm triggering settings should be set ahead Please refer to 4 7 2 Event Handling for details 4 Camera Control 1 PTZ Control PTZ Settings Enter Tool Bar System Video to se...

Page 14: ...ck the arrow icons to control direction of PTZ Click the center icon to call sequence or run scanning Please refer to the PTZ manual for details of PTZ scanning mode Speed Advanced Click and to show h...

Page 15: ...selection box press OK button to select it or cancel selection Move highlight icon to press OK button to zoom in zoom out timeline time ruler If the timeline is out ofscreen please move highlight ico...

Page 16: ...ion handle screen Choose among these three options HDD full network disconnect and IP conflict For the hard full setting user can select alarm output sound report to center email Network disconnect an...

Page 17: ...Time synchronization Click to start synchronization the device can automatically synchronize by setting the server name synchronization interval time zone Note1 All of these settings of network will...

Page 18: ...artbeat of device please check the network will be displayed in the right up side of the main screen After recovery of network the preview will be displayedautomatically When alarms ofremote notificat...

Page 19: ...cking It includes 2X 4X 8X and 16X Slow play option The speed of playing will be half down by each clicking It includes 1 2X 1 4X 1 8X and 1 16X Enhance contrast Reduce contrast Enhance brightness Red...

Page 20: ...e 4 Format HDD Please make sure that all of the important record files have already being saved before formatting HDD Please stop all of the recordings in the beginning of formatting HDD And follow th...

Page 21: ...ettings Note system setup advanced settings user can set recourse distribution mode code mode and playback mode 2 User management Please enter tool bar setting system setup advanced setting Select ADD...

Page 22: ...AM PAL 352 288 CIF NTSC 352 240 CIF Audio Compression Input Output Sampling Rate Audio Channel Type Sampling Bit G 726 ADPCM 8KHz Power Supply DC 12V 5A positive inside negative outside power adapter...

Page 23: ...m and Motion Detection Alarm supported Selectable Record Quality Best High Mid Low and User defined Playback Play progress bar supported Multiple channel video audio playback simultaneously Play pause...

Page 24: ...ty Normal Sensitivity Low Sensitivity Normal Sensitivity Mosaic On off click into sub menu screen Off Motion Detection Event Handling record zoom out alarm out buzzer upload email record Video loss ha...

Page 25: ...arm Input Type Alarm settings N O N C N O Event Handling record PTZ preset zoom out alarm out buzzer upload email Trigger alarm output buzzer and email Alarm Setting Off 1 10 ON Alarm Zoom Out 1 10 se...

Page 26: ...supported by client side are as follows Android 2 1 2 3 Symbian V3 V5 windows mobile5 5 6 1 ipad ios 5 and Iphone BlackBerry 7 Note Let s take winmobile6 0 for example to show you how to install and...

Page 27: ...Disconnect to stop preview Operations FigV 9 Buttons operation of mobile phone all of these buttons are operated by PTZ From left to right they are Turn Left Turn Right Move Up Move Down Zoom out Zoo...

Page 28: ...Zmodo encourages the customer to use a qualified installer for installation The installer should take full responsibility of installing the equipment properly and safely Your Security Our Priority...

Reviews: