


24
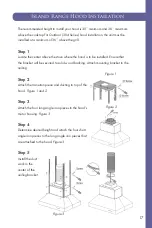
Preparation
Decide the location of the venting pipe from the hood to the outside.
Check hood for clearance.
A straight, short vent run will allow the hood to perform more efficiently.
Try to avoid as many transitions, elbows, and long runs as possible. This may reduce
the performance of the hood.
For installing under the cabinet with recessed bottom, attach 4-inch wide wood filler
strips (not provided) on each side.
Puncture the knockout holes (for mounting under the cabinet) on the hood.
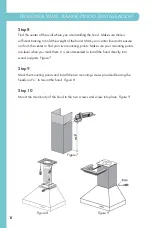
Step 1
Measure distance between stove
top and the bottom of the range
hood. A distance of 30” to 36” is
recommended.
Step 2
Attach mounting brackets to the
back of the hood.
Step 3
Mark the leveling point of the
hood. Position two mounting
screws on the wall, leaving ¹/
₈
”
space away from the wall. Make
sure that you are mounting the
hood to a secure backing to hold
the weight of the hood.
Step 4
Tighten ducting (provided) with
the hose clamp provided. Use
silver or duct tape wherever
needed.
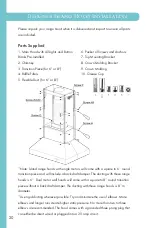
Under cabinet Installation
Summary of Contents for 432-30
Page 1: ...Range Hood Installation Guide and Users Manual...
Page 2: ......
Page 10: ...4 Wall Range Hood Installation Installation Tutorial Video...
Page 16: ...10 Designer Wall Range Hood Installation Installation Tutorial Video...
Page 21: ...15 Island Range Hood Installation Installation Tutorial Video...
Page 25: ...19 Installation Tutorial Video Designer Island Hood Installation...
Page 29: ...23 Under cabinet Installation Installation Tutorial Video...
Page 33: ...27 Range Hood Insert Installation Installation Tutorial Video...
Page 46: ...40 How to Change Parts Single Motor Electrical Diagram...
Page 47: ...41 How to Change Parts Dual Motor Electrical Diagram...
Page 54: ...48 MOUNTING SPECIFICATIONS...
Page 55: ...49 MOUNTING SPECIFICATIONS...
Page 56: ...50 MOUNTING SPECIFICATIONS...
Page 57: ...51 MOUNTING SPECIFICATIONS...
Page 58: ...52 MOUNTING SPECIFICATIONS...
Page 59: ...53 MOUNTING SPECIFICATIONS...
Page 60: ...54 MOUNTING SPECIFICATIONS...
Page 61: ...55 MOUNTING SPECIFICATIONS...
Page 62: ...56 MOUNTING SPECIFICATIONS...
Page 63: ...57 MOUNTING SPECIFICATIONS...
Page 64: ...58 MOUNTING SPECIFICATIONS...
Page 65: ...59 MOUNTING SPECIFICATIONS...
Page 66: ...60 MOUNTING SPECIFICATIONS...
Page 67: ...61 MOUNTING SPECIFICATIONS...
Page 68: ...62 MOUNTING SPECIFICATIONS...
Page 69: ...63 MOUNTING SPECIFICATIONS...
Page 70: ...64 MOUNTING SPECIFICATIONS...
Page 71: ...65 MOUNTING SPECIFICATIONS...
Page 72: ...66 MOUNTING SPECIFICATIONS...
Page 73: ...67 MOUNTING SPECIFICATIONS...
Page 74: ...68 MOUNTING SPECIFICATIONS...
Page 75: ...69 MOUNTING SPECIFICATIONS...
Page 76: ...70 MOUNTING SPECIFICATIONS...
Page 77: ...71 MOUNTING SPECIFICATIONS...
Page 78: ...72 MOUNTING SPECIFICATIONS...
Page 79: ...73 MOUNTING SPECIFICATIONS...
Page 80: ...74 MOUNTING SPECIFICATIONS...
Page 81: ...75 MOUNTING SPECIFICATIONS...
Page 82: ...76 MOUNTING SPECIFICATIONS...
Page 83: ...77 MOUNTING SPECIFICATIONS...
Page 84: ...78 MOUNTING SPECIFICATIONS...
Page 85: ...79 MOUNTING SPECIFICATIONS...
Page 86: ...80 MOUNTING SPECIFICATIONS...
Page 87: ...81 MOUNTING SPECIFICATIONS...
Page 88: ...82 MOUNTING SPECIFICATIONS...
Page 89: ...83 MOUNTING SPECIFICATIONS...
Page 90: ...84 MOUNTING SPECIFICATIONS...
Page 91: ...85 MOUNTING SPECIFICATIONS...
Page 92: ...86 MOUNTING SPECIFICATIONS...
Page 93: ...87 MOUNTING SPECIFICATIONS...