background image

Mask: The default Mask address is 255.255.255.0. Normally, it  can keep 

unchanged. To modify it, click the setting  box twice, a keypad  will pop 

up for entering new Mask  address. 

Gateway:  The  Gateway  in  one  system  must  be  in  the  same  segment. 

DNS: It refers to name resolution address (DNS of local operator). If the 

indoor  monitor  is  used  in  external  network,  the  address  must  be 

completed correctly; if it is used in internal network, the address  can be 

ignored. 


7.7.2


Room 

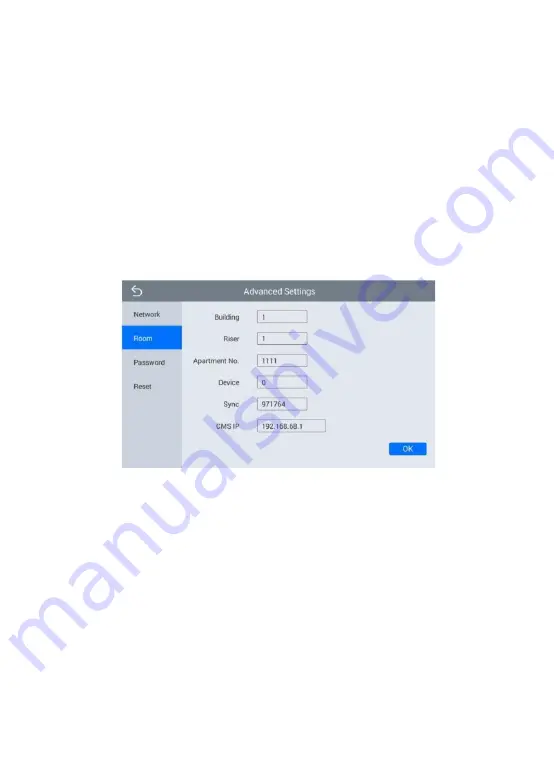
Click “Room” icon, the system will enter into the following interface:


Warning: Please revise Sync No.(6 digits) as soon  as  possible  after you 

read  the  user  manual.  The  Sync  No.  of  all  indoor  monitors  in  one 

household must be the same. 
Input the 3-digit Building No. such as 001, and then click 

“OK” to


finish the building No. setting. 

The setting method of Riser No., Apartment No., Device No., CMS IP and 
Sync No. is the same as the one of Building No..  When Device  No. is set 

to be 0, the indoor monitor is regarded as the main; when Device No. is 

set from 1 to 5, the monitor is regarded as the sub1 to sub5. 

Summary of Contents for VT07-B22L

Page 1: ...User Manual VEX B21L USER MANUAL VT07 B22L April 2023...

Page 2: ...only for reference If there is any difference please take the actual product as the standard The product and batteries must be handled separately from household waste When the product reaches the end...

Page 3: ...al Parameters 1 Pictures 2 Operations 7 1 Security 8 2 Smart 14 3 Intercom 17 4 Message 20 5 Setup 20 Web Settings 23 System Configuration 25 System Diagram 29 Installation 31 Troubleshooting 34 Safet...

Page 4: ...ication Optional 2 Operating system Linux Technical Parameters Voltage DC 12V POE VT07 B22L VT07 B23L VT10 B21L Rated power 9W 12W VT7 B22L Switch with Dual RJ45 Ports Standby power consumption 1 5W 3...

Page 5: ...Pictures Model VT10 B21L Speaker 10 1 capacitive touch screen Microphone Model VT07 C23L 7 capacitive touch screen Speaker Handsfree Reserved Calling management center Monitoring Unlocking Microphone...

Page 6: ...Indoor monitor doesn t support the connection with external camera audio extension WIFI Bluetooth external USB and TF storage card Standard indoor monitor doesn t include RS485 communication function...

Page 7: ...to check and call contacts 3 SOS Click to make a direct emergency call to Master Station 4 Lift control Click to summon the elevator to go up or down Click Permit inside of it to release the floor but...

Page 8: ...stem will enter into the following interface When the call is answered the system will enter into call state 1 If there is a camera the caller s image will be displayed on the screen 2 When the call i...

Page 9: ...or station or secondary door station calls the indoor monitor will ring when door station calls indoor monitor the image from door station will be displayed on the indoor monitor if there is no answer...

Page 10: ...type of door station Click icon Click to start monitoring 2 Click icon Click icon to select the type of door stationClick to start monitoring During monitoring click icon to unlock the door Remark Th...

Page 11: ...stalled on the computer which is usually located at guard center Up to 64 records can be received in SMS 4 Security Click Security icon on the main interface the system will enter the following interf...

Page 12: ...user password the default password is 1234 to disable the alarm under alarm ON status 4 2 Zone Remark the settings should be made when alarm is OFF Click Zone icon and input 1 16 digits password the d...

Page 13: ...setting it will show the following interface with selections 0s 5s 15s 20s 25s 40s or 60s as the desired delay time For example select the delay time 5s Once the alarm sensor is triggered the indoor m...

Page 14: ...to Alarm OFF To set the sensor of alarm stations you can click the corresponding station with icon Click Activation Time to select the corresponding time The options of activation time include NONE 3...

Page 15: ...in interface the system will enter the following interface Click icon to call master station the system will call master station No 1 No 5 successively If the master station cannot be searched or call...

Page 16: ...lease follow the operations as below 1 Click icon to select the camera Click icon Click to start monitoring 2 Click icon Click icon to select the camera Click to start monitoring Remark The system s d...

Page 17: ...er Ring Vol Intercom Vol and Ringtone can be set 7 3 Date Time Click Date Time icon the system will enter into the following interface This interface can set Auto Date Time Zone 12H 24H Date Format an...

Page 18: ...e can be switched 7 5 Devices Click Devices icon the system will enter into the following interface The device information can be viewed 7 6 Version Click Version icon the system will enter into the f...

Page 19: ...digits password the default password is 123456 to make the following settings 7 7 1 Network Click Network icon the system will enter into the following interface After using the DHCP the router will a...

Page 20: ...the address can be ignored 7 7 2 Room Click Room icon the system will enter into the following interface Warning Please revise Sync No 6 digits as soon as possible after you read the user manual The S...

Page 21: ...e following interface You can set the new system password with 1 16 digits the default password is 123456 System password is used for system settings 7 7 4 Reset Click Reset icon the system will enter...

Page 22: ...d is 123456 to enter into the web setting interface Main page is used for showing firmware version and the status of SIP registration 1 Network Network page is used for setting up network of device he...

Page 23: ...room number devices Indoor Monitor 0 9 Outdoor Station 1 9 Sync type in same numbers to make same room number Indoor Monitors ring together Server Password server is the IP of CMS and password is the...

Page 24: ...ibility features Ex Phone add other brand s IP Phone as SIP extension 4 devices supported Auto Pickup pick up automatically when receiving a call ONU Pass if using optical cable but not network cable...

Page 25: ...thers Others page is used for reboot Reboot click to reboot the device 6 Logout Logout page is used for signing off User Logout click to logout the webpage After that you can use other accounts to log...

Page 26: ...System Configuration...

Page 27: ...AL2 AL3 AL4 AL5 AL6 AL7 AL8 VT07 B22L Switch with Dual RJ45 Ports 1 Power Power input interface connects with 12V power adapter DC 12V Power 12V Power 12V 1 2 12V GND 1 2 3 4 12V GND 485 485 1 2 3 4...

Page 28: ...d 8 should connect with GND of power interface Network 3 RS485 Connect with RS485 interface device RS485 interface can output 12V 100mA power supply If RS485 equipment to be connected doesn t require...

Page 29: ...Installation Model VT10 B21L Built in box Screws Size 270 168 15mm Model VT07 C23L Built in box Screws Size 235 145 19 5mm...

Page 30: ...16 5mm Installation Instructions 400 500mm Suggestion During the installation the camera should be 1450 1550mm above the ground The camera tether for photographing human face should be the top priori...

Page 31: ...annot be played normally Check whether the system supports the file format Please refer to multimedia setting for details No response when clicking indoor monitor displayscreen Press Unlock button for...

Page 32: ...r cause the impact Do not use the power supply without the manufacturer s approval Do not have the liquids such as water go into the device Clean Device Surface Clean the device surfaces with soft clo...

Page 33: ......

Reviews: