background image

EFace10


User Manual 

P a g e

 | 12 


 Copyright©2021 ZKTECO CO., LTD.  All rights reserved. 


1:1 Facial Verification  

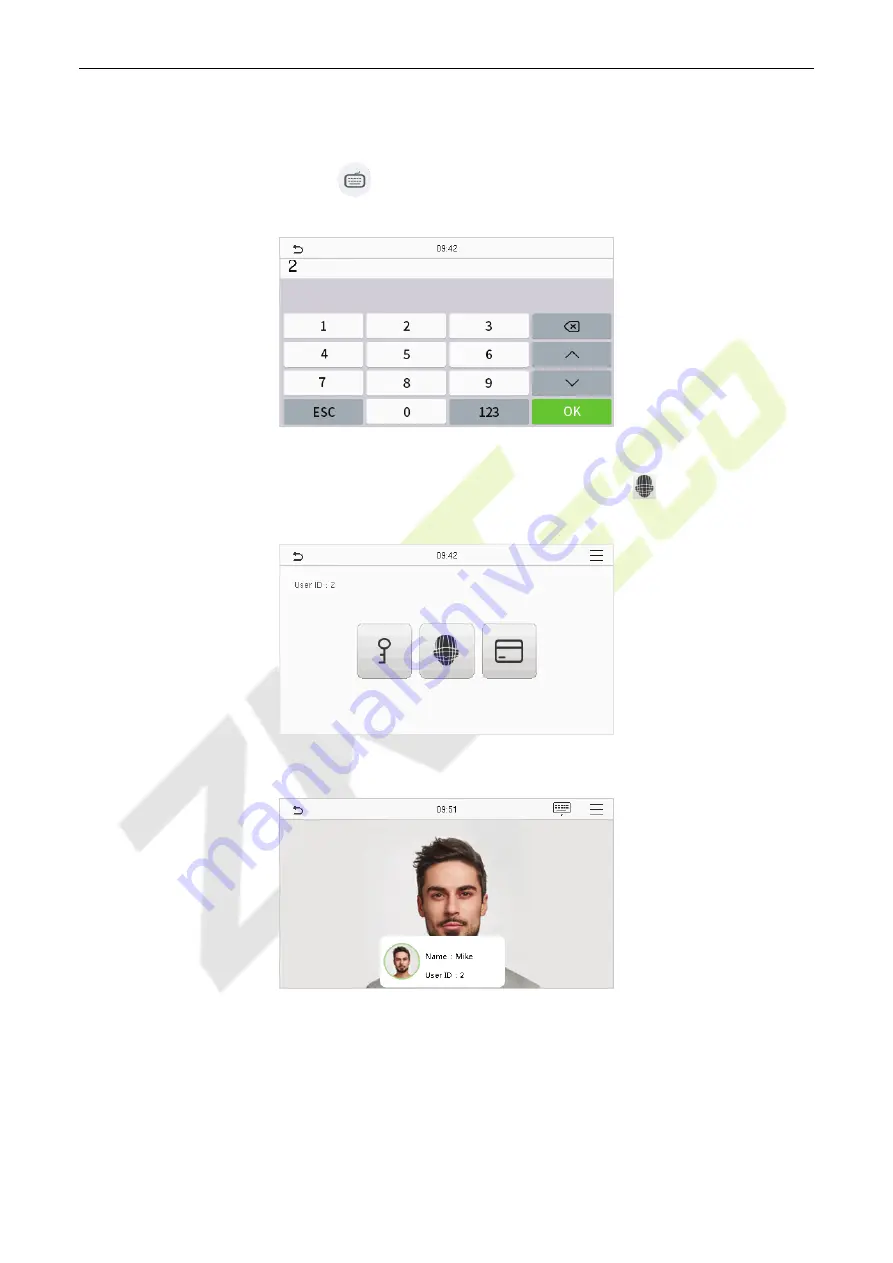
In this verification mode, the device compares the face captured by the camera with the facial template 
related to the entered user ID. Press            on the main interface and enter the 1:1 facial verification mode 
and enter the user ID and tap [

OK

]. 


If the user has registered password and card in addition to his/her face, and the verification method is set 
to password/face/card verification, the following screen will appear. Select the       icon to enter the face 
verification mode. 


After successful verification, the prompt box displays "

Successfully verified

", as shown below:  


If the verification is failed, it prompts “

Please adjust your position!

”. 


Summary of Contents for EFace10

Page 1: ...Please read the instructions carefully before operation Follow these instructions to ensure that the product is functioning properly The images shown in this manual are for illustrative purposes only...

Page 2: ...e design and that the said personnel have received thorough training in operating and maintaining the machine unit equipment It is further essential for the safe operation of the machine unit equipmen...

Page 3: ...ement better operations of the machine unit equipment and such amendments shall not give any right to claim any compensation or damages under any circumstances ZKTeco shall in no way be responsible i...

Page 4: ...iometric verification procedures and the productization of biometric verification SDK which was initially widely applied in PC security and identity authentication fields With the continuous enhanceme...

Page 5: ...on Button or key names for devices For example press OK Window names menu items data table and field names are inside square brackets For example pop up the New User window Multi level menus are separ...

Page 6: ...5 4 COMBINED VERIFICATION 15 2 MAIN MENU 17 3 USER MANAGEMENT 18 USER REGISTRATION 18 3 1 3 1 1 USER ID AND NAME 18 3 1 2 USER ROLE 18 3 1 3 FACE 19 3 1 4 CARD 19 3 1 5 PASSWORD 20 3 1 6 USER PHOTO 2...

Page 7: ...AD OPTIONS 46 10 3 11 ATTENDANCE SEARCH 47 12 WORK CODE 48 ADD A WORK CODE 48 12 1 ALL WORK CODES 49 12 2 WORK CODE OPTIONS 49 12 3 13 AUTOTEST 50 14 SYSTEM INFORMATION 51 15 CONNECT TO ZKBIOSECURITY...

Page 8: ...vice Disconnect the system from the main AC or DC power source and refer service personnel under the following conditions When cord or connection control is affected When any liquid is spilled or an i...

Page 9: ...and Standing Posture 1 1 The recommended distance Recommended Standing Posture and Facial Expression Standing Posture Facial Expression NOTE During enrolment and verification please maintain natural...

Page 10: ...to cover the eyes or eyebrows Do not wear hats masks sunglasses or eyeglasses Be careful not to display two faces on the screen Register one person at a time It is recommended for a user wearing glas...

Page 11: ...u functions NOTE For the security of the device it is recommended to register super administrator the first time you use the device The punch state options can also be displayed and used directly on t...

Page 12: ...ess 123 to switch to the numeric and symbolic keyboard Tap ABC to return to the alphabetic keyboard Tap the input box virtual keyboard appears Tap ESC to exit the virtual keyboard Verification Mode 1...

Page 13: ...and enter the 1 1 facial verification mode and enter the user ID and tap OK If the user has registered password and card in addition to his her face and the verification method is set to password fac...

Page 14: ...1 1 Card Verification The 1 1 Card Verification mode compares the card number in the card induction area with the number associated with the employee s User ID registered in the device Press in the m...

Page 15: ...d password with the registered password by the given User ID Click the button on the main screen to enter the 1 1 password verification mode Then input the user ID and press OK If the user has registe...

Page 16: ...fers the option of using multiple forms of verification methods A total of 9 different verification combinations can be used as shown below Combined Verification Symbol Definition Symbol Definition Ex...

Page 17: ...n an employee has registered only the face data but the device verification mode is set as Face Password the employee will not be able to complete the verification process successfully This is because...

Page 18: ...rs related to the system including Date Time Attendance Face Parameter Reset to factory and USB Upgrade Personalize To customize settings of User Interface Voice Bell Schedules Punch State Options and...

Page 19: ...cters 2 The user ID may contain 1 9 digits by default 3 During the initial registration you can modify your ID which can t be modified after registration 4 If a message Duplicated pops up you must cho...

Page 20: ...ed on the authentication method s that the super administrator has registered Please refer to1 5 Verification Mode 3 1 3 Face Tap Face in the New User interface to enter the face registration page Ple...

Page 21: ...ssword Tap Password in the New User interface to enter the password registration page On the Password interface enter the required password and re enter to confirm it and tap OK If the re entered pass...

Page 22: ...the screen and the camera opens up again to take a new photo after taking the initial photo NOTE While registering a face the system automatically captures a photo as the user photo If you do not regi...

Page 23: ...anagement Delete User 3 4 On the All Users interface tap on the required user from the list and tap Delete to delete the user or a specific user information from the device On the Delete interface tap...

Page 24: ...ZKTECO CO LTD All rights reserved Display Style 3 5 On the Main Menu tap User Mgt and then tap Display Style to enter Display Style setting interface All the Display Styles are shown as below Single L...

Page 25: ...e custom name of the role Then tap on Define User Role and select the required privileges to assign to the new role and then tap on the Return button During privilege assignment the Main Menu function...

Page 26: ...ce and the PC are connect to the same network segment Tap Ethernet on the Comm Settings interface to configure the settings Function Description Function Name Descriptions IP Address The default IP ad...

Page 27: ...to the PC software Tap PC Connection on the Comm settings interface to configure the communication settings Function Description Function Name Descriptions Comm Key The default password is 0 and can...

Page 28: ...d Tap on the required network from the searched network list Tap on the password field to enter the password and then tap on Connect to WIFI OK When the WIFI is connected successfully the initial inte...

Page 29: ...ts If the DHCP is enabled then the IP cannot be set manually IP Address The IP address for the WIFI network the default is 0 0 0 0 It can be modified according to the network availability Subnet Mask...

Page 30: ...DMS server Server Port Port used by the ADMS server Enable Proxy Server The IP address and the port number of the proxy server is set manually when the proxy is enabled HTTPS Based on HTTP transmissio...

Page 31: ...tem interface to set the date and time Tap Manual Date and Time to manually set date and time and tap Confirm to save Tap 24 Hour Time to enable or disable this format If enabled then select the Date...

Page 32: ...rved value ranges from 1 to 999999 minutes Camera Mode Choose whether to capture and save the current snapshot image during verification There are 5 modes No Photo No photo is taken during user verifi...

Page 33: ...attendance photos Users may disable the function or set a valid value between 1 and 99 Periodic Del of Blocklist Photo When block listed photos reach its maximum storage capacity the device automatica...

Page 34: ...rate and vice versa It is recommended to set the default value of 63 Face Enrollment Threshold During face enrollment 1 N comparison is used to determine whether the user has already registered before...

Page 35: ...as potential motion detection that wakes up the terminal from standby to the comparison interface The larger the value the more sensitive the system would be i e if a larger value is set the compariso...

Page 36: ...to restore the default factory settings USB Upgrade 6 5 With this option the device firmware can be upgraded by using the upgrade file on a USB disk Before conducting this operation ensure that the US...

Page 37: ...Name Description Wallpaper It helps to select the main screen wallpaper according to the user preference Language It helps to select the language of the device Menu Screen Timeout s When there is no o...

Page 38: ...e normal working mode This function can be disabled or set a value within 1 999 minutes Main Screen Style It helps selecting the main screen style according to the user preference Voice Settings 7 2 T...

Page 39: ...the bell status Bell Time Once the required time is set the device will automatically trigger to ring the bell during that time Repeat Set the required number of counts to repeat the scheduled bell Ri...

Page 40: ...ap Edit to edit the selected bell schedule The editing method is the same as the operations of adding a new bell schedule Delete a bell On the All Bell Schedules interface tap the required bell schedu...

Page 41: ...anual Fixed Mode After the punch state key is set manually to a particular punch status the function will remain unchanged until being manually switched again Fixed Mode Only the manually fixed punch...

Page 42: ...All rights reserved If the Shortcut key is set as a punch state key such as check in check out etc then it is required to set the punch state value valid value 0 250 name NOTE When the function is set...

Page 43: ...Data To delete attendance records conditionally Delete Attendance Photo To delete attendance photos of designated personnel Delete Blocklist Photo To delete the photos taken during failed verification...

Page 44: ...may select Delete All or Delete by Time Range when deleting the attendance records attendance photos or block listed photos When selecting Delete by Time Range you need to set a time range to delete a...

Page 45: ...Delay s The amount of time that the device controls the electric lock to be in unlock state Valid value 1 10 seconds 0 seconds represents disabling the function Door Sensor Delay s An alarm is trigge...

Page 46: ...Tap USB Manager on the main menu interface Download 10 1 Tap Download on the USB Manager interface Function Name Description Attendance Data To download attendance data in a specified time into a USB...

Page 47: ...evice You can choose Upload selected photo or Upload all photos The images will be displayed on the screen once uploaded Create a folder named wallpaper in the root directory of the USB disk and put t...

Page 48: ...attendance and blocklist photos is similar to that of searching for Attendance Record The following is an example of searching for Attendance Record On the Attendance Search interface tap Attendance...

Page 49: ...types the FFR terminal provides a parameter to indicate the corresponding work type for every attendance record to facilitate rapid understanding of different attendance situations during the handlin...

Page 50: ...work code is the same as adding a work code except that the ID is not allowed to be modified Work Code Options 12 3 To set whether entering the work code is a must and whether the entered work code mu...

Page 51: ...utomatically test the display of the LCD screen by displaying all the color bands including pure white and pure black to check whether the screen displays the colors accurately Test Voice To automatic...

Page 52: ...on Function Name Description Device Capacity Displays the current device s user storage password face and card storage administrators attendance records attendance and blocklist photos and user photos...

Page 53: ...server address 2 In the main menu click COMM Cloud Server Setting to set the server address and server port Server address Set the IP address as of ZKBioSecurity server Server port Set the server por...

Page 54: ...operation column a new window will pop up Select Icon type Area and Add to Level from each dropdown and click OK to add the device Add Personnel on the Software 15 3 1 Click Personnel Person New 2 Fil...

Page 55: ...our face and forehead properly and do not cover your face and eyebrows with your hair 5 It is recommended to show a normal facial expression A smile is acceptable but do not close your eyes or incline...

Page 56: ...lect light For persons with thick eyeglasses frames it is recommended to capture two images one with eyeglasses and the other one without them Face Complete face with clear contour real scale evenly d...

Page 57: ...3 As the provider of this device we will assume no direct or indirect responsibility for any consequences that may result from your use of this device 4 If you would like to dispute human rights or p...

Page 58: ...Name Hazardous Toxic Substance Element Lead Pb Mercury Hg Cadmiu m Cd Hexavalent chromium Cr6 Polybrominate d Biphenyls PBB Polybrominated Diphenyl Ethers PBDE Chip Resistor Chip Capacitor Chip Induct...

Page 59: ...India Pvt Ltd Global R D Centre Survey No 01 01 Outer Ring Road Mahadevpura Bengaluru Karnataka 560048 Phone 080 68281342 48 Email sales zkteco in Website www zkteco in Copyright 2021 ZKTECO CO LTD Al...

Reviews: