background image


8


Customer Helpline 

0871 226 2034

Step 2 (continued)

Assembly

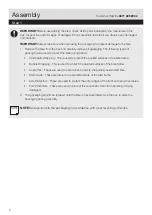
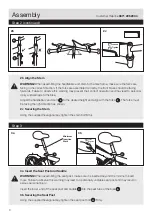
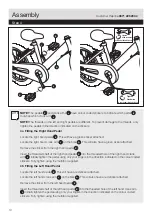
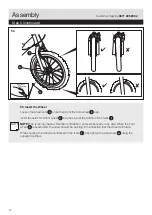
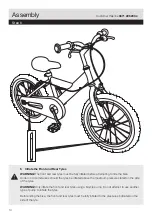
2b  Align the Stem

WARNING! 

When assembling the handlebars and stem to the bike frame, make sure the forks are 

facing in the correct direction. If the forks are assembled correctly, the front brake should be facing 
forwards. Failure to observe this warning may prevent their correct operation and may lead to personal 
injury and damage to the bike.

Adjust the handlebars and stem 

B

 to the desired height and align with the forks      . The forks must 

be facing the right direction as shown.

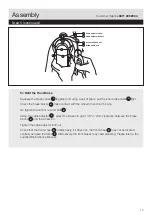
2c  Securing the Stem

Using the supplied hexagonal key, tighten the stem bolt firmly.

F

B

2b

2c

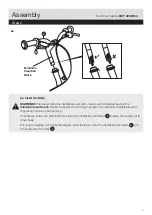
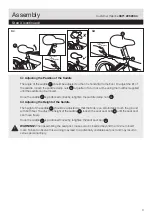
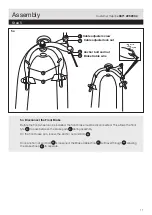
3a  Insert the Seat Post and Saddle

WARNING! 

When assembling the seat post, make sure it is inserted beyond the minimum insert 

mark. Failure to observe this warning may lead to a potentially unstable seat post and may result in 
serous personal injury.

Insert the lower end of the seat post and saddle 

C

 into the seat tube of the bike 

A

.

3b  Securing the Seat Post

Using the supplied hexagonal key, tighten the seat post bolt 

H

 firmly.

Step 3

C

A

H

3a

3b

90°

90°

F

Minimum 

Insertion 

Mark

Loosen

Tighten

Loosen

Tighten

Summary of Contents for 332/2228

Page 1: ...n that will help you get the best from your bike ensuring safe and correct maintenance If you need help or have damaged or missing parts call the Customer Helpline on 0871 226 2034 ZINC 16 inch Bike Dec 2011 Instruction Manual Important Please take time to read the instructions carefully 332 2280 332 2228 ...

Page 2: ...0871 226 2034 In the Box 5 Parts 5 Tools 5 Assembly 6 Step 1 6 Step 2 7 Step 3 9 Step 4 10 Step 5 11 Step 6 14 Riding Advice 15 Before Riding 15 Riding in Bad Weather 16 Riding in the Dark 16 Riding Using Personal Music Players 16 ...

Page 3: ...he forks are facing in the correct direction If the forks are assembled correctly the brakes should be facing forwards Failure to observe this warning may prevent their correct operation and may lead to personal injury and damage to the bike WARNING When assembling the handlebars and stem make sure it is inserted beyond the minimum insert mark Failure to observe this warning may lead to a potentia...

Page 4: ...of damage Do not assemble the bike if you observe any damaged components IMPORTANT Always take care when removing the packaging to prevent damage to the bike NOTE Always recycle the packaging in accordance with local recycling schemes NOTE The pedals and crank arms have colour coded stickers to indicate which pedal matches which Crank Arm NOTE The threads on the left and right pedals are different...

Page 5: ... the Box Parts Tools A Bike supplied with rear wheel assembled B Handlebar and stem C Seat post and saddle D Front wheel E Pedals supplied in separate box B E D C Multitool supplied in separate box Hexagonal key supplied in separate box A ...

Page 6: ...is used to protect the painted surfaces of the bike frame Bubble Wrapping This is used to protect the painted surfaces of the bike frame Cable Ties These are used to secure loose parts to the partially assembled bike Stem Caps These are placed in unprotected ends of the bike frame Axle Protectors These are used to protect the outer edges of the front and rear wheel axles Fork Protectors These are ...

Page 7: ...his warning may lead to a potentially unstable bike and may result in serious personal injury If necessary loosen the stem bolt at the top of the handlebars and stem B to allow the wedge nut to move freely Ensuring the wedge nut is correctly aligned insert the lower end of the handlebars and stem B into the head tube of the bike A Step 2 Assembly A B 2a Minimum Insertion Mark ...

Page 8: ... with the forks The forks must be facing the right direction as shown 2c Securing the Stem Using the supplied hexagonal key tighten the stem bolt firmly F B 2b 2c 3a Insert the Seat Post and Saddle WARNING When assembling the seat post make sure it is inserted beyond the minimum insert mark Failure to observe this warning may lead to a potentially unstable seat post and may result in serous person...

Page 9: ... nuts G 3d Adjusting the Height of the Saddle The height of the saddle C should be adjusted so that the Rider can comfortably touch the ground with both feet To adjust the height of the saddle C loosen the seat post bolt H until the seat post can move freely Once the saddle C is positioned correctly retighten the seat post bolt H WARNING When assembling the seat post make sure it is inserted beyon...

Page 10: ...al E into the threaded hole of the right hand crank arm J Initially tighten the pedal using only your fingers in the direction indicated on the colour coded stickers Fully tighten using the multitool supplied 4b Fitting the Left Hand Pedal Locate the left hand pedal E This will have a red sticker attached Locate the left hand crank arm J on the bike A This will also have a red sticker attached Rem...

Page 11: ...his allows the front tyre to pass between the brake pads during assembly On the front brake arm loosen the anchor nut and bolt K P L M N O Cable adjuster lock nut Cable adjuster screw Anchor bolt and nut Brake Cable wire Once anchor nut and bolt is loosened the Brake Cable Wire will travel through allowing the brake shoes to seperate N N O N P K D Loosen Tighten ...

Page 12: ... front wheel D into the slots at the bottom of the forks F NOTE The tyres may have a Direction of Rotation arrow embossed on the side When the front wheel D is assembled the arrow should be pointing in the direction that the wheel will rotate While ensuring the wheel is centralised in the forks F fully tighten the wheel nuts Q using the supplied multitool NOTE Loosen Tighten ...

Page 13: ...r adjust the brakes to give 1 16 or 2mm clearance between the brake blocks and the wheel rim Tighten the cable adjuster lock nut Check that the front wheel D rotates freely If it does not the front wheel D may not be located centrally between the forks F Alternatively the front brakes may need adjusting Please refer to the supplied Maintenance Manual Step 5 continued Assembly P K K L N O K P Cable...

Page 14: ... Under no circumstances should the tyres be inflated above the maximum pressure stated on the side of the tyres WARNING Only inflate the front and rear tyres using a bicycle pump Do not attempt to use another type of pump to inflate the tyres Before riding the bike the front and rear tyres must be fully inflated to the pressures indicated on the side of the tyre Step 6 ...

Page 15: ...f the left and right pedals tighten in different directions 4 Do the Brakes Work Stand next to the bike and apply the front brake and push forwards If the wheels move the front brake may not be working correctly If required adjust the front brake as described in the Maintenance Manual Repeat the above check for the rear brake 5 Do the Handlebars Move Hold the front wheel between your legs and try ...

Page 16: ... be seen from a distance WARNING Always take extra care when riding in wet foggy windy or icy conditions The brakes may not be as effective and the braking distances may be increased When riding in bad weather i e wet foggy windy or icy always wear bright reflective clothing which is warm and waterproof You should always give other road users clear signals in plenty of time particularly when appro...

Page 17: ... fully These instructions contain important information that will help you get the best from your bike ensuring safe and correct maintenance If you need help or have damaged or missing parts call the Customer Helpline on 0871 226 2034 ZINC 16 inch Bike ...

Page 18: ...t Brake Cable wire L M N O Loosen Tighten 1a Check the brake blocks make contact with the wheel rim and not the tyre Re tighten the anchor nut and bolt Using the cable adjuster adjust the brakes to give 1 16 or 2mm clearance between the brake blocks and the wheel rim Tighten the cable adjuster lock nut Check that the front wheel D rotates freely If it does not the front wheel D may not be located ...

Page 19: ...he wheel hub the centre of the wheel the bearings may be worn Repairing bearings requires specialist tools It is recommended that all bearings are repaired by qualified bike repair technicians Contact your local retailer for more information on bearing repairs R R her It is essential that you regularly inspect and maintain your wheels especially if your bike becomes unstable or vibrates while ridi...

Page 20: ... to trap the inner tube between the tyre levers and the wheel Insert a tyre lever between the wheel rim and the tyre wall Pull downwards on the tyre lever and hook onto the nearest spoke Insert and secure the remaining two tyre levers at suitable points around the wheel rim NOTE Do not leave too much space between tyre levers as the tyre may prove difficult to remove If it is not possible to fully...

Page 21: ...tter i e thorns or small stones Partially inflate the inner tube using a bicycle pump Carefully feed the inner tube into the tyre starting with the valve The valve must be repositioned through the appropriate hole in the wheel rim 1d Refit the Tyre to the Wheel Rim Using the thumb of one hand refit the tyre to the wheel rim a small section at a time When the tyre is too tight to fit by hand use th...

Page 22: ...nflated correctly Are the pedals tight Do the brakes work Do the handlebars move Is the bike clean Check that the bike is clean and suitably lubricated Check that all parts of the bike are securely fitted Check that the tyres are in good condition Check that the wheel spokes are tight Check the frame and forks for signs of damage Check that the wheels are running true Check the condition of the br...

Page 23: ...eel between your legs and try to move the handlebars If the handlebars move the stem bolt may have become loose Re tighten the stem bolt 6 Is the Bike Clean The bike should be cleaned and re oiled regularly to ensure it operates correctly You should perform the following checks once a month or after long rides 1 Check that the bike is Clean and Suitably Lubricated Thoroughly clean and degrease you...

Page 24: ...y qualified bike repair technicians Contact your local retailer for more information on wheel repairs 1 Check the Frame and Forks for Signs of Damage Thoroughly check all the external surfaces of the frame for signs of damage This may include cracks dents or bent mounting points If the frame damaged do not attempt to ride the bike until it has been inspected by a qualified bicycle technician 2 Che...

Reviews: