background image

PhySys Edition SD Service Manual

Rev. B 

20.08.2013

Page 32/52 

Service Manual PhySysSD_RevB_20.08.2013.doc

8.3.1.2. Mounting the rear part of housing 

Before closing the housing always check the following: 

¾

All boards and all other components are fastened in place 

¾

All connectors are fixed and plugged 

¾

No loose parts (such as screws) in the housing 

¾

Place the rear part of housing onto the lower part of housing and fix the cover to the front part by using the 
4 Screws  (PT Ejot 3,0x8mm) 

¾

Screw the 5 Screws  (Allen cylinder screws M4x10mm) located at the bottom of the device (lower part of 
housing) 

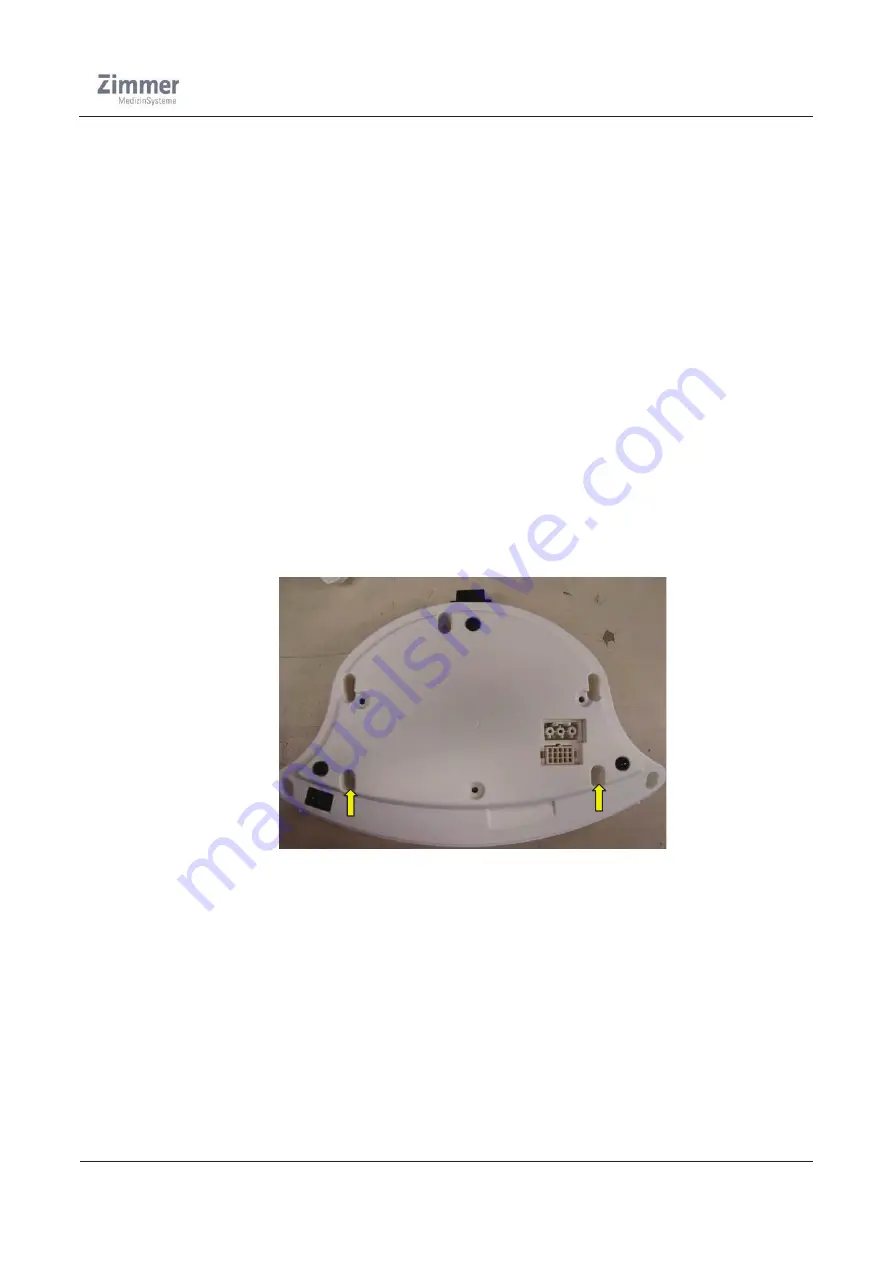
8.3.1.3. Removing of the front part of housing  

¾

Opening the rear part of housing (see 8.3.1.1) 

¾

Remove the 2x Allen cylinder screws (M4x10mm) located at the bottom of the device (lower part of 
housing) 

¾

Disconnect the connecting cables from the mainboard 

¾

Now remove carefully the front part of housing from the lower part and place it forward 

Figure 20 

Before mounting the housing always check the following: 

¾

All boards and all other components are fastened in place 

¾

All connectors are fixed and plugged 

¾

No loose parts (such as screws) in the housing 

Summary of Contents for SD Edition PhySys

Page 1: ......

Page 2: ...0 08 2013 Page 2 52 Service Manual PhySysSD_RevB_20 08 2013 doc Document history Rev Date Change Originator A 01 02 2011 Initial Release R Alareki B 20 08 2013 Correction layout device name incorporation description software update F Bechtold ...

Page 3: ...02 18 6 2 2 9 Water level sensor connection ST1202 18 7 Software 19 7 1 Installation programme update 19 7 1 1 Necessary tools 19 7 1 2 Download and Installation of the SD card update program 19 7 2 Processing the SD card update 23 7 3 Update the PhySys Edition SD 25 8 Mechanic 28 8 1 General Overview 28 8 1 1 Device Structure of the PhySys Edition SD 28 8 1 2 Device Structure of the Vaco device 3...

Page 4: ...0 2 Required Equipment 42 10 3 Starting Problems 43 10 4 Error Messages 44 10 4 1 General description 44 10 4 2 Master Processor 44 10 4 3 Slave Processor 46 10 4 4 Cable Control Problems 47 10 5 Problems without Error message 48 10 6 Test Run 49 10 6 1 PhySys Edition SD 49 10 6 2 VacoP 49 11 Service report 50 12 Safety check 51 12 1 PhySys Edition SD 51 12 2 VacoP device 52 ...

Page 5: ...o delivery options and technical features Contract service partners are responsible for all repairs that they conduct Screws that must be removed to open the housing are protected by a special warranty seal Only authorized persons are permitted to remove them If the seal is missing or has been manipulated the device will no longer be under warranty The information in the service documentation is t...

Page 6: ...iring Printed Circuit Boards Faulty boards must be repaired by the manufacturer only After replacing a module the faulty part must be labelled with the serial number of the device and returned to the manufacturer with the service report in chapter 11 4 Special incidents Zimmer MedizinSysteme is required to record malfunctions and incidents of any type Please report all unusual incidents e g electr...

Page 7: ...e of the housing The power switch is located at the right side of the lower part of housing The adjusting Knobs to set the output intensity are placed at the front part of the housing The device is operated by 2 actuators adjusting knobs and a touch screen All device functions are controlled by a microprocessor The device contains 2 galvanically separated stimulation current modules where the ultr...

Page 8: ...08 2013 doc Figure 2 Right view of PhySys Edition SD Figure 3 Left view of PhySys Edition SD Figure 4 Front view of VacoP device Figure 5 Rear view of the VacoP device Channel 2 Channel 1 Ethernet connection Ultrasonic connection Stimulating current connection Housing Water separator Pump PCB ...

Page 9: ... is the power supply board which contains a wide range switching power supply unit for a voltage range between 90V to 275V All device external connectors for the stimulating currents and ultrasonic therapy are also located on this board Several connecting cables realize the communication between these two boards The next figures show the various circuit sections and components on the main board Fi...

Page 10: ...PhySys Edition SD Service Manual Rev B 20 08 2013 Page 10 52 Service Manual PhySysSD_RevB_20 08 2013 doc Figure 7 Bottom view of the mainboard ...

Page 11: ...the power supply board Figure 9 bottom view of the power supply board Opening for the connecting cables for the vaco device Mains coil choke Ethernet section PCB section for Mainboard user User interface PCB section for Patient Ultrasonic PCB section for Patient stimulating current channel1 PCB section for Mains power PCB section for patient stimulating current and US Channel 2 SD card connection ...

Page 12: ...channnel1 channel 2 and for the User interface The generated voltages are as following listed A 200V DC 0 15A to generate the therapeutically currents and 15V 0 33A for the logical components of the channel 1 stimulating current ultrasonic A 200V 0 075A to generate the therapeutically currents and 15V 0 33A for the logical components of the channel 2 stimulating current only A 12V 1 7A for the use...

Page 13: ...PhySys Edition SD Service Manual Rev B 20 08 2013 Page 13 52 Service Manual PhySysSD_RevB_20 08 2013 doc Figure 10 Block diagram PhySys Edition SD ...

Page 14: ...sformer input voltage between 115V or 230V The low voltage part on the mainboard starts at the secondary side of the transformer which generates the necessary voltage of 12V for operating the pump and the valve Furthermore the required voltage of 5V for operating the pressure sensor and the water level sensor is directly achieved by connecting cable to the PhySys Edition SD device All device funct...

Page 15: ...onnection PhySys Edition SD VacoP SI1001 Pump fuse 1 25AT ST1203 Stimulating current connection PhySys Edition SD Vacoboard ST1204 Stimulating current connection VacoP mainboard suction electrodes ST1201 Connection of the VacoP user cable ADC_Press Levelsens Pump Valve GND V 12V EXT und 5V 0 5 ST1202 Connection of the water level sensor cable ST1502 Connection of the valve cable BU1401 Connection ...

Page 16: ...ion SD Service Manual Rev B 20 08 2013 Page 16 52 Service Manual PhySysSD_RevB_20 08 2013 doc 6 2 Pin Assignments 6 2 1 Overview PhySys Edition SD device Figure 12 Overview electric of the PhySys Edition SD device ...

Page 17: ..._CTRL Pin 12 VACO Detection Pin 13 5V 0 5 Pin 14 Cathode Float Pin 15 Anode Float 6 2 2 2 Power supply connection ST1001 Name Note 1 N blue 2 L brown 6 2 2 3 Jumper JP1001 JP1004 Name Note JP1001 and JP1002 For 230V power supply JP1003 and JP1004 For 115V power supply 6 2 2 4 VacoP User connection ST1201 Name Note 1 Pressure_Vaco 2 Vaco_Fluid_Level 3 VACO_Pump 4 VACO_Valve_ON 5 GND 6 12_CTRL 7 12V...

Page 18: ...rent connection ST1203 VacoP mainboard suction electrodes Name Note 1 Anode Float 2 Cathode float 3 Anode 4 Cathode 6 2 2 7 Pump connection BU1401 Name Note 1 12V 2 VACO_Pump 6 2 2 8 Valve connection ST1502 Name Note 1 12V 2 VACO_Valve_ON 6 2 2 9 Water level sensor connection ST1202 Name Note 1 Vaco_Fluid_Level 2 GND 3 5V 0 5 4 ...

Page 19: ...7 1 1 Necessary tools Windows XP 2000 Vista Windows7 PC with SD card reader 7 1 2 Download and Installation of the SD card update program Open the file from ftp server Open the folder Products Physys Edition SD Software Update ZI_Installation_Kit_PhysysSD ZIP file with double click Figure 1 Start the file Setup exe with double click Figure 2 Figure 2 ...

Page 20: ... asked to insert the password Figure 3 The password is zimmer small initial letter Figure 3 The Installation program starts automatically Please wait until you get the display as Picture 4 Please press Next to continue Figure 4 The Installation program change to Picture 5 Press again on Next to continue Figure 5 ...

Page 21: ...n is completed Figure 6 Close the installation by pressing Next key Figure 6 The Installation program has proceeded to the following Î It has installed the SD card update program on your computer Î It has placed an icon for the SD card update program onto your desktop The program can be started by simply double clicking the icon Figure 7 ...

Page 22: ...8 2013 doc Î It created a path C Program ZI_Installation_Kit_PhysysSD Figure 8 with under path C Programm ZI_Installation_Kit_OptonPro physyssd On this path you can find the Software for the SD card update program A further under path has also been created C Zimmer_Device PhysysSD_Data Figure 8 ...

Page 23: ...m automatically starts If not please start manually with double clicking the icon Figure 7 First remove the SD card from the PhySys Edition SD unit and insert it in the SD card slot of the computer Please enter the Serial number of the PhySys Edition SD unit from which you removed the SD card Figure 9 Picture 9 Start the data transfer by pressing the Start Data Transfer Figure 10 key Figure 10 ...

Page 24: ...e 24 52 Service Manual PhySysSD_RevB_20 08 2013 doc The program automatically searches for the SD card If it cannot be found a corresponding window appears Figure 11 Here you can select the SD card manually Figure 12 Confirm with Done Figure 11 Figure 12 ...

Page 25: ...rmation stored on the SD card into the path in the computer Î Then the necessary files for the update are saved onto the SD card Î When finished the information All done remove SD Card gets displayed Figure 13 Î You can now remove the SD card from the PC Figure 13 7 3 Update the PhySys Edition SD Open the setting and service menu Figure 14 ...

Page 26: ...PhySys Edition SD Service Manual Rev B 20 08 2013 Page 26 52 Service Manual PhySysSD_RevB_20 08 2013 doc Figure 15 Enter the password armin to get into the service menu Figure 16 ...

Page 27: ...Rev B 20 08 2013 Page 27 52 Service Manual PhySysSD_RevB_20 08 2013 doc Update DSP1 Update DSP2 Update Main CPU Figure 17 After installing the PhySys Edition SD start automatically and it appears the message Firmware update done 1 2 3 ...

Page 28: ...Service Manual Rev B 20 08 2013 Page 28 52 Service Manual PhySysSD_RevB_20 08 2013 doc 8 Mechanic 8 1 General Overview 8 1 1 Device Structure of the PhySys Edition SD Figure 13 Front part of housing 6 3 4 9 2 5 8 7 10 1 ...

Page 29: ...PhySys Edition SD Service Manual Rev B 20 08 2013 Page 29 52 Service Manual PhySysSD_RevB_20 08 2013 doc Figure 14 lower part of housing Figure 15 Rear part of housing 11 13 14 15 18 17 16 19 12 ...

Page 30: ... Touch pin 8 Front part of housing 9 Adjusting knob 10 Adapter part for actuator 11 Power supply connector vaco 12 Rubber feet 13 Power inlet element 14 Lower part of housing 15 Power supply board 16 Connector for Vaco user acble 17 Isolation foil Transformer 18 Mains switch 19 Rear part of housing 8 1 2 Device Structure of the Vaco device Figure 16 Figure 17 Vaco housing Pump Water separator Boar...

Page 31: ...dules or parts in the device when working on an open device with the power cable plugged in Electrical cables and wires may have a voltage up to 120V 240 V Unplug power cable before opening and closing the device 8 3 1 Replacement of PhySys Edition SD components 8 3 1 1 Opening the rear part of housing Caution High voltage inside 1 Unplug power cable from power source 2 Unplug all cables from the ...

Page 32: ... PT Ejot 3 0x8mm Screw the 5 Screws Allen cylinder screws M4x10mm located at the bottom of the device lower part of housing 8 3 1 3 Removing of the front part of housing Opening the rear part of housing see 8 3 1 1 Remove the 2x Allen cylinder screws M4x10mm located at the bottom of the device lower part of housing Disconnect the connecting cables from the mainboard Now remove carefully the front ...

Page 33: ...rew PT EJOT 3 0x8 mm and remove the holder Now the speaker can be taken out and be changed After changing the speaker mount the cover see 8 3 1 2 Figure 21 8 3 1 6 Replacement of the main board Opening the rear part of housing see 8 3 1 1 Remove the front part of housing from the lower part see 8 3 1 3 Disconnect all cables from the main board Detach the main board from the distance bolts Therefor...

Page 34: ...bles from the main board Remove the mainboard from the distance bolts and take out of the isolation foil Unscrew the 4x distance bolts and place the display aside Place the new display on the front part and fix it by screwing the 4x distance bolts Fit the isolation foil into the front part and mount the mainboard again Connect all cables Mount the front part and rear part to the lower part of hous...

Page 35: ... 3 1 1 Remove battery using a screw driver see Figure 24 Insert the new battery After replacing the battery close the rear part of housing Connect the device to the power source and turn on the device In the maintenance window of the configuration menu set the current RTC Real time clock again and confirm these inputs Close the configuration window and restart the device again Figure 24 ...

Page 36: ...part of housing see 8 3 1 1 Now slide the power inlet out of the housing wall and disconnect the cable from the mains switch and the PE conductor from the power supply board After replacing the power inlet element insert it to their position at the housing and connect the new cable to the mains switch and power supply board Mount the rear part of housing Figure 25 ...

Page 37: ...front part of housing from the lower part Disconnect all cables from the power supply board Unscrew the 6 screws PT EJOT 3 0x8mm and take the board out Place the new board onto the lower part of housing and screw it by using the 6x screws Connect all cables again to the board Mount the front part and rear part to the lower part of housing Run a function check use the Safety check in chapter 12 Fig...

Page 38: ...er level sensor and valve from the board Detach the silicone tubes from the water separator Unscrew the 6x screws located at the bottom of the vaco housing Take the water separator out of the housing and place it aside Now place the water separator beside the housing and connect all cables to the board Place the new water separator onto the housing and screw it by using the 6x screws Attach the si...

Page 39: ... the silicone tube from the pump Now unscrew the 3x screws M4x40mm located at the bottom of the housing as shown in Figure 33 Demount the vibration absorber from the old pump and mount them into the new one Screw the new pump to the housing and connect the pump cable to the board Attach the silicone tube to the pump Mount the water separator again into the housing Run a function test see 10 6 2 Fi...

Page 40: ...ove the water separator 8 3 2 1 Remove the pump 8 3 2 2 Unplug all connectors and use a gripper to compress the 5 bracket clips at the plastic stand offs and remove the PCB Now mount the new PCB onto the brackets and connect the power supply cable vaco to the board Mount the pump Mount the water separator Run a function test see 10 6 2 Figure 34 ...

Page 41: ... 2x 0 2AT 100 120V device 2x 0 4AT 230 240V device Protection class PhySys Edition SD IEC 601 1 Class 1 Type BF Protection class VacoP IEC 601 1 Class 2 Type BF MDD MPG PhySys Edition SD Class IIa MDD MPG VacoP Class IIa Housing dimensions PhySys Edition SD HxWxD 300mmx350mmx200mm VacoP 322mm x 234mm x 260mm Weight PhySys Edition SD 3 8 Kg VacoP 2 2 Kg Transport The device should only be shipped i...

Page 42: ...on of the DSPs are monitored by a watchdog It monitors the program operation and initiates a processor reset in the event of malfunction such as an endless loop Safety Note Do not touch modules or parts in the device when working on an open device with the power cable plugged in Electrical cables and wires may have a voltage up to 120V 240 V Unplug power cable before opening and closing the device...

Page 43: ...act the Service department of Zimmer MedizinSysteme In case of a dark background on the display check the backlight cable Therefore open the rear part of housing chap 8 3 1 1 and check if the backlight cable is correctly attached After reattached the cable mount the rear part of housing and connect the power cable and switch on the device If the above measures are not successful please contact the...

Page 44: ...ror description Zimmer internal use only 10 4 2 Master Processor Error Error code xxxxx Description Error Error code xxxxx Description 1001 general error 1014 An unexpected watchdog reset occurred 1002 Cancel the Sreen or Popup 1015 Stack boundary violation 1003 illegal case state in graph 1016 an exception has occurred 1004 illegal action state in graph 1017 A timeout has occurred 1005 Value was ...

Page 45: ...reading file 1125 failed to create directory the given path is not a directory 1082 error while writing file 1126 failed to create directory 1083 can t erase file 1130 attempt to set illegal parameter 1084 can t find file 1131 crc in rx telegram failed 1085 not enough memory to store file 1132 nack from dsp 1086 error in file structures 1133 rx or tx queue overflow 1087 file checksum error file co...

Page 46: ...ture 19 illegal or incomplete US parameter set cannot start therapy 60 EM overcurrent detected by SW in fast context 20 selftest 200V supply too low 61 EM overcurrent detected by HW 21 selftest 1 5V supply 62 EM CC high Zload cable break 22 selftest ImVolt not 0 though switched OFF 63 EM CV high Zload 23 selftest ImCurr not 0 though switched OFF 64 EM CV low Zload short circuit 24 selftest ImVolt ...

Page 47: ...otloader there is no Application in FLASH 95 Idle Task 104 a supervised variable s value is out of range 96 watchdog test failed 105 105 the firmware is running on the wrong hardware EM US 97 there was an unexpected reset by external watchdog 98 there was an unexpected reset by internal watchdog 10 4 4 Cable Control Problems When increasing the current to the patient the message Cable control appe...

Page 48: ... the Pulsation modus in the therapy window If it possible to set the therapy pressure on a higher level but not possible to relieve the pressure that means that the valve is defective or the valve connection at the main board is not correctly plugged The pump does not stop running even the vacuum at the suction cups already reached The pressure level on the vacuum panel is still at minimum Check i...

Page 49: ...The device must be visually inspected loose parts plug connector etc A safety check must be performed see chapter 12 2 10 6 2 VacoP The following is required after each VacoP repair module replacement The device must be visually inspected loose parts cable fixation plug connector silicone tube Jumper fuses etc A test run with a therapy time of 15 minutes must be carried out A safety check must be ...

Page 50: ... signature Customer Information Customer Date Description of fault Occurrence of fault once several times frequent always Under the following conditions after switching on with a warm device during treatment after minutes Other Special environmental conditions Humidity Temperature Power connection Other Prior repairs and installed spare parts name serial number Other notes ...

Page 51: ...x 500PA O ok Patient leakage current ultrasonic head max 100PA O ok Patient leakage current 1st error ultrasonic head max 500PA O ok Function test Cable control both channels O ok LCD display O ok Touch screen O ok Actuator O ok Speaker O ok Therapy clock O ok Device test Program GA01 80mA eff 15 Ch 1 mA Ch2 mA Note The accuracy of the measuring equipment must be 5 A patient cable must be grounded...

Page 52: ...e current 1st error max 500PA O ok Patient leakage current channel 1 max 100PA O ok Patient leakage current 1st error channel 1 max 500PA O ok Patient leakage current channel 2 max 100PA O ok Patient leakage current 1st error channel 2 max 500PA O ok Function test Communication VacoP with PhySys Edition SD Vacuum Panel on the therapy window O ok Device test Stimulation current channel1 with suctio...

Reviews: