CHARGING THE BATTERY
1. Remove the battery from the PDU by unclipping the male and female white clips. Then remove the
battery from the storage compartment by pulling the tag attached to the battery.
2. Connect the battery to the PDU battery charger by attaching the charger to the battery lead. A
steady red light will appear on the charger indicating that the battery is charging.
3. When the battery is completely charged, the light will change to blue. Normal charge time is ap-
proximately 3 hours.
4. The battery can then be placed into the PDU (Note: A fully charged battery will provide approxi
-
mately 6 hours of use).
5. When the battery has almost lost its charge, the drying unit LED will change from green to red and
an audible alarm will sound. At this point the battery MUST be removed and charged to avoid the
potential shortening of the battery’s lifespan.
OPERATION ON AC POWER
1. Remove the battery from the PDU (see “Charging the Battery” section above).
2. Plug the AC adapter lead into the socket on the front of the PDU and connect to AC power (Note:
If the battery is not removed from the PDU prior to connecting to AC power, it will only charge while
the PDU is switched OFF, but the connection of battery to the PDU while on AC power is not rec-
ommended).
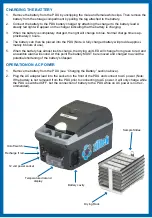
12 volt power socket
On/off switch
Temperature dial and
display
Battery cavity
Recharge if red
Drying Rack
Sample Slides


