background image

[email protected] 

17

 / 

59


6.1.2Local Access via Web Browser


Run the search tool and click “Next” to search cameras on the LAN. After the device is found 

and listed in the search result window, double click on the device item to open a web browser 

for viewing the camera on computer. If Microsoft Edge pops up as default browser, go to 

“More”->”Open with Internet Explorer” for normal viewing. 

Or you can open the web browser first, put the IP address and port number of the camera in 

the URL blank of the browser by manual to login your camera. 

For example: http://192.168.1.147:80. 

The IP Address and HTTP port number of the camera are displayed on the list of the Search 
Tool. Usually the default HTTP port No. is 80. 


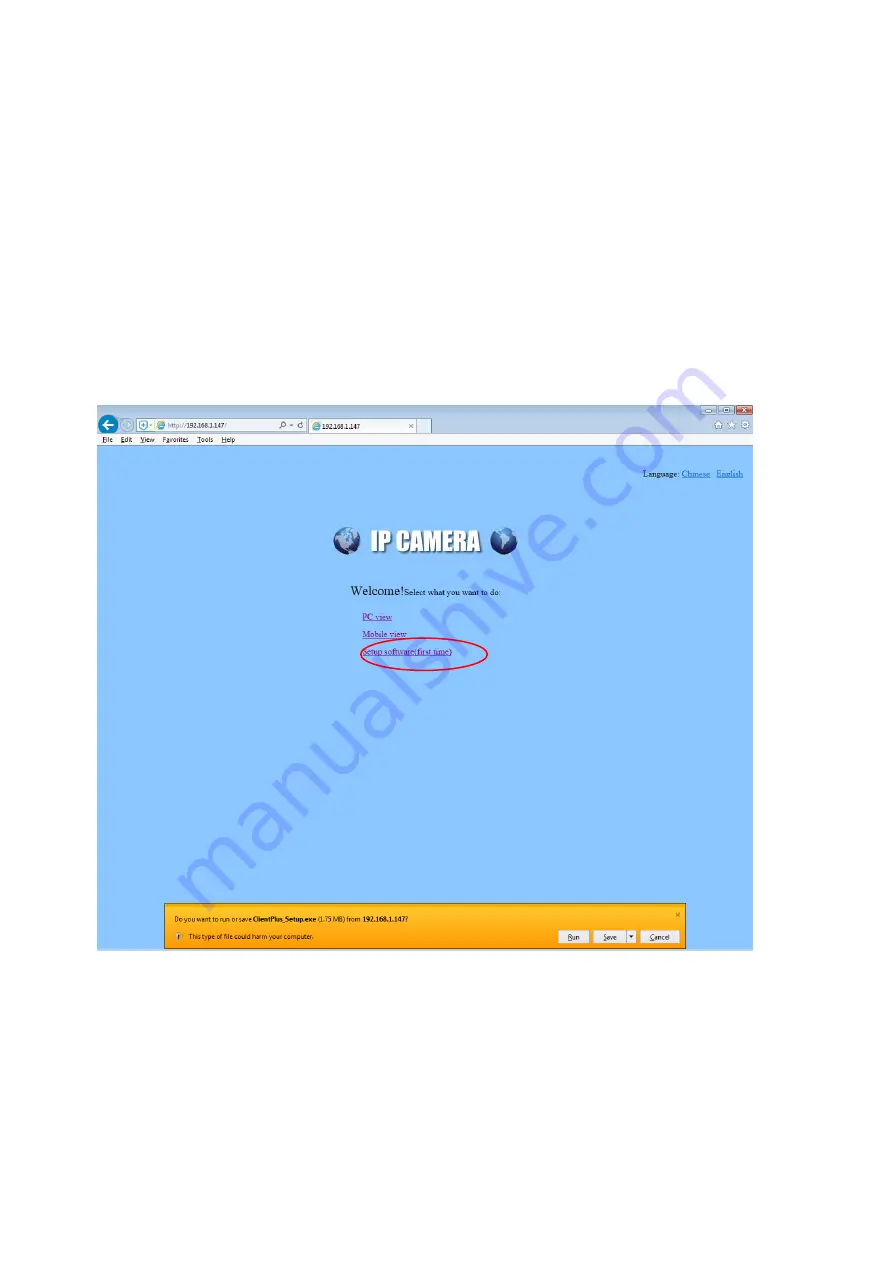
When opening the camera’s interface, the browser like IE on Windows OS will prompt you to install 
a plugin. The plugins are necessary to get videofrom camera.  


Click the button “install” to download and install the plugin. If the browser prompts you to allow the 
plugin to work on the computer, click “Allow” to ensure the plugin can run successfully.  

Then the camera is now successfully set up for live viewing, playback and configuration!


Summary of Contents for DH46H-2MP-W

Page 1: ...r other advanced software settings such as Motion Detection Email Alarm FTP Settings please find corresponding instruction in the User Guide included in the CD We much appreciate if you can contact us...

Page 2: ...mputer 15 6 1 1 Search Tool for Windows OS 15 6 1 2 Local Access via Web Browser 15 6 1 3 Remote Web Access 19 6 2 NVR access 21 6 3 RTSP access 21 6 4 Camera List Page 22 6 5 Live View Page 23 6 6 Ca...

Page 3: ...34 7 2 6 Preset 35 7 3 SD Card 35 7 4 Capture 35 7 5 Record 35 7 6 Playback 36 7 6 1 Playback tool bar 36 8 Settings 37 8 1 Media Settings 37 8 1 1 Video 37 8 1 2 OSD set 38 8 1 3 Image 38 8 1 4 Audi...

Page 4: ...tion 53 8 5 4 System Log 55 9 Frequently Asked Questions 56 9 1 How to start the live view in computer by web browser 56 9 2 How to install the plugin for IE browser in Windows OS 56 9 3 How to instal...

Page 5: ...on chapter 2 or PC installation on chapter 3 after completing first step on hardware installation Hardware installation Mount the Wi Fi antenna and make it stand vertically Connect the camera s DC soc...

Page 6: ...mart Phone Installation Method This camera can only connect to 2 4 GHz Wi Fi networks so please ensure that your phone is connected to the same2 4 GHz Wi Fi network if the router is dual band Download...

Page 7: ...p the mobile phone connected to WiFi the camera will have a WiFi Hot Spot which name is IPCXXXXX and the password is 01234567 connect your phone to this WiFi click add camera Search Camera From LAN it...

Page 8: ...upport zilink cn 8 59 Click the Setting icon to set the camera to connect your Wireless Router Click Wi Fi Setting Wi Fi MANAGER Select your Wireless Router SSID input the password to finish the setup...

Page 9: ...to delete the camera View the video After add the camera for a few seconds waiting the camera connected successfully when prompt online instructions it means you can view the camera video now Camera...

Page 10: ...e button install following the messege for plugin installation After successfully installing the plugin you will be back to login window again Please re enter the username and password for login For s...

Page 11: ...t from LAN IP of wired connection That is why we need to refresh the Search Tool to research the camera in wireless connection mode Remote Access Settings via Web Browser You needn t do any additional...

Page 12: ...the access link of the cameravia internet would be http 22 123 66 168 88 Note If the WAN IP Camera port link of the camera does not work it is probably caused the UPNP settings You should access to yo...

Page 13: ...a helpful tool for the installation and operation of your camera For access to other support information please contact us for further details Important Security Warnings In order to keep your camera...

Page 14: ...make your experience with the our camera easy and simple we ve provided multiple ways to set up view and operate your camera as on your needs Please set up your camera in the way that works best for...

Page 15: ...r 10 seconds to reset it at status of power on And then do initial setup In addition the computer client HIP2P Username admin Password space only one character 6 Access theCamera 6 1 Web Browser Acces...

Page 16: ...name through the Search Tool after inputting the correct username and password Please remind that the login Username and Password of the camera are not available to change in below blanks of the Sear...

Page 17: ...era in the URL blank of the browser by manual to login your camera For example http 192 168 1 147 80 The IP Address and HTTP port number of the camera are displayed on the list of the Search Tool Usua...

Page 18: ...support zilink cn 18 59...

Page 19: ...Forwarding Before using UPnP DDNS functionality ensure your router should support the uPnP networking protocol and the protocol should be enabled Please refer to your router manufacturer s documentat...

Page 20: ...ort center on our website to learn the detail instruction 6 2 NVR access The camera can connect to any NVR that supports ONVIF protocol This allows the camera to view live playback and record to a net...

Page 21: ...username password IP port 12 For example rtsp admin 123456 192 168 1 10 554 12 Follow these steps to access the camera s RTSP stream by VLC player Open the VLC player and go to Media Open Network Stre...

Page 22: ...playernow Note you can also view the video remotely by the RTSP stream if you have the set up DDNS or port forwarding 6 4 Camera List Page Run the CamHiPro App and go to the first page you can delete...

Page 23: ...ent and notification Video settings Audio settings SD card plan recording SD card settings Device time setting Default setting Device Information 6 5 Live View Page After installation and setup you ca...

Page 24: ...support zilink cn 24 59 Audio Listening Audio Talk Record Snapshot...

Page 25: ...support zilink cn 25 59 6 6 Camera Setups via App 6 6 1 Wireless Setting Go to Camera Setting Wireless setting to configure the camera wireless...

Page 26: ...support zilink cn 26 59 6 6 2 Change Password 6 6 3 Alarm management and notification...

Page 27: ...9 Receive alarm push If you want to receive the alarm notification on your smart phone enable this option Alarm recording to SD card if you want to save alarm recording on the SD card enable this opti...

Page 28: ...ith two way audio function 6 6 6SD card plan recording Go to Camera Setting SD card plan recording to enable disable automatic and constant recording The video length of each recording can be set up a...

Page 29: ...support zilink cn 29 59 6 6 7SD card settin 6 6 8Device time setting Go to Camera setting SD card setting to check the usage status of the SD card And you can also format the SD card...

Page 30: ...support zilink cn 30 59 6 6 9Default Setting Go to Camera Settings Time Settings to configure the time and local time zone 6 6 10Device Information...

Page 31: ...ort zilink cn 31 59 6 7 Picture and Video file Management Recording file on SD card Local video and snapshot file you can save the recording file to your phone album here Click here to see the local F...

Page 32: ...as all of the operations the camera can perform including the Login LIVE PLAYBACK and CONFIG pages 7 1 Login Page Username and Password It is the account of your camera the factory default username pa...

Page 33: ...o not applicable on some models 6 Only available on IE Firefox browser on windows OS Enable Disable speaker fortalk not applicable on some models 7 Only available on IE Firefox browser on windows OS S...

Page 34: ...ndows 1 4 or 9 for simultaneously viewing multiple cameras Note As the Chrome and Safari forbid any third party plugin programs to be installed so some features are not available and their correspondi...

Page 35: ...o control the Pan Tilt speed from 1 63 the higher value means faster speed 7 2 6 Preset This camera can support maximum 8 preset positions from 1 to 8 You can click the button Set to save a preset pos...

Page 36: ...video stream and audio stream to set path of local computer When recording the status bar in video playback area will show it is recording Only available on IE browser on windows OS 7 6 Playback Clic...

Page 37: ...s motion detection recordings and constant time schedule recordings pictures and videos are included from SD Card of the camera 7 6 1 Playback tool bar The tool bar on the bottom of playback page is f...

Page 38: ...u can set the configurations of power frequency E g 50Hz for the regions like Europe and China 60Hz for USA and Canada For Video Coding you can select baseline mainprofile and highprofile The paramete...

Page 39: ...1 2 OSD set You can turn on off time stamp on the right corner or change the camera s name displayed on the left top corner of the live video see below 8 1 3 Image You can set the color parameters of...

Page 40: ...the image Here you can control the LED light status On Make the camera work at night vision mode the video will be inblack white Off Make the camera work at day mode the video will be always in color...

Page 41: ...and second stream the input volume and the output volume Please note that two way audio function is not available on some models 8 2 Network 8 2 1 Network Here you can set up the network configuration...

Page 42: ...ilink cn 42 59 8 2 2 Wireless On this page you can search the WiFi AP available for your camera to connect then select and apply the one you want to connect from the list Please ensure to enable Wirel...

Page 43: ...dns setup is mainly for remotely accessing the camera You can use the hipcam DDNS or a third party DDNS like Dyndns org 3322 org dynddns us No ip com and UPnP service with your camera You can get the...

Page 44: ...can be changed here and you can also select the accessing mode of privilege 8 2 6 P2P On this page you can check the UID of your camera for P2P and enable or disable the P2P feature of the camera as y...

Page 45: ...detection Only available for IE browser on windows OS Here you can set up the areas of the motion detection and the sensitivity values of each area You can turn on off the window 1 to window 4 area by...

Page 46: ...m On this page you can set the alarm Linkage action Include the E mail Alarm and Send with Picture Save Picture Video on the FTP Server and set up preset positions for motion detection only for Pan Ti...

Page 47: ...Select List Set 24 7 motion detection Clear List Empty the schedule 8 4 Advance 8 4 1 User Here you can edit the account information of the camera such as change the username or password the default...

Page 48: ...and playback smoothly The timer record are titled as Plan recording on SD Playback list of App and P on the list of Playback on computer 8 6 6 Email On this page you can configure the parameters for...

Page 49: ...k the Test button to check whether your email settings are valid or not 8 4 5 FTP Setting FTP server to save recordings on computer is available You can click the Test button to check whether your set...

Page 50: ...hile Self Check The lens will go to the preset center position after the cruise is complete Close the alarm PTZ movement Stop motion detection while the camera is panning or tilting Indicator Display...

Page 51: ...same LAN and add them into your multiple device group Then you can view them at the live page together 8 4 9 Video shade Here you can set up video shade for up to 4 areas which you don t want the came...

Page 52: ...support zilink cn 52 59 8 4 10Restart timer Here you can set the camera restart every week or everyday Or If you don t like this feature you can turn off it...

Page 53: ...support zilink cn 53 59 8 5 System 8 5 1 Time Here you can set the time date the status of NTP and DST Daylight Saving Time and the time zone for your camera 8 5 2 Initialize...

Page 54: ...nt settings of the camera it will generate a file name config_backup bin for you to save Restore Import and restore the configuration file you backed up before Please browse and select the file you wa...

Page 55: ...can query and check the main information and status of the camera including the name time IP firmware version DDNS UPnP status and the SD Card 8 5 4 System Log Here you can query the history operatio...

Page 56: ...ctly by accessing the IP address of your camera no need to install the plugin which is not supported for installation by Chrome and Safari 9 2 How to install the plugin for IE browser in Windows OS Wh...

Page 57: ...stall it by manually 1 Click and download the plugin from the login page save it to your computer 2 Double click the Plugin file to install it in your computer 3 Refresh the IP address in your web bro...

Page 58: ...l be restored to the factory default settings Default username admin Default password admin Note The password is case sensitive 9 6 Could not record videos or snap pictures in IE 11 or Firefox of Wind...

Page 59: ...gh web browser 2 Please make sure these special characters did not be included in your Wi Fi password such as 3 The camera only support 2 4G Wi Fi did not support 5G Please make sure you didn t set th...

Reviews: