background image

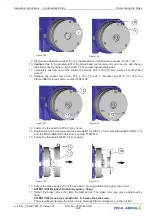
Figure 7-05

Figure 7-06

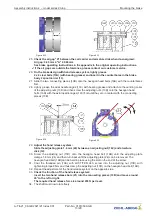
9. Dismounting absolute encoder (9), see "Replacement of the absolute encoder A-TIA17_02-..."

10.

Caution:

 Due to the great weight of the brake body, we recommend you to secure and change 

the brake body by using an eye bolt M12 (10) and appropriate lifting gear.

11. Completely unscrew one of the socket cap screws M16 x 190 (11) with a size 14 socket head 

wrench

12. Replace  the  socket  cap  screw  M16  x  190  (11)  with  a  threaded  bolt  M16  (12)  from  the 

ZIEHL-ABEGG toolkit, article number 70027450.

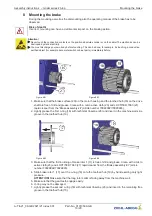
Figure 7-07

Figure 7-08

13. Fasten the threaded bolt M16 (12) by hand.

14. Replace the two remaining socket cap screws M16 x 190 (11) in turn with a threaded bolt M16 (12) 

from the ZIEHL-ABEGG toolkit, article number 70027450.

15. Fasten the threaded bolts M16 (12) by hand.

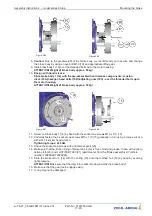
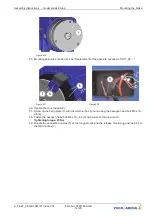
Figure 7-09

Figure 7-10

16. Secure the brake body 2 (13) to the eye bolt (10) using suitable lifting gear and remove.

ATTENTION! Weight of brake body approx. 50 kg!

17. Detach the brake rotor 2 (14) from the toothed hub. The brake rotor may only be detached by 

hand.

ATTENTION! Do not use screwdrivers to release the brake rotor.

The screwdrivers damage the friction lining. Damaged friction linings may not be re-

tted!

Assembly instructions  

 model series ZAtop

Dismounting the brake

A-TIA21_08-GB 2021/21 Index 001

Part.-No. 01013509-GB

8/20

Summary of Contents for ZA top Series

Page 1: ...Art Nr 01013509 GB A TIA21_08 GB 2021 21 Index 001 ZAtop SM225 60B SM250 45B Replacement of the brake Assembly instructions Store for future use...

Page 2: ...ructions 4 3 Safety precautions 4 4 Versions of the brake 4 5 Scope of delivery 5 6 Required tool equipment 6 6 1 Tools 6 6 2 Equipment 6 7 Dismounting the brake 7 8 Mounting the brake 10 9 Functional...

Page 3: ...instructions are highlighted with warning triangles and are depicted according to the degree of hazard as follows Danger General hazardous area Death or severe injury or signi cant property damage can...

Page 4: ...sed elevator machine to generate a brake torque dependent on the speed In the event of a short circuit a short circuit current of at least the level of the rated current is owing The windings may not...

Page 5: ...kit 207 VDC Article number 70029992 Brake assembly kit 24 VDC Article number 70029993 Figure 5 01 Figure 5 02 Brake bodies 1 in version with hand release Assembly instructions model series ZAtop Scope...

Page 6: ...4 1 Feeler gauges 13 part 25 1 Anti tamper paint 20 ml 26 1 Technical vaseline 50 g 27 1 Quick cleaner LOCTITE 7063 400 ml The corresponding brake assembly kits item 4 and items 22 to item 27 are avai...

Page 7: ...e by touching a conductive earthed object for example bare metal switch cabinet parts immediately before Figure 7 01 Figure 7 02 1 Remove cover from connection box 1 2 Disconnect the electrical connec...

Page 8: ...ded bolt M16 12 by hand 14 Replace the two remaining socket cap screws M16 x 190 11 in turn with a threaded bolt M16 12 from the ZIEHL ABEGG toolkit article number 70027450 15 Fasten the threaded bolt...

Page 9: ...eye bolt 10 using suitable lifting gear and remove ATTENTION Weight of brake body approx 50 kg Figure 7 13 Figure 7 14 21 Detach the brake rotor 1 17 from the toothed hub The brake rotor may only be...

Page 10: ...rapid cleaner from the Brake assembly kit article number 70029992 70029993 2 Lightly grease the rst o ring 18 with technical Vaseline 26 and insert in the machine wall side groove in the toothed hub...

Page 11: ...screws M16 x 110 15 12 Uniformly fasten the 3 socket cap screws M16 x 110 15 gradually in turn using a torque wrench with size 14 socket head wrench Tightening torque 200 Nm 13 Endue the socket cap s...

Page 12: ...2 13 by hand with the socket cap screws M16 x 190 11 22 Uniformly fasten the 3 socket cap screws M16 x 190 11 gradually in turn using a torque wrench with size 14 socket head wrench Tightening torque...

Page 13: ...connecting pieces 13B Figure 8 14 Figure 8 15 29 Adjust the hand release system Slide the adjusting plate 1 8 mm 24 between an adjusting nut 16C and armature disk 14 30 Screw the adjusting nut 13D on...

Page 14: ...al box by hand using the hexagon head bolt M8 x 16 8 8 6 38 Fasten the hexagon head bolt M8 x 16 8 8 6 with a size 13 torque wrench Tightening torque 23 Nm 39 Bundle the connection cables 5 of the mag...

Page 15: ...nal operation instructions of the frequency inverter 9 Functional test on microswitch inductive proximity switch for re lease monitor After mounting of the brake a functional test must be performed on...

Page 16: ...s are selected for the magnet to be adjusted Adjustment of the release monitor with microswitches inductive proximity switches see Assembly and adjustment of release monitor with microswitches or indu...

Page 17: ...Assembly instructions model series ZAtop Adjustment of the microswitch inductive proximity switch for release monitor A TIA21_08 GB 2021 21 Index 001 Part No 01013509 GB 17 20...

Page 18: ...Assembly instructions model series ZAtop Adjustment of the microswitch inductive proximity switch for release monitor A TIA21_08 GB 2021 21 Index 001 Part No 01013509 GB 18 20...

Page 19: ...Assembly instructions model series ZAtop Adjustment of the microswitch inductive proximity switch for release monitor A TIA21_08 GB 2021 21 Index 001 Part No 01013509 GB 19 20...

Page 20: ...ical changes Customer Service phone 49 7940 16 308 fax 49 7940 16 249 drives service ziehl abegg com Headquarters ZIEHL ABEGG SE Heinz Ziehl Stra e 74653 K nzelsau Germany phone 49 7940 16 0 fax 49 79...

Reviews: