background image

S

OUTHERN

 H

EMISPHERE

 & S

TAR

 D

RIFT

 P

OLAR

 A

LIGNMENT

1. Having already roughly aligned your telescope, loosen the declination 

clamp  and  swivel  telescope  until  scale  reads  90°,  then  retighten  clamp. 

Loosen the right ascension clamp and rotate telescope so that it points 6 

hours away from the celestial pole and retighten clamp. The R.A. and Dec. 

adjustment cables may need to be temporarily removed in order to swivel 

the telescope freely. The telescope should now be pointing roughly where 

the meridian and celestial equator intersect.

2. Find a bright star in the viewfinder of your telescope and use the R.A. 

and Dec. adjustment cables to center it in the crosshairs. Work up to your 

most powerful eyepiece, centering the star in the viewfinder each time you 

replace the eyepiece.  
3. Engage the clock drive by tightening the thumbscrew which connects 

it to the R.A. axis of the mount. Turn on the clock drive, ensuring that it 

is set to the correct hemisphere setting. Let the clock drive run for about 5 

minutes.
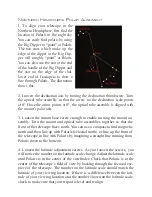
4. Look into the eyepiece after the clock drive has run for about 5 minutes 

to see which direction the star has drifted. If the star has drifted to the right 

(left in the Northern Hemisphere) in the eyepiece, the mount is pointed too 

far to the west. If the star has drifted to the left (right in the Northern Hemi-

sphere), the mount is pointing too far to the east. To correct this, loosen the 

mount base screw and center the star in the eyepiece. Any drifting up or 

down in the eyepiece is a result of your clock drive speed setting and can be 

corrected by adjusting the clock drive speed.

5. Unengage the clock drive. Loosen the right ascension clamp and rotate 

the telescope back 6 hours (opposite the direction you rotated it in step 1).  

Find a bright star in the viewfinder and center the star in the viewfinder. 

Center this star in the highest power eyepiece as you did with the previous 

star. Reengage the clock drive and turn it on, letting it run for another five 

minutes.
6. Check to see which way this new star has drifted. If the star has drifted 

to the left (right in the Northern Hemisphere) in the eyepiece, the mount 

latitude setting is too low. If the star drifts to the right (left in the Northern 

Hemisphere) in the eyepiece, the mount latitude setting is too high. Adjust 

the latitude setting until the star is centered in the field of view. Again, any 

drifting up or down in the eyepiece is a result of your clock drive speed set-

ting and can be corrected by adjusting the clock drive speed. 

7. Repeat this process as needed until you are satisfied with the alignment 

of the telescope. The more closely polar aligned your telescope is, the more 

accurate it will track stars.

Star Drift alignment is more precise than polar star alignment, but may also 

prove to be more difficult to those not used to aligning a telescope. Once 

you polar align using the star drift method a few times, it becomes easier, 

but the first few times may take a considerable amount of time. For general 

viewing uses, the rough alignment described above may prove to be suf-

ficient. The alignment procedure described below can be used to acheive 

more accurate alignment when needed. The alignment is described using a 

standard eyepiece without an erecting prism.

Summary of Contents for ECLIPSE 114

Page 1: ...ECLIPSE 1 1 4...

Page 2: ...telescopes require some technical knowledge of stellar movement and optical properties We have tried to provide the basics of telescope use and astronomical viewing in this manual If after reading th...

Page 3: ...F 8 8 Eyepiece Format 1 25 Finder Scope 6x30 Mount Type ET 7 Equitorial MOUNT Materials Aluminum R A Adjustment Manual Worm Gear Dec Adjustment Manual Worm Gear Clock Drive Axis R A Clock Drive Power...

Page 4: ...and great care should be taken to maintain this alignment over the life of the telescope Cleaning should be done as little as possible and then only with a mild soap solution and soft lint free cloth...

Page 5: ...ude scale located on the side of the mount above the base of the mount Remove the nut and washer located in the center of the latitude scale Slide clock drive mounting bracket over the exposed bolt an...

Page 6: ...ace thumb screws Hand tighten thumbscrews to secure optical tube assembly in mounting belts 10 Screw eyepiece adapter onto the threaded end of rack and pinion focusing mechanism Loosen thumbscrew on e...

Page 7: ...telescope SOME NOTES ON VIEWING Never look at the sun without using a solar filter When using a solar filter do not remove the full lenscap view only through the small opening in the lenscap Looking a...

Page 8: ...the Southern Hemisphere the switch should be set to S The speed setting should be adjusted while viewing to help keep stars centered in the field of view You may have to increase or decrease your spee...

Page 9: ...nce the telescope The optical tube assembly should move very easily Do not force the optical tube assembly as you may cause damage to the telescope INTERMEDIATE OBSERVATION Once you are familiar with...

Page 10: ...the Queen will allow you to properly align your telescope In the Southern Hemisphere you will need to use a star chart to find stars near the meridian and the ce lestial equator so that you can use th...

Page 11: ...mount base screw enough to enable turning the mount as sembly Turn the mount and optical tube assemblies together so that the front of the telescope faces north You can use a compass to find magnetic...

Page 12: ...t you roughly at the southern celestial pole 1 Having already roughly aligned your telescope loosen the declination clamp and swivel telescope until scale reads 90 then retighten clamp Loosen the righ...

Page 13: ...clock drive speed setting and can be corrected by adjusting the clock drive speed 5 Unengage the clock drive Loosen the right ascension clamp and rotate the telescope back 6 hours opposite the directi...

Page 14: ...l be viewing 58 for Dubhe 63 for Acrux Retighten the clamp to lock the declination in place 2 Loosen the right ascension clamp and rotate the telescope on the R A axis until the star you are using to...

Page 15: ...Telescope Focal Length mm Aperture mm Ex Focal Ratio of a 114x1000mm telescope Focal Ratio F x 1000mm 114mm Focal Ratio F x F 8 8 Limiting Magnitude To determine the limiting magnitude of a telescope...

Page 16: ...quator The vernal equinox is where right ascension is at 0 h hours The autumnal equinox can be found at 12 h R A ZENITH The zenith is the point in the celestial sphere directly above your head The zen...

Page 17: ...isually the smaller the focal ratio also called f stop of a telescope the wider the field of view Photographically the lower the f stop the shorter the exposure time needed to capture an object on fil...

Page 18: ...hy we love you and a flaw that you have noticed may be hard to find by our techni cian A letter will speed up the warranty process and save a phone call Oh yes please include your phone number and an...

Page 19: ...SCOPE EYEPIECES 0 965 6 3mm Pl ssl 0 965 7 5mm Pl ssl 0 965 10mm Pl ssl 0 965 12 5mm Pl ssl 0 965 17mm Pl ssl 0 965 20mm Pl ssl 0 965 25mm Pl ssl 1 25 6 3mm Pl ssl 1 25 7 5mm Pl ssl 1 25 10mm Pl ssl 1...

Page 20: ...ories about expe riences with your Zhumell telescope we would like to hear them We are confident that you will be pleased with your new Zhumells and hope to hear from you soon SPORT OPTICS 30 E SUPERI...

Reviews: