


Clean and replace the air filter
MXK Hardware Installation Guide
69
–
Soaking in warm water and mild detergent. Rinse thoroughly and
allow the filter to completely dry before reinstalling it in the MXK
chassis.
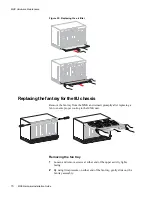
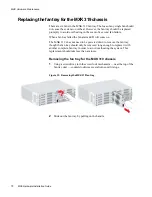
Removing the air filter with the cable management bracket
installed
Replacing the air filter requires you to temporarily remove the cable
management bracket (if installed). Before performing this procedure, make
sure the MXK connectors are securely fastened. The MXK is designed so that
the air filter can be removed without disturbing any of the cables.
1
Put on an antistatic wrist strap that touches the skin. Make sure it is
properly grounded to the ESD jack on the front of the unit.
2
Remove the bezel from the bottom of the MXK chassis by grasping both
ends and gently pulling straight out (
).
3
Remove the air filter by carefully sliding it out (
Figure 31: Removing the front bezel and air filter
4
Replace the air filter (
).
5
Replace the front bezel (
mx0707


