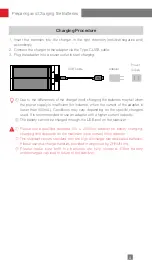
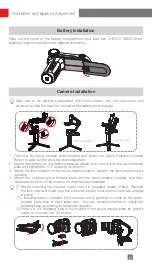
Zhiyun WEEBILL-S User Manual Download Page 18

14

Motor Torque Adjustment

The motor torque of the stabilizer shall be adjusted by 3 levels to adapt the specific 
camera and lens applied for ideal performance. 

Auto torque adjustment: 

Under auto torque adjustment, the stabilizer will adjust the 

motor torque according to the weight of the carried camera and lens.

Operation Method:

Single press Menu Button and rotate the dial to "motor", then 

rotate the dial to "auto" and press the right side of the dial to confirm. The stabilizer will 
enter the auto torque adjustment state. Please do not operate the stabilizer before the 

stabilizer shortly vibrate, and a “√” mark will appear on the display screen, which means 

the auto torque adjustment is completed.

Customized Motor Torque: 

Please set a proper motor torque according to the actual 

camera setup. Overhigh motor torque will cause the stabilizer vibration, vise versa, 
excessive low motor torque will affect the gimbal stabilization.

Operation Method:

Single press Menu Button and rotate the dial to "motor", then 

rotate the dial to "custom" and press the right side of the dial to confirm. Press right 
again to select the corresponding axis and set the parameters via the dial. Single press 

the left to exit, then the stabilizer will save the parameter and  a “√” mark will appear on 

the display screen, which means the auto parameter adjustment is completed.
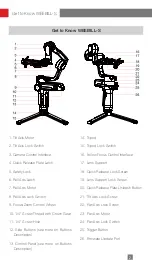
How to Use

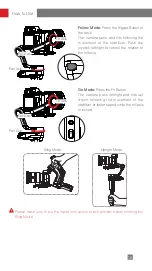
Stabilizer Mode Description

Motors circled in red will auto move with the stabilizer, while motors circled in grey 
are locked instead of moving with the stabilizer.

Tilt Axis

Roll Axis

Pan Axis

Pan Following Mode (PF): 

Push up the 

PF/L mode switch 
The camera pans left/right following the 
movement of the stabilizer while the tilt 
and roll axes are locked. Push the joystick 
up/down allows manual control of the tilt 
axis.

PF

L

① When conducting the auto torque setting, please make sure that the three axes 

are unlocked and the stabilizer is straightly put on a flat surface.

② Please rebalance the stabilizer if camera setup is changed, and adjust the motor 

torque settings following the above method.

Summary of Contents for WEEBILL-S

Page 1: ...Quick Keyword Search Enter the keyword in the search box and hit the search button Quick Jump between Chapters Click the title of a specific chapter on the Contents to jump to it Reading software such...

Page 2: ...WEEBILL S User Guide Z H I Y U N E N v 1 2 0...

Page 3: ...and Balance Adjustment Tripod Installation 5 Battery Installation 6 Camera Installation 6 Camera Control Cable Connection 7 Balance Adjustment 7 How to Use Buttons Description 9 Display Screen Descri...

Page 4: ...libration 20 Motor Fine tuning 22 Stabilizer Firmware Update 22 Product Specifications Disclaimer and Warning Reading Tips 24 Warnings 24 Safe Operation Guidelines 24 Disclaimer and Warning Warranty T...

Page 5: ...agent WEEBILL S Stabilizer 1 Quick Release Plate 1 Tripod 1 18650 Li ion Battery 2 18650 Battery Charger 1 Camera Backing Base 1 1 4 20 Screw 3 ZW Micro 002 Camera Control Cable 1 ZW Mini 002 Camera C...

Page 6: ...Screw Thread with Crown Gear 11 1 4 Screw Hole 12 Side Buttons see more on Buttons Description 13 Control Panel see more on Buttons Description 14 Tripod 15 Tripod Lock Switch 16 Follow Focus Control...

Page 7: ...IMR 18650 MP Capacity 2600mAh Voltage 3 6V Battery Specifications Status LED Indicator The stabilizer is equipped with high energy density batteries which may cause fire economic loss or personal inju...

Page 8: ...ard 5V 2000mA adapter for battery charging charging time depends on the maximum input current of the adapter This stabilizer comes standard with two high discharge rate dedicated batteries Please use...

Page 9: ...lizer then unfold the tripod on a flat surface Tripod Installation You can also install the tripod onto the base of the battery compartment to enter Sling Mode Please make sure to put the tripod lock...

Page 10: ...module and then install and lock the whole module on the three axis stabilizer Before mounting the camera make sure it is prepared ahead of time Remove the lens cap and make sure the camera s battery...

Page 11: ...e form are only for reference When controlling a Sony camera via a control cable please power on the stabilizer before powering on the camera Please make sure the camera is fully charged The optical z...

Page 12: ...h the camera to move left or right until the camera can stay still and horizontal to the ground as shown below Complete this step by tightening up Roll Axis Lock Latch Unlock the tilt axis and Quick R...

Page 13: ...seconds to power on off the stabilizer OLED Display Stabilizer status and camera parameters see more Display Screen Description Joystick Four way direction control of the camera lens on the stabilizer...

Page 14: ...ra damage Please keep the grip stable when turning on the stabilizer Shakes during the power on may cause the stabilizer power on failure Display Screen Description motor camera advance axislock keylo...

Page 15: ...his icon prompts when the axis is locked and the stabilizer will make a beep sound Please unlock the axis and long press the POV Button to resume operation Stabilizer is on Standby Buttons are locked...

Page 16: ...sony off Charging is off on Charging is on panaso Panasonic ccs Stabilizer params settings speed Control speed of joystick Tilt Axis Roll Axis Pan Axis Follow speed of motor Tilt Axis Roll Axis Pan A...

Page 17: ...ontrol wheel on the handle reverse control the wheel in reverse direction off on Joystick Setting Reverse control the joystick in reverse direction Joystick in vertical direction off on Joystick in ho...

Page 18: ...on Operation Method Single press Menu Button and rotate the dial to motor then rotate the dial to custom and press the right side of the dial to confirm Press right again to select the corresponding a...

Page 19: ...pan axis Point of View Mode POV Single press the POV mode button This mode allows all three motors to rotate 360 following the movement of the stabilizer Vortex Mode Double press the POV mode button...

Page 20: ...he rotation of the roll axis Go Mode Press the Fn Button The camera pans left right and tilts up down following the movement of the stabilizer at faster speed while the roll axis is locked Sling Mode...

Page 21: ...nually rotate the camera to a certain angle then loosen your grip and the camera position will be fixed Under pan following mode you can manually adjust the angle of the tilt axis Under locking mode y...

Page 22: ...Mode Stabilizer Parameters Settings Customized Scene Mode Stabilizer Calibration Video and Photo Timelapse Panorama ZY Play 1 Power on the stabilizer and connect the stabilizer with your camera with...

Page 23: ...used for a long time 3 The stabilizer undergoes significant temperature differences in operating environments Six side calibration A slight deviation is found in the tilt or roll angle of the camera...

Page 24: ...se conduct the process according to the following steps A mark will appear after the calibration is completed 3 Six side calibration via OLED display guide Power on the stabilizer and enter standby mo...

Page 25: ...21 Calibration and Firmware Upgrade STEP 3 STEP 4 STEP 5 STEP 6...

Page 26: ...irmware update according to the operations in the firmware update tutorial Method 2 Update via APP According to the method introduced in APP Operations connect the stabilizer to APP If a firmware upda...

Page 27: ...180g Bluetooth Bluetooth 5 0 Product Model CR110 Product Specifications Lab Data 1 The 12h runtime is concluded via a complete test session in which the stabilizer is well balanced with ILCE 7RM3 came...

Page 28: ...YUN TECH and its affiliates All product names or marks referred to herein are trademarks or registered trademarks of their respective holders Read the ENTIRE User Guide to become familiar with the fea...

Page 29: ...eries from ZHIYUN s official website or authorized channels ZHIYUN takes no responsibility for any damage caused by non ZHIYUN batteries 5 Never use or charge swollen leaky or damaged batteries Never...

Page 30: ...re cord plug or other parts Never use a damaged charger Do not clean the charger with any liquid containing alcohol or other flammable solvents Disconnect the charger when not in use Battery Storage 1...

Page 31: ...whose warranty has expired 4 Products damaged due to force majeure such as fire flood lightening etc 1 If failure or any problem occurs to your product after purchase please contact a local agent for...

Page 32: ...28 Contact Card Website Weibo Facebook Zhiyun Support Youtube Google Youku Vimeo Facebook Zhiyun Tech Wechat Instagram...

Page 33: ...ial Zone Qixing District Guilin Guangxi China This product is confirmed to meet quality standards and permitted for sale after strict inspection Certi cateofQuality QC Inspector Please download the la...

Page 34: ......

Reviews: