background image

5

Battery and Charging

CRANE-M3 is equipped with built-in battery. When using CRANE-M3 for the first 
time, please fully charge the battery to activate them and to ensure the proper 
function of the gimbal.
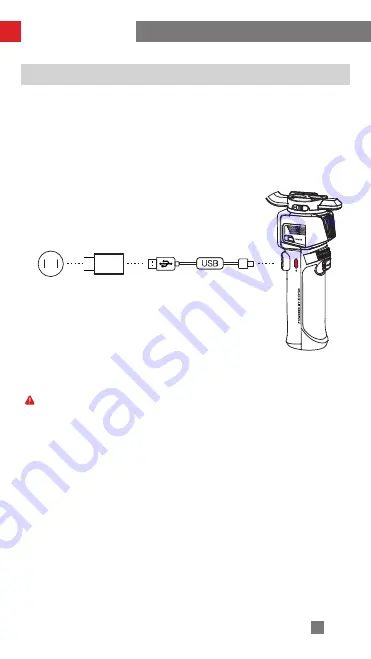
Charging method: Use provided USB Type-C cable to connect the USB charger 
(not provided, recommend chargers that meet the USB Power Delivery 
Specification, supports 12W at most) to the charging port of CRANE-M3.

Battery and Charging

CRANE-M3

AC Power

(100-240W)

USB Charger

USB Type-C Cable

The gimbal is equipped with high-energy-density battery, which may cause 
fire, economic loss, or personal injury when not properly used and stored. 
Please read the disclaimer and warning herein as well as the description on 
the battery label carefully before using the battery.

Summary of Contents for CRANE-M3

Page 1: ... Quick Keyword Search Enter the keyword in the search box and hit the search button Quick Jump between Chapters Click the title of a specific chapter on the Contents to jump to it Reading software such as Adobe Reader is needed to support the functions above ...

Page 2: ...CRANE M3 User Guide Z H I Y U N E N v 1 0 0 ...

Page 3: ...Camera 6 Mounting the Phone 10 Mounting the Action Camera 10 Balancing 11 How to Use CRANE M3 Buttons Description 14 Touch Screen Introduction 15 Motor Torque Adjustment 17 Gimbal Modes Description 18 Manual Reposition 21 Changing Fill Light Filters 21 Using with TransMount Shotgun Microphone 22 How to Use the App Download the App 24 How to Connect 24 ZY Play Feature Description 25 ...

Page 4: ...ware Upgrade 26 Six side Calibration 28 Product Specifications Disclaimer and Warning Reading Tips 32 Warnings 32 Safe Operation Guidelines 33 Warranty Card Warranty Period 35 Warranty Exclusions 35 Warranty Claim Procedure 35 Contact Card ...

Page 5: ... that any item is found missing please contact ZHIYUN or your local selling agent CRANE M3 x1 USB Type C Cable x1 Quick Start Guide x1 Fill Light Filters x4 Type C to Micro USB LN UCMA D01 Camera Charging Cable x 1 Type C to Type C LN UCUC D05 Camera Charging Cable x 1 Type C to Multi USB LN UCUS C01 Sony Camera Control Cable x 1 EPP Storage Box x1 ...

Page 6: ... Tripod x1 Phone Clamp x1 TransMount EasyGo Backpack x1 CTIA2 5 to CTIA2 5 LN TRS25TRS25 B01 Audio Cable x1 CTIA2 5 to CTIA3 5 LN TRS25TRS35 B01 Audio Cable x1 6 5mm to XLR Audio Cable x1 TransMount CRANE M3 Expansion Base x1 ...

Page 7: ...arked are included in CRANE M3 Items marked are included in CRANE M3 COMBO and CRANE M3 PRO Items marked are included in CRANE M3 PRO TransMount Shotgun Microphone x1 TransMount Microphone Sponge x1 Product List ...

Page 8: ...k 9 Handle 10 Tripod 11 Audio Transmission Port 12 Camera Control Charging Port 13 Roll Axis Latch 14 Roll Axis Motor 15 Touch Screen 16 M Button 17 Photo Video Button 18 Tilt Axis Lock Switch 19 Tilt Axis Latch 20 Tilt Axis Motor 21 Pan Axis Lock Switch 22 Power Button 23 Type C Charging Firmware Upgrade Port 24 Fill Light 25 Level Mount Lock Screw 26 Pan Axis Latch 27 Pan Axis Motor 28 Adjustmen...

Page 9: ...t provided recommend chargers that meet the USB Power Delivery Specification supports 12W at most to the charging port of CRANE M3 Battery and Charging CRANE M3 AC Power 100 240W USB Charger USB Type C Cable The gimbal is equipped with high energy density battery which may cause fire economic loss or personal injury when not properly used and stored Please read the disclaimer and warning herein as ...

Page 10: ... the Camera 1 Each axis of the gimbal is equipped with a lock switch You can use these lock switches to lock the axes for convenient installation and storage The storage state is the default state Please toggle the lock switch to unlock the three axes expand the gimbal as shown in the image and lock the axes again for convenient camera installation Lock state for storage ...

Page 11: ...7 Mounting and Balancing Lock state for installation 2 Mount the camera on the quick release plate Tighten the bottom screw ...

Page 12: ...safety lock to unlock install the whole quick release plate on CRANE M3 and make sure a firm installation When detaching toggle the quick release plate safety lock to unlock press the quick release plate release button to push the whole quick release plate out ...

Page 13: ... filming scenarios The camera control charging port is only available for controlling certain Sony cameras For other cameras you can purchase the TransMount CRANE M3 Bluetooth Control Unit and install it on the gimbal to control For the detailed tutorial of the unit please visit the official website of ZHIYUN www zhiyun tech com and check the TransMount CRANE M3 Bluetooth Control Unit User Guide F...

Page 14: ...ick release plate Make sure to tighten the screw Mounting the Action Camera Mount the action camera to the camera base not provided and mount the whole base to the quick release plate Make sure to tighten the screw CRANE M3 only provides stabilization for mobile phones and action cameras Button controls are not supported ...

Page 15: ...steady and is at almost level with the ground Tighten the latch 2 Vertical Balance of the Tilt Axis Unlock the tilt axis arm make the lens face up loosen the level mount lock screw Push the whole level mount to move forward or backward Push until the camera can stay still with the lens facing up i e the camera stays still and vertical to the ground Complete this step by tightening up the screw ...

Page 16: ...oll Axis Balance Unlock the roll axis loosen the roll axis latch push the roll axis arm to move left or right until the camera can stay still and horizontal to the ground as shown below Complete this step by tightening up the latch ...

Page 17: ... to move left or right until the pan axis can stay still in any position Complete this step by tightening up the pan axis latch After balancing CRANE M3 the motor torque needs to be adjusted for proper function For the adjustment details please see the methods introduced in Motor Torque Adjustment Mounting and Balancing ...

Page 18: ...ness color temperature Press and hold Turn on off the fill light Slide up down Adjust brightness color temperature Trigger Button Double press Reposition Triple press 180 rotation for the pan axis motor Press and hold Enter Go Mode Release to return to the previous mode Joystick Push the joystick up down left right to control the gimbal to rotate Adjustment Wheel Adjust customized setting aperture...

Page 19: ... CRANE M3 Touch Screen Introduction Touch Screen Interface PF Main page set as default Motor Torque Smoothness Follow Speed Swipe right at the left edge of the screen return to the previous menu Parameter Settings ...

Page 20: ...ied Chinese English 2 Device Info See the device information such as device name device model SN firmware version 3 Factory Reset Tap to factory reset the gimbal Settings 1 Auto Calibration To perform auto calibration after the balancing is finished 2 Parameter Settings Sets the motor torque smoothness follow speed joystick speed deadband of the gimbal 3 Parameter Reset Reset the parameters to def...

Page 21: ...e according to the weight of the carried camera and lens Select Settings Auto Calibration tap to enter calibration You can see the calibration progress on the screen Motor Torque Adjustment Using the CRANE M3 When performing auto calibration please make sure that the three axes are unlocked and the gimbal is straightly put on a flat surface Please don t touch the gimbal when calibrating 2 Paramete...

Page 22: ...Modes Description Motors circled in red are free to move in line with the movement of the gimbal handle while motors circled in grey are locked Pan Follow mode PF The tilt axis and roll axis motors are locked and the camera rotates with the handle while panning horizontally Push the joystick up down to control the tilt axis angle and push it left right to control the pan axis of the camera Lock mo...

Page 23: ...o change the horizontal orientation of the camera Point of View mode POV All three motors move when the handle is rotated Vortex mode V The tilt axis motor rotates upward by 90 and the tilt axis roll axis and pan axis motors follow the rotation of the handle Push the joystick to the left right to control the rotation of the pan axis Tilt axis Pan axis Roll axis Tilt axis Pan axis Roll axis Tilt ax...

Page 24: ...e tilt axis and pan axis motors quickly follow the rotation of the handle Portrait mode The tilt axis motor rotates upward by 90 and the pan axis rotates by 90 You can enter this mode for vertical filming Using the CRANE M3 Tilt axis Pan axis Roll axis ...

Page 25: ...the camera angle will be fixed at that angle after you release the camera Manual Reposition The fill light filters for CRANE M3 are magnetic and easy to detach There are four colors for the filters red yellow blue and orange You can change your fill light filters according to your actual filming scenarios Changing Fill Light Filters ...

Page 26: ... CRANE M3 Expansion Base to the bottom of the CRANE M3 handle Tighten the screw and make sure a firm installation Using with TransMount Shotgun Microphone 2 Connect the microphone and the MIC IN port at the base with the 6 5mm to XLR audio cable ...

Page 27: ...audio cable corresponding to the input port type of the camera microphone There are two modes in the microphone HYPER CARDIOID and CARDIOID Choose the proper mode according to the actual setting Install the battery before using the microphone Read TransMount CRANE M3 Expansion Base User Guide for more details of the expansion base ...

Page 28: ... notice Please always refer to the latest version How to Connect 1 Power on CRANE M3 and turn on Bluetooth on the smartphone 2 Launch the ZY Play app Select the CRANE M3 page and tap to connect Select the Bluetooth name of your CRANE M3 to connect the CRANE M3 Bluetooth name can be found on the side of the tilt axis USER ID XXXX 3 If the CRANE M3 is being used for the first time you need to activa...

Page 29: ... Sensor Control Firmware Upgrade Video and Photo Taking Timelapse Panorama ZY Play For more details of the ZY Play app features please visit the official website of ZHIYUN www zhiyun tech com and watch CRANE M3 video tutorials CRANE M _XXXX 4 3 How to Use the App ...

Page 30: ...oad find the USB driver the ZHIYUN calibration upgrade tool and the firmware and download USB drivers are not required for Mac OS systems 3 Install the driver and the software unzip the firmware for the documents with the ptz file extension 4 Open Zhiyun Gimbal Tools select the corresponding port click Open click Firmware Upgrade Click Browse under Path to select the latest firmware downloaded wit...

Page 31: ...ed Before upgrading the firmware please ensure that the CRANE M3 has more than 50 power remaining Do not exit the app interface or access in the background during the upgrading process Pay attention to the prompts on the app Searching Files Open Cancel File Name Firmware Upgrade Path Browse Upgrade Uploading please wait Cancel Firmware Upgrade and Calibration ...

Page 32: ...open on the top and click calibration on the bottom Please conduct the process according to the following steps A mark will appear after the calibration is complete Six side Calibration Please refer to the six side calibration steps below After the calibration completes please restart the gimbal In simple terms six side calibration is to place all six sides of the tilt axis in vertical to a level ...

Page 33: ...29 Firmware Upgrade and Calibration STEP 1 STEP 2 STEP 3 STEP 4 STEP 5 STEP 6 ...

Page 34: ...e 309 Roll Mechanical Range 333 Pan Mechanical Range 360 Controllable Tilt Angle 45 160 Controllable Roll Angle 30 30 Controllable Pan Angle 360 Unlimited Rotation Operation Temperature 10 C 25 C 50 C Battery Capacity 1150mAh Battery Runtime 8H Lab Data 1 Charging Time 2H Lab Data 2 Gimbal Net Weight 735g Quick Release Plate Weight 41g Tripod Weight 158g Gimbal Size Folded 280 157 75mm Gimbal Size...

Page 35: ...g time varies with environmental factors In addition the lower the temperature the longer the charging time All the data in this guide is collected from internal experiments of ZHIYUN laboratories Under different scenarios the above data is subject to a margin of error Please refer to actual use of this product Product Specifications Min Standard Max Remark Bluetooth Bluetooth 5 0 EIRP 10dBm Opera...

Page 36: ...or any legal responsibility incurred directly or indirectly from the use of this product Users shall observe safe and lawful practices including but not limited to those set forth herein ZHIYUN TransMount are the trademark of Guilin Zhishen Information Technology Co Ltd and its affiliates All product names or trademarks referred to herein are trademarks or registered trademarks of their respective...

Page 37: ...ire use sand or dry powder fire extinguisher immediately to put out the fire 3 Never use non ZHIYUN batteries If replacement or backup is needed please purchase new batteries from ZHIYUN s official website or authorized channels ZHIYUN takes no responsibility for any damage caused by non ZHIYUN batteries 4 Never use or charge swollen leaky or damaged batteries Never use or charge if the battery sm...

Page 38: ... lower than 0 C may lead to leakage overheating or damage Battery Storage 1 Keep batteries out of the reach of children and pets 2 Do not leave the battery near heat sources such as a furnace or heater or inside of a vehicle on hot days Never expose the battery in any environment with temperature of over 60 C The ideal storage temperature is 22 C 28 C 3 Store batteries in a dry environment 4 Do no...

Page 39: ...te or your place of purchase for detailed warranty information 1 Products subjected to unauthorized repair misuse collision neglect mishandling soaking accident and unauthorized alteration 2 Products subjected to improper use or whose labels or security tags have been torn off or altered 3 Products whose warranty has expired 4 Products damaged due to force majeure such as fire flood lightning etc ...

Page 40: ...mber Address Sales Information Sales date Product Serial Number Distributor Name Distributor s Contact Number First Maintenance Record Service Date Repairman Signature Cause of Problem Service Result Solved Unsolved Refunded Replaced Warranty Card ...

Page 41: ...37 Website Weibo Facebook Zhiyun Support Youtube Google Youku Vimeo Facebook Zhiyun Tech Wechat Instagram Contact Card ...

Page 42: ...spective holders Copyright 2021 ZHISHEN All rights reserved Tel 86 400 900 6868 USA Hotline 1 808 319 6137 9 00 18 00 GMT 7 Mon Fri Europe Hotline 49 0 61018132180 10 00 17 00 GMT 1 Mon Fri Web www zhiyun tech com E mail info zhiyun tech com Address 09 Huangtong Road Tieshan Industrial Zone Qixing District Guilin 541004 Guangxi China This product is confirmed to meet quality standards and permitte...

Page 43: ...n accordance with the instructions may cause harmful interference to radio communications However there is no guarantee that interference will not occur in a particular installation If this equipment does cause harmful interference to radio or television reception which can be determined by turning the equipment off and on the user is encouraged to try to correct the interference by one or more of...

Page 44: ......

Reviews: