background image


23

ACQUAINTANCE WITH THE TRACTOR 

F28 F_02_152a  F_02_137 

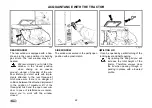
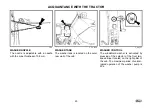
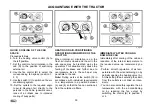
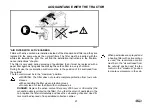
WASHER NOZZLE 

The nozzle is adjustable with a needle 
with the max. thickness of 0.8 mm. 


WASHER TANK  

The washer tank is located on the outer 
rear wall of the cab.  


WASHER CONTROL  

The windshield washer is activated by 
pressing of the selector of the front two-
speed wiper located on the right pillar of 
the cab. The maximum period of uninter-
rupted operation of the washer pump is 
20 s.  


Summary of Contents for FORTERRA 105

Page 1: ......

Page 2: ......

Page 3: ...ead the information contained in this Operator s Manual very carefully In the Manual you will find a lot of new information and get a perfect overview of how to use the tractor with maximum efficiency...

Page 4: ...4 The technical specifications and information about the design equipment material and appearance are valid at the time of print The manufacturer reserves the right to implement changes...

Page 5: ...u at the purchase of your new tractor Page Location of serial numbers 7 Safety instructions for users 9 Preventive daily maintenance 13 Acquaintance with the tractor 19 Driving operation 47 Running in...

Page 6: ...6 ZETOR FORTERRA TRACTORS Zetor Forterra 95 66 kW Zetor Forterra 105 74 kW Zetor Forterra 115 81 kW Zetor Forterra 125 90 kW...

Page 7: ...7 LOCATION OF SERIAL NUMBERS XH154...

Page 8: ...below Tractor type Zetor Forterra 95 Zetor Forterra 105 Zetor Forterra 115 Zetor Forterra 125 The right left front and back indications refer to the driving direction of the tractor The manufacturer r...

Page 9: ...be subject to a claim GENERAL SAFETY REGULATIONS 1 The tractor may only be operated by a trained person that has a valid driving licence and has been thoroughly acquainted with the operation and safe...

Page 10: ...agricultural machines attached to the front three point hitch reduce the driving speed to 20 km h 22 During aggregation of Zetor Forterra tractors with machines and implements with high tensile resist...

Page 11: ...topped 42 Do not refill fuel up to the top of the fuel tank in summer Wipe spilt fuel immediately 43 Do not refuel the tractor near open flame and do not smoke 44 Do not smoke and do not use open flam...

Page 12: ...the screw union of the air conditioning system is not allowed in any case Sudden leak of the coolant may occur causing quick local cooling Contact or freezing of components in hands may cause serious...

Page 13: ...13 PREVENTIVE DAILY MAINTENANCE Perform this maintenance daily or after every 8 10 hours of operation at the latest XF_02_148...

Page 14: ...l quantity in the engine and then check the connection of the engine lubrication system for leaks Maintain the oil level between the dip stick marks COOLING SYSTEM Check the connections of the engine...

Page 15: ...iquid level in the range of 3 4 of the tank content max level and 1 2 of the tank content minimum level TRAILER AIR BRAKES Check the air system of the brakes for leaks and the efficiency of the tracto...

Page 16: ...r cleaner is heavily clogged with dirt this condition is indicated by a sensor that lights up an indicator on the dashboard CAB FILTRATION Check and if necessary clean the cab ventilation air filters...

Page 17: ...the hood Release and slide the cooler to the left side of the tractor Clean the front walls of the engine gearbox air conditioning condenser cooler with compressed air blow air in the direction from...

Page 18: ...102a SHORT FUNCTIONAL TEST After starting the engine check whether the hydrostatic steering failure engine lubrication and charging indicators have gone off Verify the function of the hydraulic steeri...

Page 19: ...seat for the driver s weight 25 Longitudinal adjustment of the seat 25 Vertical adjustment of the seat 25 GRAMMER MAXIMO driver s seat 26 GRAMMER S driver s seat 26 Air filter with active carbon 27 C...

Page 20: ...in II position 40 Lighter and three pin socket 40 Manual throttle lever 40 Engine stopping control 41 Torque multiplier preselection switch i 41 Pedals and levers 42 Main shifting lever and reversing...

Page 21: ...area of the shifting lever and the manual throttle lever The safety cabin is equipped with tinted glass as standard DOOR OPENING FROM THE OUTSIDE The cab doors can be locked from the outside DOOR OPEN...

Page 22: ...nt hitch make sure there is no danger of collision between the attached implement in the position of maximum lift of the three point hitch and the open rear win dow In case of interference we recom me...

Page 23: ...max thickness of 0 8 mm WASHER TANK The washer tank is located on the outer rear wall of the cab WASHER CONTROL The windshield washer is activated by pressing of the selector of the front two speed w...

Page 24: ...an tilt the passenger s seat upwards STORAGE COMPARTMENT AND TOOL BOX The storage compartment is located at the left side of the driver s seat The toolbox is positioned in the rear part of the cab beh...

Page 25: ...handle The weight adjustment indicator is located in the recess of the rear seat cover The spring stroke is 120 mm Do not adjust the seat when driv ing Danger of accident LONGITUDINAL ADJUSTMENT OF T...

Page 26: ...can adjust it in the range of 170 mm 8 Tilting armrest 9 Armrest adjustment control by turning the control you can adjust the height of the armrest GRAMMER S DRIVER S SEAT It only uses positions 1 2 a...

Page 27: ...n of air suctioned from the outside The fan control must be in the maximum position WARNING The filter does not provide complete protection from toxic sub stances When handling the filter wear protect...

Page 28: ...CONTROL A a Heating valve closed b Heating valve open FAN CONTROL B 0 Fan off 1 Slow fan speed 2 Medium fan speed 3 Maximum fan speed AIR CONDITIONING SWITCH C The air conditioning system is switched...

Page 29: ...R FUNCTION OF THE HEATING AND AIR CONDITIONING SYSTEM To ensure proper functioning of the heat ing or air conditioning system it is neces sary to create overpressure in the cab Therefore we recommend...

Page 30: ...d and the air in the cab space may be breathed up by the operators This situation may cause the feeling of tiredness and further due to overpressure loss in the cab dust may penetrate to the cab Note...

Page 31: ...ick defrosting of the front windshield direct the central heating outlets 3 under the angle of approx 45 towards the windshield Direct the side outlets 4 un der the angle of approx 45 to the cab corne...

Page 32: ...32 ACQUAINTANCE WITH THE TRACTOR B21a...

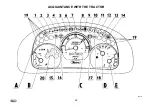
Page 33: ...if the engine oil pressure drops below 120 to 60 kPa If the engine is at standstill it must be lit 19 Air cleaner clogging yellow It lights up if the air filter is clogged 20 Indicator of warning lig...

Page 34: ...34 ACQUAINTANCE WITH THE TRACTOR F54b...

Page 35: ...lue will ap pear on the display 31 Button of the operation hour counter The value will appear on the display 32 Battery voltage button The voltage value is displayed on the display with the resolution...

Page 36: ...king headlight switch off on The function of the working headlight is indicated by the illuminated sym bol on the switch e Warning light switch f Switch of the front driving axle En gaged front drivin...

Page 37: ...the front driving axle in case the rear wheels slip to increase the traction of the tractor a Front driving axle OFF b Front driving axle ON When the tractor is stopped the tractor is braked engine s...

Page 38: ...a Differential lock engaged b Differential lock disengaged The differential lock is engaged by press ing of the button which returns to the original position after being released The engagement of the...

Page 39: ...located on the dashboard see arrow KEY IN 0 POSITION The voltage of all appliances controlled via the key is disconnected The key can be removed KEY IN I POSITION Voltage is connected to all applianc...

Page 40: ...electric appliances are connected except wipers washers cab fan and air conditioning After starting the key auto matically returns to the I position LIGHTER AND THREE PIN SOCKET The lighter 1 and thr...

Page 41: ...ection switch OFF b Preselection switch ON Position b preselection switch ON is indicated by the illuminated symbol on the switch If the preselection switch b is ON on each pressing of the clutch peda...

Page 42: ...s connected with a latch 39 Foot throttle pedal MAIN SHIFTING LEVER AND REVERSING LEVER 40 Main shifting lever with three stage multiplier control buttons 41 Reversing lever SHIFTING LEVER OF ROAD AND...

Page 43: ...rpm of the PTO engaged the rpm value de pends on the travelling speed of the tractor LEVERS OF THE PARKING BRAKE AND HITCH FOR A SINGLE AXLE TRAILER 42 Parking brake lever a Unbraked b Braked 43 Hitch...

Page 44: ...L PANEL ON THE RIGHT CAB PILLAR 1 Front PTO switch 2 Rear PTO switch 3 Switch of the front working lights on the cab roof 4 Switch of the rear working lights on the cab roof 5 Switch of rearview mirro...

Page 45: ...0 FUEL TANK All the tractor types are equipped with a plastic fuel tank with the volume of 180 l as standard Do not step on the fuel tank DRAIN PLUG OF THE FUEL TANK The hole for draining dirt and fue...

Page 46: ...46 NOTES...

Page 47: ...sing lever 53 Shifting of road and reduced gear speeds 53 Shifting from lower to higher gear speed 54 Shifting from higher to lower gear speed 54 Three stage torque multiplier 54 Indication of the mul...

Page 48: ...ION Page Ensuring free space for the Cardan shaft of the front driving axle 62 Stopping the tractor parking brake 62 Stopping the engine 62 Leaving the tractor 63 Warning indication of a hydrostatic s...

Page 49: ...IF THE ENGINE WILL NOT START Return the key to position 0 Wait for 30 seconds and repeat the start Never support the stopping en gine with the starter motor There is a danger of damaging the starter...

Page 50: ...tem Have the reported error repaired in a specialized repair shop 7 Turn the key to position II start 8 Release the key immediately after start ing the engine Do not start the engine for more than 15...

Page 51: ...heater to electric mains with the voltage of 220 V With regard to reduced wear of the engine during starting at low temperatures the use of the heater is recommended by the manufacturer The heating t...

Page 52: ...g the indica tors must go off and other functions en suring proper operation of the engine The period of running the engine without loading must be observed especially in winter ENGINE PREHEATING Cont...

Page 53: ...direction of the tractor forward reverse F Forward drive N Neutral R Reverse drive The reversing gearbox offers 18 reverse speeds that are approximately as fast as the forward speeds Therefore consid...

Page 54: ...via the neutral position to the lower gear Note To extend the life of the syn chromesh you can shift the gear from higher to lower speed using the double clutch depressing THREE STAGE TORQUE MULTIPLI...

Page 55: ...the tortoise symbol is lit L Two indicators with the tortoise symbol are lit Note On starting or stopping of the trac tor engine the H stage is always engaged automatically SHIFTING THE STAGES OF THE...

Page 56: ...e engine speed continue releasing the clutch pedal smoothly 11 Release the parking brake com pletely 12 Start moving smoothly and slowly Very fast acceleration may cause over loading of the power trai...

Page 57: ...dy Note The gear that allows you to get uphill reliably is also suitable for getting down the hill safely FOOT BRAKES The foot brakes are of the disc wet hy draulically controlled double pedal type wi...

Page 58: ...rking pressure is set by the pres sure controller to 740 20 kPa If the pressure drops below 550 40 kPa the relief valve puts the secondary devices differential lock engagement of the front driving axl...

Page 59: ...ctor type the maximum allowed speed of the set is 30 km h The maximum permissible speed of the set results from the maxi mum permissible speed of the slower vehicle in the set DOUBLE HOSE BRAKES The c...

Page 60: ...ust amount to 12 15 MPa The brake valve makes sure that the brake function overrides the hy draulic function If during depression of the foot brake pedals shocks occur in the hydraulic circuit it is n...

Page 61: ...RIVING AXLE ENGAGED Use the front driving axle in case the rear wheels slip to increase the traction of the tractor On a road and hard surface driving with the front driving axle engaged is ac ceptabl...

Page 62: ...main gear shifting lever to the neutral position 3 After every stopping secure the tractor against accidental movement with the parking brake Activation of the park ing brake is signalled by illumina...

Page 63: ...ever engaged in a low gear position and the wheels secured with wedges Before leaving a tractor with the safety cab remove the key from the switching box and lock the cab Note When the engine is stopp...

Page 64: ...64 NOTES...

Page 65: ...65 RUNNING IN THE TRACTOR Page General principles for running in the new tractor in the course of the first 100 hours of operation 66 During the first 10 hours 66 From 100 hours on 67...

Page 66: ...e engine increased oil consumption is normal in this period Check screw connections mainly of the supporting parts of the tractor Immediately remove all established shortcomings thus you will prevent...

Page 67: ...N After running in you can work with the tractor without any restrictions Recommended operation speed 1400 2300 rpm Idle speed 800 25 rpm Operation oil pressure 0 2 0 5 MPa Oil pressure at the idle sp...

Page 68: ...68 NOTES...

Page 69: ...take care of your assistant s safety Page CBM stage quick adjusting hitch 70 Height adjustment and disassembly of the CBM stage hitch 70 Automatic mouth of the CBM stage hitch 70 Modular system of hi...

Page 70: ...and you can adjust its height or disas semble it When you release the lever from position 2 the locking pins 3 will extend and the lever will automatically return to the initial position AUTOMATIC MO...

Page 71: ...LE The swinging draw bar console module is located in the stage hitch console SWINGING DRAW BAR Disassembly 1 Release and remove the pins 1 2 Slide the swinging draw bar out in the arrow direction Do...

Page 72: ...he locking wedge 2 Locking the hitch fig B By moving the lever 1 in the arrow di rection you will retract the locking wedge 2 HITCH FOR A SINGLE AXLE CBM SEMI TRAILER The hitch for a single axle semi...

Page 73: ...class D2 Hitch class D3 2 000 kg 43 mm 2 000 kg 50 mm The maximum weight of an aggregated braked trailer or semi trailer must not exceed the value specified on the data plate of the tractor and the v...

Page 74: ...ble speed of the set results from the maximum permissible speed of the slower vehicle in the set MAXIMUM PERMISSIBLE VERTICAL STATIC LOAD OF HITCHES FOR TRAILERS AND SEMI TRAILERS Hitch type Permissib...

Page 75: ...d of the tractor PTO 540 rpm or 1000 rpm Different speeds may lead to serious damages and injuries Page Working with PTO 76 Control of the front and rear PTO 77 Rear PTO selection of dependent and ind...

Page 76: ...and disconnect the articulated shaft of the attached machine to and from the tractor with the lever of dependent and independent rpm of the PTO shifted to the N Neutral position 4 Any repairs or clea...

Page 77: ...the electromagnetic valve of the front PTO Z The switch controls the valve of the rear PTO By pressing both the switches you will activate both the PTO s front and rear Activation of the PTO s is ind...

Page 78: ...750 and 1000 rpm with the PTO stopped PTO END PIECES Speed rpm End piece 540 and 1000 rpm standard A 540 6 splines 1000 21 splines standard 540 1000 standard B 540 6 splines 1000 6 splines option 750...

Page 79: ...case of power transmission without impacts the value of the maximum transmitted power can be increased to 50 kW DRIVE OF MACHINES WITH LARGER INERTIAL MASSES CRUSHERS HARROWS MOWING MACHINES ETC The...

Page 80: ...80 NOTES...

Page 81: ...k couplers 83 Oil quantity drawn from the outer hydraulic outlets 84 Hydraulic distributor of the outer hydraulic circuit 85 Description of the functions of individual positions of control levers of t...

Page 82: ...x and final drive housing HYDRAULIC PUMP The hydraulic pump cannot be disen gaged When the engine is running the pump is in operation Pump type Delivered quantity 2 UD 25 02 V 69 l min The pressure ge...

Page 83: ...quick couplers have the inner diameter of 12 5 mm and comply with the international ISO 5675 standard CONNECTING AND DISCONNECTING QUICK COUPLERS When connecting and discon necting the quick couplers...

Page 84: ...pe Max oil consumption 12 litres Gearbox filling Lower mark on the cylindrical part of the dipstick C transmission oil filling increased by 7 litres Type of work On level ground Max oil consumption 27...

Page 85: ...section of the distributor is equipped with lock ing in pressure positions with hydraulic securing In the case of the two section and three section distributor it is the section controlling quick coup...

Page 86: ...imit position With an increased force you can shift the control levers from position 3 further to the front to position 4 i e floating free position where the levers are locked Both the quick couplers...

Page 87: ...ith pressure quick couplers 1 to 4 The third quick coupler marked 0 is di rectly connected to the final drive hous ing and is designed for return oil from ex ternal hydraulic implements e g from ro ta...

Page 88: ...4 or 6 Connecting a rotational hydraulic motor If a rotational hydraulic motor is connected to an outer outlet of the hydraulic system its return branch must always be connected to quick coupler 0 In...

Page 89: ...n 92 Vibration compensator damper 93 Limitation of the upper position of the three point hitch 93 Lowering speed 94 Free position 94 Work in the field 95 Using the rear control 96 External control but...

Page 90: ...ion c 2 Blocking in the transport position 3 Lowering speed 4 Setting the position of the lifting device 5 Upper position limitation 6 Stepless control setting power positional 7 LED diagnostic 8 LED...

Page 91: ...ed The engine can only be started if the engine 1 is in position b The EHR B electro hydraulic system is only active when the engine is started Activation of the EHR B system is only possible when the...

Page 92: ...F IMPLEMENTS Shift the lifting lever 1 to position a and block it with the moving latch 2 Blocking the lifting lever 1 by the mov ing latch 2 in position a A Lever movement blocked B Lever movement no...

Page 93: ...sition limiter 5 Advantages of active dampening of vibrations during transport of a heavy implement attached to the rear three point hitch 1 Increased operation safety the steering axle is not unloade...

Page 94: ...imum lowering speed In the vibration dampening mode and during the use of the rear control buttons the lowering speed setting is out of function FREE POSITION For permanent work with free hydraulic sy...

Page 95: ...nt To set the control type and their combination use the control 6 Power control symbol Positional control symbol The control activity lifting and lowering can be monitored with the use of the in dica...

Page 96: ...s long as the button is held Every use of the rear control causes blocking of the control system and the Blocking cancellation must be repeated see page 130 EXTERNAL CONTROL BUTTONS OF THE ELECTRO HYD...

Page 97: ...ERRORS Flashing combination of the diagnostic LED 7 Long pause No of flashes Short pause No of flashes Error category Error description 1x 1x 1x 2x 1x 3x 1x 4x 1x 5x 1x 6x Serious error Error with in...

Page 98: ...c pin A Faulty dynamometric pin 3x 2x Left dynamometric pin A Faulty contact or interrupted conductor of the dynamometric pin Short circuit of the dynamometric pin conductor Possible overloading of th...

Page 99: ...th extensible end pieces 102 Lower draw bars with CBM hooks 102 Securing the lower draw bars with CBM hooks 103 Upper draw bar 103 Front three point hitch 104 Front three point hitch control 104 Adjus...

Page 100: ...ower draw bars G452 SAFETY PRINCIPLES OF WORKING WITH THE THREE POINT HITCH Persons that are not authorized to work with the attached implement must not stand between the tractor and the hitched machi...

Page 101: ...RAW BARS Fixed position of the lower hydraulic draw bars A The pin head 1 and washer 2 are in stalled horizontally Free position of the lower hydraulic draw bars B The pin head 1 and washer 2 are in s...

Page 102: ...n by the securing pegs 1 Always check the position of the extensible end pieces and the securing pegs see fig 3 LOWER DRAW BARS WITH CBM HOOKS The lower 3 and upper 4 draw bars of the hitch are equipp...

Page 103: ...anging to one side we recommend you to securely lock the lower draw bar hook by inserting an M8 screw in the opening S and locking it with a nut UPPER DRAW BAR The upper draw bar 1 has adjustable leng...

Page 104: ...e acting hydraulic cylinders that are sup plied with oil from the integrated hydrau lic distributor The lifting and lowering is controlled by the control lever of the in tegrated distributor 1 Positio...

Page 105: ...Transport position of the front three point hitch Changing the position of the draw bars of the front three point hitch 1 Release and remove the pin 1 from the opening 2 Lift the arm from position A t...

Page 106: ...106 NOTES...

Page 107: ...g axle of the tractors 108 Toe in of the wheels of the front driving axle 109 Adjustment of toe in of the wheels of the front driving axle 110 Fenders of the front driving axle 110 Setting the wheel s...

Page 108: ...e of 200 220 Nm You can change the wheel track by changing the position of the rim and disc First secure the tractor against moving lift the axle with a lifting jack and support it Loosen the nuts of...

Page 109: ...Proper toe in of the front wheels of tractors with the front driving axle is 0 to 2 mm and is measured on the front wheel hub flanges if the front wheels are installed you can measure toe in on the wh...

Page 110: ...eads of the ball screws 2 of connecting rods of the steering at the hydraulic cylinder Adjust the toe in value by turning the shank of the ball screw 3 Perform the adjustment of both the joints symmet...

Page 111: ...he front three point hitch without fenders with fenders Tyres Wheel track mm Right stop A mm Left stop A mm Right stop A mm Left stop A mm 12 4 R24 1590 1740 1890 50 33 19 47 33 20 50 33 19 47 35 25 3...

Page 112: ...nst moving by wedging the front wheels After changing the wheel track tighten all the screws connecting the disc with the rim with the torque of 200 220 Nm and the nuts of the screws connecting the di...

Page 113: ...ar wheel weights 114 Bottom weights 114 Front weights 115 Weight of the front three point hitch 115 Valve for filling tyre tubes with liquid 116 Procedure of filling the tyres with liquid 116 Procedur...

Page 114: ...2x25 4x30 170 2 6 2x25 6x30 230 2 10 2x25 10x30 350 BOTTOM WEIGHTS Combina tion of weights pcs Mass of weights kg 2 2x34 68 They are installed in case the tractor is not equipped with the front PTO in...

Page 115: ...ier They are protected from lateral movement with a pin inserted between the central weights The other weights are attached to the central ones with two clamps Note After the insertion of the pin the...

Page 116: ...the tyre by lifting the tractor and turn it with the valve upwards A 2 Deflate the tyre and unscrew the valve insert 3 Screw the adapter for water filling on and attach the liquid supply hose to it 4...

Page 117: ...er position B 3 Remove the rest of the liquid after screwing on the adapter for water filling by sup plying pressurized air C 4 Blow out the liquid until it stops running through the tube of the air a...

Page 118: ...ater l kg Calcium chloride solution CaCl2 kg Water l Extra load ing kg 16 9 34 250 108 166 274 16 9 38 290 126 192 318 18 4 34 330 144 218 362 18 4R 38 385 168 254 422 480 70R38 335 146 222 368 18 4 3...

Page 119: ...s tyres by the manufac turer Solution preparation 1 Dry calcium chloride CaCl2 is added to water never the other way round 2 The solution is not dangerous but it is necessary to work carefully with it...

Page 120: ...120 NOTES...

Page 121: ...ing Page Electric system 122 Basic service information 122 Accumulator battery 123 Battery disconnector 123 Accumulator battery maintenance 124 Alternator 125 Alternator maintenance 125 Fuse box 126 C...

Page 122: ...an auxiliary battery do not forget to connect the terminals plus to plus and minus to minus If you replace a part of the charging circuit disconnect the battery from the tractor ground with the batter...

Page 123: ...step 4 Remove the safety pin 3 5 Grasp the bottom edge of the cover and remove it BATTERY DISCONNECTOR The battery disconnector is lo cated at the left hand side of the tractor near the starter motor...

Page 124: ...stic substance therefore handle it with proper care If your skin or clothes get stained by electro lyte wash the skin or clothes with water and neutralize them with soap 4 During charging hydrogen is...

Page 125: ...protect the alternator from penetration of water or diesel fuel During operation the alternator must not be disconnected from the battery The alternator must never be put in operation without load i...

Page 126: ...PTO control multi plier control EHR control 4 15A High beam lights with the indicator 5 15A Left position lights dashboard light ing registration number lighting 6 15A Right position lights rear work...

Page 127: ...r l distance of the test wall from the headlight 5 m h height of the headlight centre above the road surface h headlight inclination 3 5 to the distance of the test wall 17 5 cm raising of the outline...

Page 128: ...the headlight centre further than 30 m from the front outline of the tractor In the horizontal direction the light beams must be parallel with the longitudinal axis of symmetry of the tractor Check th...

Page 129: ...V 10 W BA 15 s 4 Working light H 3 12 V 55 W PK 22 s 5 Rear combined lights Tail lights 12 V 10 W BA 15 s Brake lights 12 V 21 W BA 15 s Turn signal lights 12 V 21 W BA 15 s 6 Working and ploughing li...

Page 130: ...130 NOTES...

Page 131: ...Front PTO oil 136 Oil for transmission systems of the tractors 137 Oil for transmission systems of the tractors 137 Oil for the front driving axle 138 Oil for the hydrostatic steering of the tractors...

Page 132: ...unction indicator Check the charging function indicator Check the steering function indicator Check the function and tightness of the steering circuit Check the function and efficiency of the tractor...

Page 133: ...layer of grease Check the tightness and function of the pressurized air system Check the function of the driver s seat lubricate the movable parts with grease STEPS PERFORMED OUTSIDE THE INTERVAL OF...

Page 134: ...nt of heating every 1000 hours or once every 2 years Replace coolant once every 2 years Replace brake liquid once every 2 years Replace oil in the gearbox and final drive housing o 1500 Clean the magn...

Page 135: ...arbox and final drive housing oil 52 Front PTO gearbox oil 2 7 Fuel 180 This is the standard filling of the gearbox and final drive housing Depending on the type of work and use of the tractor on a sl...

Page 136: ...I CG 4 MV truck LD 15W 40 API CI 4 Fuchs Titan Truck 15W 40 API CG 4 For extremely low ambient temperatures we recommend you to use engine oil with the viscosity class 10W FRONT PTO OIL Manufacturer O...

Page 137: ...THE TRACTORS TAB 2 Manufacturer Oil designation Viscosity class SAE Performance class API Shell Shell Donax TD 80W GL 4 Shell spirax GX 80W GL 4 Aral EP 80 80W GL 4 Fluid HGS 80W GL 4 Super Traktoral...

Page 138: ...1030MC 10W 30 GL 4 Titan Renep 8090MC 80W 90 GL 4 GL 5 MV Gear Oil LS 85W 90 GL 5 OIL FOR THE HYDROSTATIC STEERING OF THE TRACTORS Manufacturer Oil designation Classification Shell TELLUS DO 32 HLP D...

Page 139: ...together LIQUID FOR THE COOLING SYSTEM OF THE TRACTORS FRIDEX STABIL FRIDIOL 91 or FRICOFIN S and demineralised water in the proportion of 1 1 5 replenish the mixture in this proportion Antifreeze liq...

Page 140: ...fuel types abroad should be used in a similar way Natural Diesel mixed fuel bio diesel Note Using bio fuel in the tractor requires installation of REP hoses in the fuel system Using bio fuel increases...

Page 141: ...141 TRACTOR MAINTENANCE LUBRICATION PLAN OF THE TRACTOR FRONT DRIVEN AXLE Pos no Identification No of lubrication points 1 Turning radius pins 4 2 Central pin 2...

Page 142: ...SINGLE AXLE SEMI TRAILER Pos no Identification No of lubrication points 1 Hook pin bearings 0 to 4 by version FRONT THREE POINT HITCH Pos no Identification No of lubrication points 1 Pins of cylinder...

Page 143: ...E POINT HITCH Pos no Identification No of lubrication points 1 Pins of auxiliary hydraulic cylinders 2 2 Lifting draw bars 2 HITCH MOUTH FOR A TRAILER Pos no Identification No of lubrication points 1...

Page 144: ...n of the following distribution of tractor work Ploughing and pre sowing soil treatment 15 25 Sowing and planting 10 15 Harvest work 10 20 Farming transport 40 65 If the tractor works in mountainous a...

Page 145: ...air cleaner maintenance instructions 151 Recovery of the main air cleaner element 151 Replacing the safety element of the air cleaner 151 Reassembly of the air cleaner elements 152 Hydrostatic steerin...

Page 146: ...ONS Page Tyre inflation 163 Recommended inflation values of the front wheel tyres 164 Recommended inflation values of the rear wheel tyres 165 Tyres for driving wheels 166 Tyres for driving wheels 166...

Page 147: ...safety peg Note Perform the assembly and disas sembly from the operator s position in front of the front axle DISMANTLING THE REAR SIDE PLATE OF THE HOOD After unlocking the safety peg lift the right...

Page 148: ...plug 3 best immediately after a drive or after heating the engine to the working tem perature Clean the drain plug before re turning it to its place Check the sealing ring for integrity REPLACING THE...

Page 149: ...ipstick 1 to check the oil level and check the cleaner drain plug 3 and other joints for leaks REPLACING THE FUEL FILTER ELEMENT Replace the filter element after releasing the nut 1 and unscrewing the...

Page 150: ...system with several strokes of the manual control of the priming pump 1 2 Release the screw 2 of the fitting of the fuel inlet to the filter and let the foam es cape 3 Retighten the screw and repeat...

Page 151: ...by pulling If the main element is not damaged there must not be any dust on the inner side of the element recover it by blow ing pressurized air from the inner side of the element This way you can rec...

Page 152: ...st not vibrate After closing of the cleaner with the lid the whole cleaner must be perfectly leak proof After the maintenance of the dry air cleaner ensure proper functioning of the clogging indicator...

Page 153: ...ing tank 3 Release the drain screw 4 Drain oil from the tank 5 Unscrew the tank lid 6 Replace the filtration element 7 Install the new element 8 Disconnect both the hoses from the working cylinder and...

Page 154: ...and let it run at the idle speed for approx 1 minute 2 Turn the steering wheel several times to both the sides at the idle speed of the engine 3 At the maximum engine speed turn the wheels with the st...

Page 155: ...ieces and on the hose surface abrasion of the hose surface to the metallic reinforcement damage of the outer yarn braiding in the case of low pressure hoses In case of a pump failure or after stopping...

Page 156: ...oth the drain valves leave the heating valve open 5 Fill the cooling system with coolant up to the neck of the compensation tank and close it with the overpressure plug 6 Start the engine and let it r...

Page 157: ...pending on the way the tractor is used Measure the oil level in the gearbox with the engine stopped by completely inserting the plug with the dipstick to the pipe mouth Gearbox oil level Tractor use A...

Page 158: ...the dipstick LUBRICATION AND FILLING POINTS OF THE FRONT DRIVING AXLE 1 Lubricating nipple of the kingpin 2 Sliding bearings 2 pieces of the front driving axle 3 Drain opening of the final drive housi...

Page 159: ...LIQUID REPLENISHMENT The tank is accessible after the removal of the right rear side plate of the hood Maintain the brake liquid level in the range of 3 4 of the tank content max level and 1 2 of the...

Page 160: ...rmal filters The filter must be inserted with the white side towards the grill The installation instructions are found on the next page The filter is only used during spraying of pesticides then it mu...

Page 161: ...e cooler back and fix it properly Be careful about the proper routing of hoses to the oil cooler When the air conditioning functions properly water condenses in the roof space of the cab and the conde...

Page 162: ...y be fore driving with a trailer or semi trailer In case of a brake system failure or if the pressure drops below 450 kPa the warning indi cator on the dashboard will light up WORKING PRESSURE OF AIR...

Page 163: ...hen the tyres are cold To inflate the tyres use the pressure controller B which acts as a pressure equalizer tyre filling device and safety valve Remove the rubber cap of the pressure controller and s...

Page 164: ...oader at the maximum permitted speed of 8 km h Load bearing capacity kg max 2830 max 2040 max 1910 Tyre dimensions and design Principal working activity 14 9R24 380 70R24 420 70R24 12 4 28 10PR For fi...

Page 165: ...6 9R38 480 70R38 18 4R38 520 70R38 18 4 38 For field work Inflation kPa 110 140 130 160 120 160 130 160 110 160 130 140 Load bearing capacity kg 1940 2230 2255 2575 2500 2900 2625 3000 2635 3350 2595...

Page 166: ...40 140 120 107 100 90 80 125 100 100 100 100 100 minimum value for 6 PR It is not allowed to increase the load bearing capacity of the tyres except the above mentioned cases by further in creasing the...

Page 167: ...justing the play of the brake pedals 169 Bleeding the brake system of the tractor 169 Bleeding the rear brake system 170 Adjusting the play of the clutch pedal 171 Bleeding the hydraulic circuit of th...

Page 168: ...lt to the prescribed value after releasing the fixation screws of the AC compressor RETIGHTENING THE CYLINDER HEAD The engine cylinder head is retightened with the cold engine in the prescribed or der...

Page 169: ...ut 1 that the piston rod is screwed in BLEEDING THE BRAKE SYSTEM OF THE TRACTOR Do the bleeding with the pedals discon nected for each wheel separately as fol lows Note When bleeding the hydraulic bra...

Page 170: ...Depress the brake pedal release the bleeding screw by 1 4 turn at the most further depress the brake pedal and tighten the bleeding screw Release the brake pedal and repeat the procedure until air bu...

Page 171: ...r stop screw 2 can be 0 1 0 2 mm at the same time Then the piston rod is secured with the nut 3 with regard to the lug After the adjust ment check whether the dust cap of the cylinder is not deformed...

Page 172: ...such a way that you depress one of the pedals slightly and perform the bleeding of one pair of the brake stirrup cylinders of the 1st circuit with the other pedal Then change the pedals and bleed the...

Page 173: ...basic adjustment check the operation of the foot brakes to see whether the braking effect of both the wheels is the same If not loosen the adjustment nut 4 by the required value on the side where the...

Page 174: ...arms to the upper transport position with the position control selected and the vibration compensator off Screw the nuts on the adjustable draw bars towards the guiding pipe without any play Tighten t...

Page 175: ...to the beginning of the 100m track Simultaneously press the button A and button B Hold the buttons de pressed for 7 s The dashboard is switched over to the calibration mode Start will start flashing...

Page 176: ...176 NOTES...

Page 177: ...anoeuvrability condition 182 Load bearing capacities of the front tyres 183 Change of the load bearing capacity of the front tyres 183 Load bearing capacities of the rear tyres 184 Change of the load...

Page 178: ...nders 1890 Height to the exhaust outlet 2694 2780 depending on tyre dimensions Tractor height to the upper cab edge 2639 2725 depending on tyre dimensions Inner height under the front axle support 468...

Page 179: ...1 3 4 2 1 3 4 2 Compression ratio 17 17 17 17 Max overspeed rpm 2460 2460 2460 2460 Idle speed rpm 800 25 800 25 800 25 800 25 Net power at the nominal speed kW 66 74 81 90 Fuel consumption at the nom...

Page 180: ...re C 106 Timing type OHV Oil cleaner Full flow single use type Fuel cleaner Single stage with a replaceable element Injection pump type PP4M10P1i 3775 PP4M10P1i 3776 PP4M10P1i 3767 PP4M10P1i 3766 Nozz...

Page 181: ...y refers to the entire axle the permissible load with regard to tyres is specified in the tab Load bearing capacity of the front tyres MAX PERMISSIBLE LOAD OF THE REAR AXLE KG Wheel track mm Travellin...

Page 182: ...RACTOR MACHINE SET KG Travelling speed km h Maximum weight of the set 8 9000 20 8000 30 8000 40 8000 MANOEUVRABILITY CONDITION Travelling speed km h Weight of the front axle of the tractor out of the...

Page 183: ...1950 3900 160 2464 4930 180 14 9R24 1700 3400 160 1820 3640 160 1950 3900 150 2550 5100 160 380 70R24 1650 3300 160 1765 3530 160 1950 3900 150 2475 4950 160 420 70R24 1900 3800 160 1950 3900 160 1950...

Page 184: ...0 160 2750 5500 130 3400 6800 130 18 4 38 2170 4340 140 2715 5430 140 2750 5500 110 3400 6800 110 18 4R38 2750 5500 140 2750 5500 140 2750 5500 110 3400 6800 120 480 70R38 2750 5500 150 2750 5500 150...

Page 185: ...0R38 13 6R24 380 70R24 18 4R38 18 4 38 520 70R38 600 65R38 18 4R38 18 4 38 520 70R38 600 65R38 12 4 28 420 70 R24 14 9R24 14 9 24 16 9R38 480 70R38 Caution The combinations of dimensions of the front...

Page 186: ...60 8 66 5 73 9 Engine after the running in stage from 100 hours on 56 5 64 0 70 0 77 8 LIFTING FORCE OF THE THREE POINT HITCH Lifting force at the end of the bottom draw bars of the rear three point...

Page 187: ...858 17 0 17 5 L 34 336 19 2 19 8 L 44 983 14 7 15 1 H 38 859 17 0 17 5 H 51 883 12 7 13 1 2 Hi M 44 930 14 7 15 1 1 Hi M 59 987 11 0 11 3 L 52 012 12 7 13 1 L 69 443 9 49 9 79 H 59 989 11 0 11 3 H 91...

Page 188: ...d engine speed PTO speed engine speed 3 54 540 1913 621 2200 1 95 1000 1950 1128 2200 2 89 750 2171 760 2200 SPEED OF THE ZUIDBERG FRONT PTO Turning direction PTO speed engine speed PTO speed engine s...

Page 189: ...5 mm 9 690 mm With engagement of the front driving axle 13 130 mm 12 180 mm Track diameter With engagement of the front driving axle with braking of the inner rear wheel 8 795 mm 8 360 mm Without enga...

Page 190: ...190 NOTES...

Page 191: ...172 Bleeding the fuel system 150 Bleeding the hydraulic circuit of the clutch 171 Bleeding the hydraulic circuit of the hydrostatic steering 154 Bleeding the rear brake system 170 Blocking cancellatio...

Page 192: ...34 Filling the engine with oil 149 Filling inspection and drain opening of oil of the front wheel redu cers 158 Fixed and free position of the lower hydraulic draw bars 101 Foot brake adjustment 173 F...

Page 193: ...or a single axle trailer 43 Lifting force of the three point hitch 186 Light switch A 37 Lighter and three pin socket 40 Limitation of the upper position of the three point hitch 93 Limiting draw bars...

Page 194: ...pieces 78 Q Quick cooling of the cab space 30 Quick sinking 92 R Rear outlets of the outer hydraulic circuit 87 Rear PTO selection of dependent and independent speed rpm 77 Rear three point hitch 100...

Page 195: ...37 Switching box 39 T Technical data of tractors 179 Technical maintenance of the tractors after a general overhaul of the main groups 144 Tensioning the V belt 168 Tensioning the V belt of the AC com...

Page 196: ...196 Operator s manual Forterra 95 Forterra 105 Forterra 115 Forterra 125 Edition I 300 2009 Publication No 22 22 12 488 Zetor Tractors s r o Department of Technical Documentation Trnkova 111 632 00...

Page 197: ......
Reviews: