background image

Maintenance

Cleaning:

Avoid exposing your Raven drone and its accessories to dust, sand and moisture 

as these can damage the Raven drone. If the Raven drone is exposed to dust  

or sand, use a soft brush to remove any visible particles.

3.


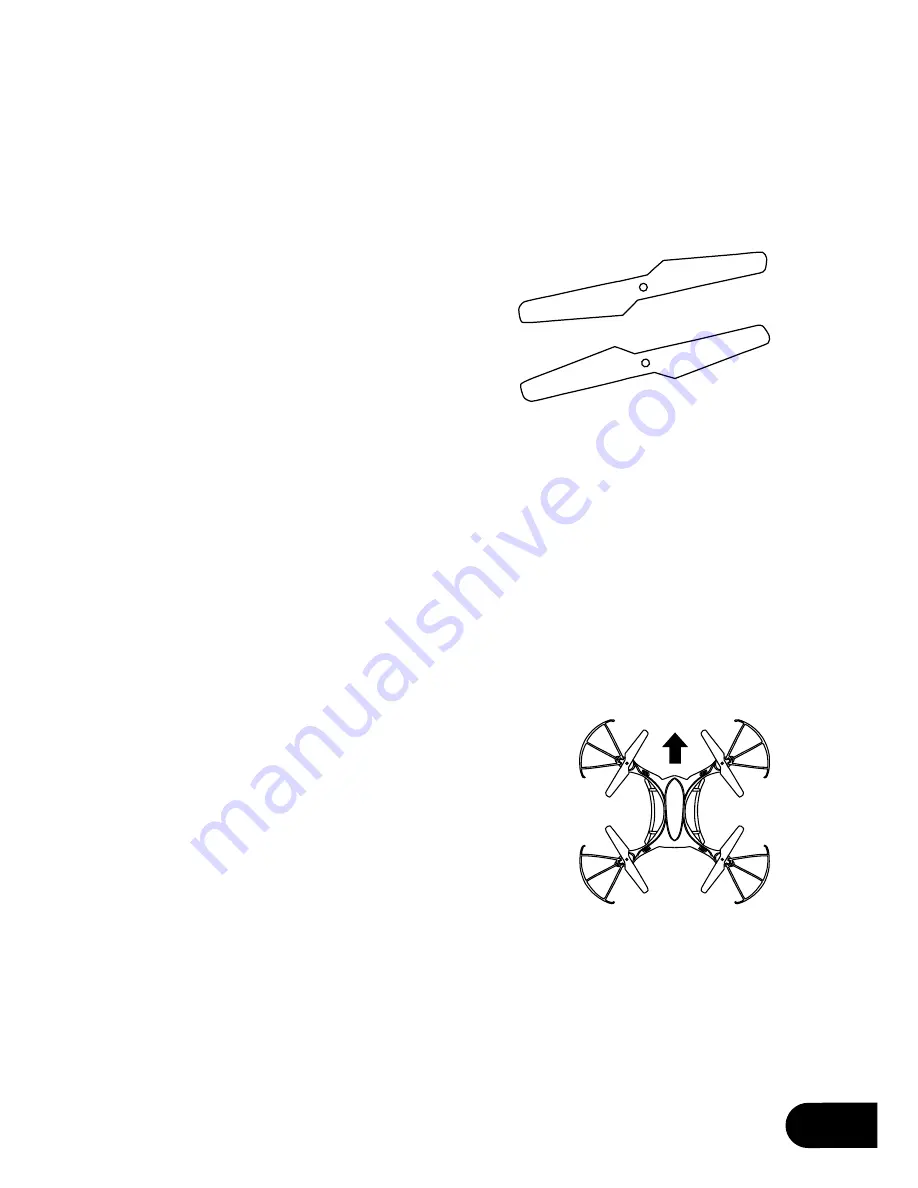
Ensure that you are replacing the Rotor Blade with the correct blade as 

    there are two different orientations of blades which are labelled A and B on 

    the underside of the blade.

    If the incorrect blade is used in the incorrect placement the Raven drone  

    WILL NOT WORK.
  

Different colour Rotor Blades are used front and back on your Raven drone 

    so  it  is  easy  to  identify  the  front  and  rear  of  the  Raven  drone  when  flying.  

    To ensure that it is easy to fly the Raven drone make sure that the front and  

    rear  blades  are  different  colours.Because  Assisted  Return  Mode  causes  the 

    drone to move quickly, it is advised that this function is only used in an open 

    space and while the drone is not in Directional Lock Mode.

Parts and Accessories

To purchase parts and accessories for your Zero-X Raven drone, please visit your 

nearest Zero-X retailer or visit us online at www.zero-x.com.au or www.zero-x.co.nz
ZXRBRVBW Rotor Blades for Raven - Black and White
ZXRBRVVP Rotor Blades for Raven Value Pack
ZXBATRV700 700mAh Battery for Raven
ZXCHRVDR Battery charger for Raven

19

Rotor Blade replacement:
1.


Use the Included screwdriver to 

   remove the screw on the top 


    of the Rotor Blade.

2.


Gently remove the Rotor Blade.

4. 

Gently push the replacement Rotor Blade 


  into place. Replace the screw being careful 

  not  to  over  tighten.  If  the  screw  will  not  fit  in 

  place, remove the screw and make sure 

  that the holes on both the Rotor Blade and 

  the rod are aligned.

A

B

Summary of Contents for RAVEN DRONE

Page 1: ...USER MANUAL PRODUCT CODE ZXRVN www zero x com au www zero x co nz RAVEN DRONE v2...

Page 2: ......

Page 3: ...his information as operating a drone outside of these guidelines may result in legal issues The manufacturer takes no responsibility for operation of this product outside of what is legally permissibl...

Page 4: ...ry for any damage or swelling Do not cover the batteries when charging Do not leave batteries in direct sunlight If the battery is damaged leaking making noise punctured or malformed in any way DO NOT...

Page 5: ...kage Contents 2 9 8 1 Raven Drone 2 Remote Control 3 Drone battery 4 Drone battery charger 5 Drone Feet 6 Rotor Guards 7 Spare Rotor Blades 8 Screwdriver 9 Manual 10 USB Wall Charger 1 4 5 7 6 A B A B...

Page 6: ...4 Raven Drone Diagram 1 LED Lights 2 Camera 3 Power Switch 4 Micro SD Card Slot 5 Feet 6 Battery Hatch 7 Rotor Blades 8 Rotor Guards Micro SD Card not included 1 2 5 3 6 4 7 8 Under Side View...

Page 7: ...oto Button 6 Video Button 7 Light Button 8 Directional Lock Button 9 Assisted Return Button 10 Speed Button 11 Flip Button 12 Yaw Trim Controller 13 Roll Trim Controller 14 Pitch Trim Controller 15 Ca...

Page 8: ...Diagram 1 Drone Diagram 2 Connection Strength 3 Remote Battery 4 Acceleration Level 5 Pitch Trim Balance 6 Yaw Trim Balance 7 Roll Trim Balance 8 Light Indicator 9 Channel connection 10 Acceleration...

Page 9: ...the LED light in the charger will glow red Connect the drone battery to the charging cable and the light will glow red indicating charging is in process The LED on the USB charging cable will begin to...

Page 10: ...battery with the charging wires facing outwards Close the battery hatch making sure the door clicks into place Release the battery hatch lock by gently squeezing the sides of the door at the front of...

Page 11: ...facing the correct way as plugging these in incorrectly could permanently damage the connection pins on the Raven drone Installing a Micro SD Card With the Raven drone upside down and facing away from...

Page 12: ...attach them Whether Rotor Guards are attached or not please be very careful when handling the drone To avoid injury do not touch the drone while the blades are turning or the remote control is powere...

Page 13: ...your Raven drone make sure that you are in a safe setting CASA restrictions regarding flying drones require the drone to be no closer than 5 5kms from any airport or airfield whilst flying Drones shou...

Page 14: ...3 With the Left Thumbstick Acceleration Yaw 2 in the lowest down position power on the remote control 1 The remote should beep once to indicate power up has been successful 4 To activate the connectio...

Page 15: ...ven drone may not have been completed correctly Ensure that when activating the connection the Left Thumbstick is moved all the way to the top and then all the way to the bottom If this is not complet...

Page 16: ...ed Button 10 once and the Remote Control will beep twice indicating that the Raven drone is now in the medium Speed Mode In this mode the sensitivity of both the acceleration and directional control o...

Page 17: ...Control to the left of the Right Thumbstick This will balance the forward and back movement of the Raven drone Trimming Roll To trim the Raven drones roll use the Roll Trim Controller which is the sm...

Page 18: ...ht on the camera will start flashing red indicating that recording is in progress To stop recording push the Video Button 6 again and the light on the camera will return to shining green Ensure you ha...

Page 19: ...flash indicating that the drone is now in Directional Lock mode It is important that you do not change the orientation position you are standing in when you activate Directional Lock as this will aff...

Page 20: ...start moving backwards 4 Use the Right Thumbstick Pitch Roll 3 to guide the Raven drone left and right to avoid obstacles while it is moving backwards 5 Use the Left Thumbstick Acceleration Yaw 2 to l...

Page 21: ...lades are different colours Because Assisted Return Mode causes the drone to move quickly it is advised that this function is only used in an open space and while the drone is not in Directional Lock...

Page 22: ...2 4Ghz Camera Resolution 720P Photo Resolution 2MP Video Format AVI Photo Format JPG Memory SD Micro Card Dimensions 37 9cm x 37 9cm Weight 219g Channels 4 Battery 700mAh Transmitter Battery 4 x AA b...

Page 23: ...ging This warranty is only valid where you have used the product in accordance with any recommendations or instructions provided by Zero X This warranty excludes defects resulting from alterations of...

Page 24: ...www zero x com au www zero x co nz Zero X v2 0 2016...

Reviews: