background image

6

Grand Master and Blackout


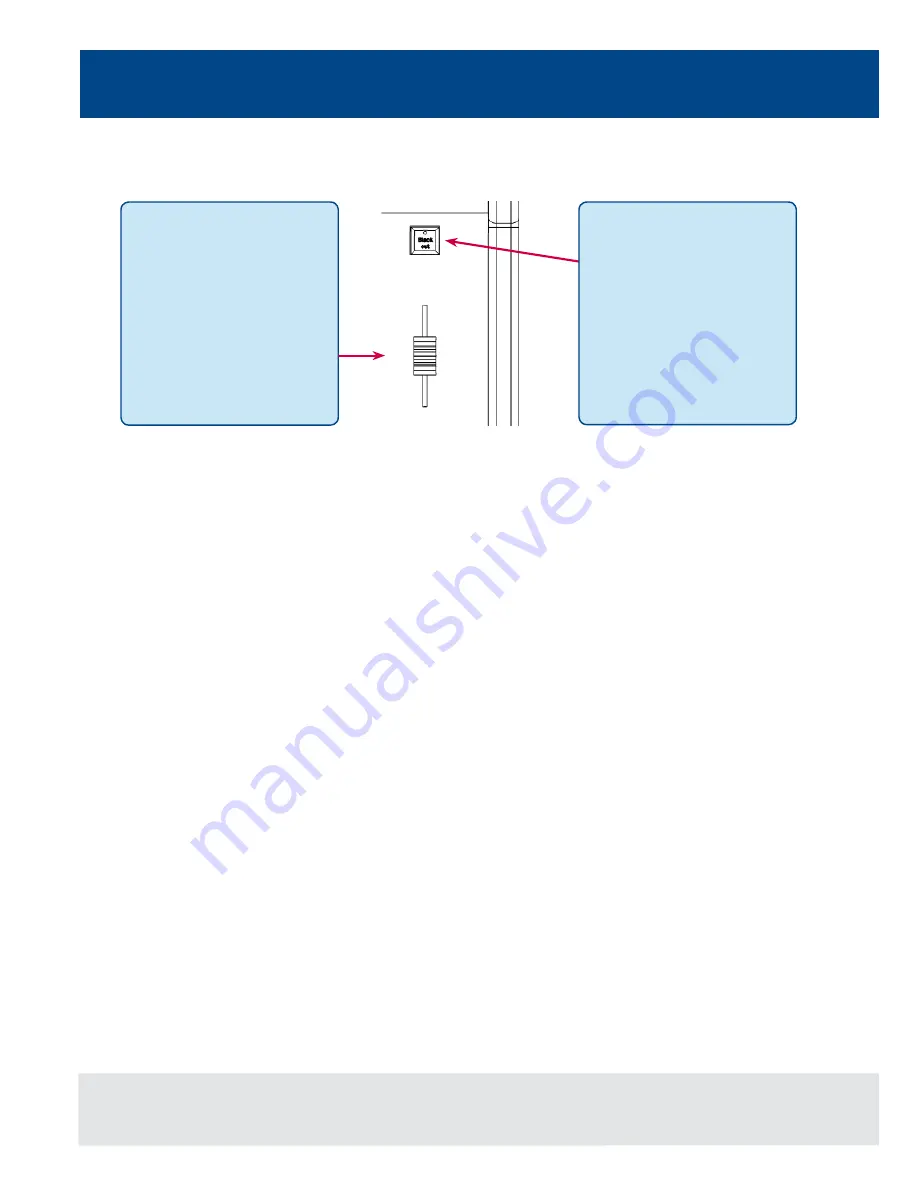
Figure 3 - Grand Master and Blackout

Grand Master and Blackout

The GRAND MASTER fader 
allows you to temporarily limit 
the output values of all dimmer 
channels. The Grand Master 
level is displayed on the monitor 
screen task bar. In normal  
operation the Grand Master 
should be at 100%.

The BLACKOUT key enables 
you to lock the dimmer outputs 
from the desk at 0%, regardless 
of the level of the Grand Master 
Fader. Pressing the BLACKOUT 
key toggles between enabled 
and disabled. The red LED in the 
BLACKOUT key flashes when 
blackout is enabled and BLK is 
displayed on the monitor screen.

Summary of Contents for ORB Series

Page 1: ...English 2 0 Quick Start Guide ORB Series...

Page 2: ......

Page 3: ...ed as follows Desk Setup Values Syntax keys which appear on the LCD screen above the main keypad are displayed as follows Knockout Close Merge The ORB Series The ORB Series of lighting control desks c...

Page 4: ...the 4 DMX universes available Fixtures Every device controlled by an ORB Series desk is known as a Fixture Fixtures can be a simple generic dimmer channel or a complex DMX device such as a colour scro...

Page 5: ...k Masters into Submasters The ORB XF provides 20 pages of upto 60 Submasters which are mapped to the Multi Function Faders Intensity and Attribute Control on the ORB Series The desks have two distinct...

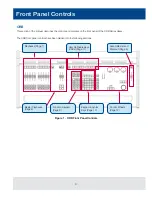
Page 6: ...the ORB Series desks The ORB front panel controls have been divided into the following sections Figure 1 ORB Front Panel Controls Grand Master and Blackout Page 6 Playbacks Page 7 User Definable Keys...

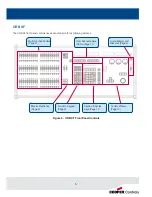
Page 7: ...nto the following sections Figure 2 ORB XF Front Panel Controls Grand Master and Blackout Page 6 Multi Function Faders Page 8 User Definable Keys UDKs Page 11 Control Wheels Page 12 Keypad Syntax Keys...

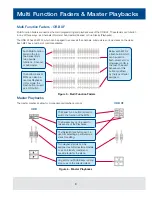
Page 8: ...level is displayed on the monitor screen task bar In normal operation the Grand Master should be at 100 The BLACKOUT key enables you to lock the dimmer outputs from the desk at 0 regardless of the le...

Page 9: ...tacks and activating cue stacks on the Master Playback These are detailed in later sections The Master Fader allows you to override the programmed dimmer level A PAUSE key temporarily stops a fade whi...

Page 10: ...ttom bank of MFFs can also be used as Playbacks In this mode the Flash button is used as a GO button The Release key can be used to release any of the Playbacks The Select Stack button can be used for...

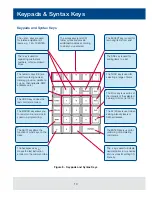
Page 11: ...rom the programmer releasing those channels from control TRY CUE lets you try out a crossfade before programming the cue LOAD allows you to bring back a programmed item into the programmer for alterat...

Page 12: ...mand entered The MACRO key allows you to record and run macros to speed up programming The SHIFT key alters the function of most keys on the desk The backspace key f moves the last instruction entered...

Page 13: ...ORB can be changed by pressing the UDK PAGE button and entering the required number in syntax eg UDK PAGE 4 ENTER On ORB XF this function uses the PAGE key and a UDK softkey Pressing SHIFT and a UDK...

Page 14: ...y wheel is used for adjusting the intensity of the currently selected fixture s The intensity level is displayed on the LCD screen above the wheel The three control wheels are used for setting and adj...

Page 15: ...ou start programming cues etc you will need to set up the desk The desk comes with a default patch of channels on ORB 1 to 96 are assigned to DMX addresses 1 to 96 on DMX universe 1 as standard Dimmer...

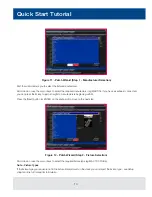
Page 16: ...e M key to jump straight to manufacturers beginning with M Press the Next button or ENTER on the keyboard to move to the next step Figure 12 Patch Wizard Step 2 Fixture Selection Scroll down or use th...

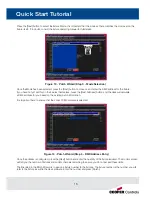
Page 17: ...button and the desk will calculate a DMX address for you based on the existing patch information It is important here to ensure that the correct DMX universe is selected Figure 14 Patch Wizard Step 4...

Page 18: ...should now have moved to their Home positions You can repeat the Patch Wizard for every group of fixtures you have Exiting Setup Once you have finished making changes to the setup press the SETUP but...

Page 19: ...e group window shows groups of all your fixtures The Output Window is central to the operation of the ORB Series It is recommended that the Output Window is displayed on one of the monitor screens whe...

Page 20: ...tensity wheel to adjust the level The output value is shown on the LCD screen above the corresponding control wheel Using the MFFs ORB XF only The Intensity channel of a fixture can also be adjusted b...

Page 21: ...l send the fixtures to its home values and automatically tags the fixture parameters for programming Controlling Fixture Parameters Each fixture type has it s own set of parameters Intensity Colour Go...

Page 22: ...parameter is tagged If a parameter s value is changed by a command moving the control wheel or directly in the Output Window it will be tagged automatically Figure 17 Output Window Tagged Untagged ch...

Page 23: ...d As you become more experienced with the desk you will find the most efficient way of programming your cues for more methods See Page 96 of the full User Manual Note Record Options Window When you pr...

Page 24: ...e next memory in the stack simply press the GO button again The desk will continue down the cue list one cue at a time Once the end of the cue stack is reached the first cue will be selected as the ne...

Page 25: ...ate each cue individually When updating a cue there are four tracking options available Track Forward Track Backward Track Both or Cue Only For a full explanation of each of these options see page 128...

Page 26: ...ing a palette is simple and very similar to recording a cue Set up the fixture outputs as required ensuring that the correct parameters are tagged To record the data as a colour palette enter the foll...

Page 27: ...y programmed in the applied palette but there are one or more fixtures of the same type that are programmed the fixture will use the values programmed for the first fixture of the same type If the fix...

Page 28: ...s see the UDK chapter Page 111 in full user manual Set up the fixture outputs as required ensuring that the correct parameters are tagged To record the data to a User Defined Key enter the following c...

Page 29: ...xture type in the schedule To create the automatic groups first enter SETUP press the Auto Menus soft key on the touch screen select the Create Auto Groups option then exit Setup User Defined Groups Y...

Page 30: ...hannel Mode all 60 faders function as controls for the dimmers of patched fixtures This is indicated by the MFF window being dark blue Figure 21 MFF Window Channel Mode In Submaster Mode all 60 faders...

Page 31: ...rs Or FADER FUNC Playbacks Figure 23 MFF Window Playback Mode Submasters The ORB Series supports upto 60 submasters which can be paged 20 times to give upto 1200 programmable locations for scenes stor...

Page 32: ...ing SHIFT and pressing SUB Replaying Submasters In this quick start guide we will just look at using the on board controls For details relating to DMX In submasters see the Submasters chapter of the f...

Page 33: ...e If the device does not appear straight away wait a few seconds and then click Refresh Type the show name in the Filename box using an external keyboard or the numeric keypad on the desk Press the OK...

Page 34: ...s OK key to load the show The desk will load the show into its memory and you will be returned to the home screen Loading a show brings back the desk to the same settings that were defined when the sh...

Page 35: ...33...

Page 36: ...zero88 com www zero88 com Cooper Industries 600 Travis Ste 5800 Houston TX 77002 1001 P 713 209 8400 www cooperindustries com International Usk House Lakeside Cwmbran Gwent NP44 3HD UK Tel 44 0 1633...

Reviews: