background image


   Touch-MyDesign


http://www.zennio.com


Technical Support:


http://zennioenglish.zendesk.com


12 

shown by 

Figure 7

 (i.e., with the additional buttons on the left or on the top), the 

meaning of the words “left” and “right” should be assumed inverted as well. 

Note: this parameterization does not alter the names of the touch  buttons or of 

their objects. It does not affect the behaviour of the non-pair buttons (such as the 

additional buttons) either. 

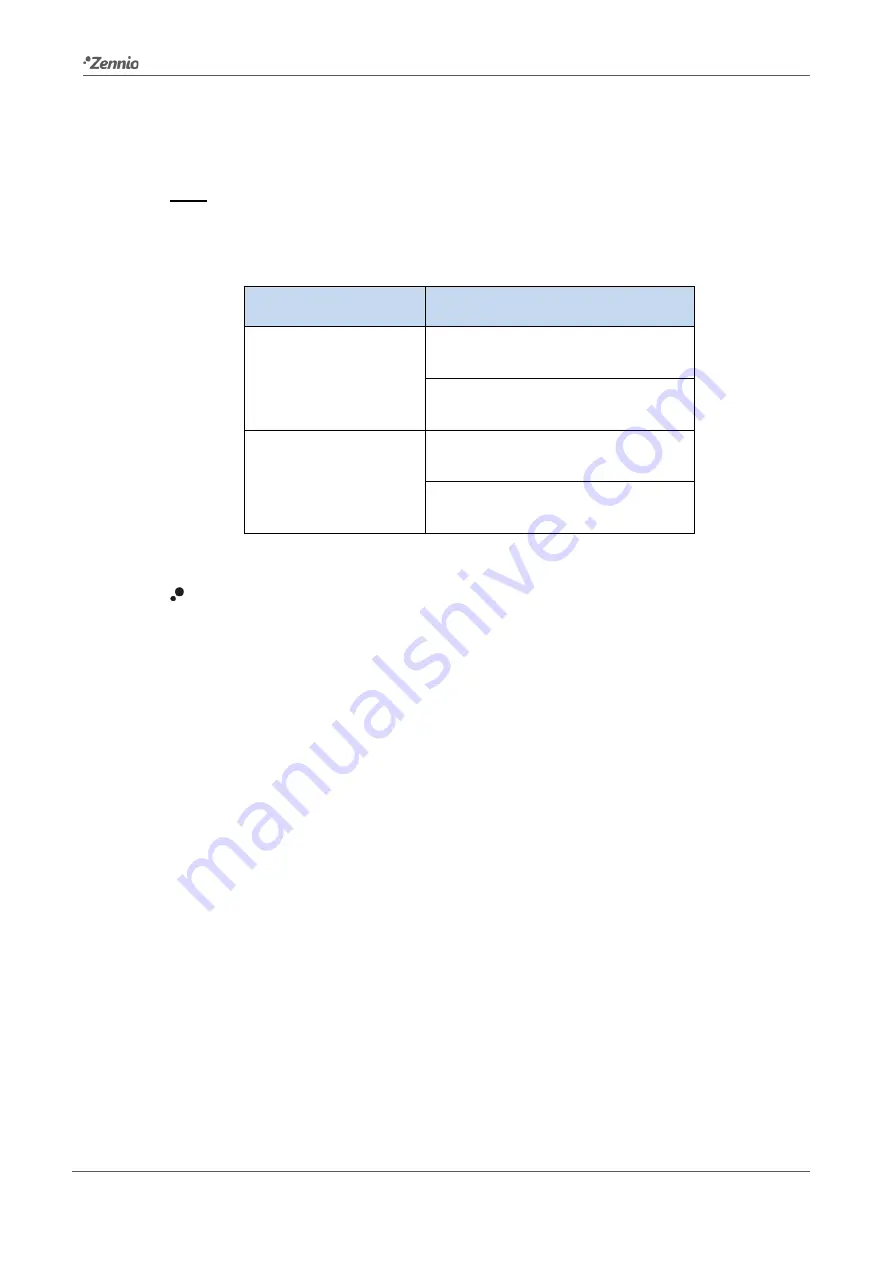
Orientation 

Pair Button behaviour 

Vertical  

Left: off / decrease 

Right: on / increase  

Left: on / increase 

Right: off / decrease  

Horizontal  

Down: off / decrease 

Up: on / increase  

Down: on / increase 

Up: off / decrease  

Table 1 

Orientation vs. pair button behaviour


LED lighting

. In addition to the specific behaviour of every LED regarding its 

own button (see section 2.2), it is possible to define certain general attributes that 

will affect all the LEDs. For that purpose, this parameter provides two options: 

Default

: the LEDs will assume the default light levels for the “on” and “off” 

states (maximum level and minimum level, respectively). 

Custom

: permits the definition of custom light levels for the “on” and “off” 

states of the LEDs, as well as enabling complementary functionalities, like 

the night mode or the LED flashing object. For that purpose, after selecting 

this option a new screen will come up (

LED lighting

; see 

Figure 8

), where the 

following parameters can be found: 


Normal mode

: this section is provided for defining the desired lighting 

level (“max” or “min”) for the “on” state of the LEDs under normal 

condition, and, analogously, the desired level (“off”, “min” or “max”) for 

the “off” state of the LEDs, under normal condition. The default values 

are respectively “max” and “off”. 

In addition to this normal mode it is also possible to implement a night 

mode with its own light parameterization (equal or different to that of 

Summary of Contents for Touch-MyDesign Display One

Page 1: ...KNX Capacitive Touch Switch with 4 6 8 buttons ZN1VI TPTMD4 ZN1VI TPTMD6 USER MANUAL ZN1VI TPTMD8 Application Program Version 1 0 User Manual Version 1 0 _a www zennio com...

Page 2: ...Parameterization 10 3 2 General 11 3 3 Main Buttons 18 3 3 1 Pair 20 3 3 2 Individual 23 3 4 Additional Buttons 27 3 4 1 Disabled 28 3 4 2 Setpoint Temperature 29 3 4 3 1 byte Control unsigned int 29...

Page 3: ...functions is enhanced by the built in analogue digital inputs temperature sensor and thermostat function and by an elegant and fully customizable design of the front glass consumers can choose the bu...

Page 4: ...ome Back object binary or scene which will be sent to the bus on the first press of the touch panel after a long standby period Two analogue digital inputs for movement sensors temperature probes addi...

Page 5: ...wer supply since it is powered through the KNX bus Figure 3 Touch MyDesign Element diagram The programming button 5 shown in Figure 3 may be pressed with the help of a thin screw to set Touch MyDesign...

Page 6: ...gain making sure that the front glass is not touched during this process For detailed information about the technical features of Touch MyDesign as well as information on security and on the installat...

Page 7: ...upled inputs each of which may be independently configured as a switch sensor a push button a movement detector or a temperature probe And depending on the selection a series of external elements may...

Page 8: ...f them for user defined applications Each of the mentioned buttons incorporates a central LED which by default will turn on for a brief instant whenever the button is touched although alternative LED...

Page 9: ...air of buttons The only difference compared to the previous case is that under the both LEDs case the two LEDs will always turn off or on simultaneously as if it were a unique state indicator consisti...

Page 10: ...meterization starts Figure 5 shows the communication objects displayed by default General Scene receive intended for the reception of scene values from the bus General Scene send destined to send scen...

Page 11: ...rizontal vertical of the device with the aim of implementing a logical behaviour in the buttons Figure 7 Orientation of the device Next to Touch MyDesign Orientation a second parameter is shown Pair b...

Page 12: ...rtain general attributes that will affect all the LEDs For that purpose this parameter provides two options Default the LEDs will assume the default light levels for the on and off states maximum leve...

Page 13: ...ght mode implements by itself an additional attenuation of the light levels Figure 8 Lighting with the night mode and the flash object enabled Night mode permits enabling Yes or disabling No the funct...

Page 14: ...n the max light level in the night mode Even the min light level in the normal mode will be Note due to hardware reconfiguration switching from one mode to the other causes that for 2 3 seconds the to...

Page 15: ...in seconds how much time the device must stay idle since the last button touch before entering into the locked state Unlocking method defines the procedure for leaving the locked state of the touch p...

Page 16: ...welcome back object is effectively sent Note if combining the welcome back function with the automatic timed touch lock function it is important to take into account that the delay of the sending of t...

Page 17: ...this parameter will bring up a new object Internal sensor Current temperature as well as a new parameterizable window see Figure 11 from where it is possible to define the following Figure 11 Internal...

Page 18: ...ing which will send the value 1 as soon as the temperature reaches the limit corresponding to each case and the 0 as soon as such situation ends It is therefore necessary to define the limit temperatu...

Page 19: ...led In short the following functions are available for the main buttons depending on the behaviour Disabled Pair or Individual parameterized for each pair of buttons Disabled non functional buttons in...

Page 20: ...nary control object through which the values 0 or 1 will be sent to the KNX bus depending on user touches over the buttons of the pair The particular correspondence between each button in the pair and...

Page 21: ...f the light source according to Table 2 Dimming step Number of presses required for the entire dimming 0 100 1 100 1 2 50 2 3 25 4 4 12 5 8 5 6 25 16 6 3 1 32 7 1 5 64 Table 2 Step dimming Pair button...

Page 22: ...value of the X Light On Off object therefore behaving as a state indicator However in this case both LEDs will always share the same light status i e switching on and off together Shutter this option...

Page 23: ...d for the former which permits the following options Disabled this option disabled by default entirely disables the functionality of button Xi however there will still be the possibility of selecting...

Page 24: ...that corresponds to the button has the value 1 the LED will light with the maximum power level Whenever the object that corresponds to the button has the value 0 the LED will light with the minimum po...

Page 25: ...will then turn off again according to the custom OFF level if parameterized State dependent the light state of the LED will depend on the current value of the Xi 1 byte value unsigned int object so i...

Page 26: ...tton and two communication objects Xi Light On Off Toggle 1 bit linked to short touches and Xi Light dimming Toggle 4 bit linked to long touches Having only one button to perform these functions impli...

Page 27: ...er short touch on the button will cause the sending of an upwards step order 0 through the same object After that a further short touch will cause the sending of the value 1 again and so on for the ne...

Page 28: ...dividual buttons permits configuring each of the additional buttons as an independent control analogously as with any of the main buttons while all the other options are intended to jointly parameteri...

Page 29: ...re setpoint additional buttons This type of functionality will always entail a state dependent behaviour in the LEDs as soon as the Z Temperature setpoint object receives a value that equals one of th...

Page 30: ...00 depending on the particular button being touched Figure 18 1 byte control scaling additional buttons This type of functionality will always entail a state dependent behaviour in the LEDs as soon as...

Page 31: ...Touch MyDesign 8 the main buttons are referred to as A1 A2 B1 B2 etc In the case of the additional button panel the 5 buttons constitute a sole block Z because of which the additional individual touc...

Page 32: ...e LED will switch to the on state default or customized see LED lighting in Section 3 2 when the Zi LED On Off object receives the value 0 and will switch to the off state default or customized when i...

Page 33: ...will require the definition of the actions to be performed on the event of button presses both short and or long Figure 22 Push button inputs The available options are Short press permits selecting an...

Page 34: ...ns are Move shutter up the value 0 will be sent Move shutter down the value 1 will be sent Move shutter toggle direction after the first press the value 1 will be sent while after the second press the...

Page 35: ...after the second press the value 0 will be sent and so on after any subsequent presses commuting the value every time Increase light Stop dimming Toggle after the first press the bus will be sent an o...

Page 36: ...o please refer to its description for further information Threshold time defines the minimum time in tenths of a second that the push button connected to the input of Touch MyDesign should remain hold...

Page 37: ...rising edge in the line which takes place whenever the switch closes the circuit No action no action is triggered Send 0 the value 0 is sent through the Ix Edge binary control object Send 1 the value...

Page 38: ...onding input by sending the values 1 or 0 respectively While the input remains locked any order it sends will be ignored Sending of status 0 and 1 on bus voltage recovery when this option is enabled t...

Page 39: ...ature so when the difference between two consecutive measurements is greater than such margin the bus will be automatically sent the newest value through the Ix Current temperature object even if no p...

Page 40: ...h provides up to two detection channels Figure 29 Movement detector inputs Enabling each of the two available channels will bring up a new parameter window as in Figure 30 Figure 30 Channel 1 inputs m...

Page 41: ...bled from he General tab Once this function has been enabled a set of additional tabs is displayed among them the Configuration window as shown by Figure 31 so that it can be parameterized For detaile...

Page 42: ...O R T 0 15 0 Last A2 Light Dimming Toggle 4 bit dimming control 7 9 2 Bytes O R T Ac to param Ac to param Ac to param Accord to param 10 4 bits O R T 0 15 0 Last B1 Light Dimming Toggle 4 bit dimming...

Page 43: ...41 2 Bytes O R T Ac to param Ac to param Ac to param Accord to param 42 4 bits O R T 0 15 0 Last Z3 Light Dimming Toggle 4 bit dimming control 43 45 2 Bytes O R T Ac to param Ac to param Ac to param A...

Page 44: ...1 Last General Buzzer Enabling 1 Enabled 0 Disabled THERMOSTAT 62 2 bytes I W 40 C 150 C 25 C Last T Temperature Source 1 External Sensor Measure 63 2 bytes I W 40 C 150 C 25 C Last T Temperature Sour...

Page 45: ...Last T Setpoint Offset Status Current setpoint offset 78 1 bit I W 0 1 0 Last T Setpoint Reset Reset setpoint to default 79 1 bit I W 0 1 0 Irrelevant T Mode 0 Cool 1 Heat 80 1 bit O T R 0 1 Ac to pa...

Page 46: ...102 1 Byte O T R 128 191 Irrelevant Irrelevant Ix Long Press Save Scene Save Scene Send of 128 191 103 104 2 Bytes O T R 20 95 C 25 C Last Ix Current Temperature Temperature sensor value 106 107 1 bit...

Page 47: ...35 1 Byte O T 0 63 128 191 Irrelevant Irrelevant Ix Ch y Scene Sending 0 63 Send Scene 1 64 INTERNAL SENSOR 105 2 Bytes O T R 20 95 C 25 C Last Internal Sensor Current Temperature Temperature sensor v...

Page 48: ...your inquiries about Zennio devices http zennioenglish zendesk com Zennio Avance y Tecnolog a S L C R o Jarama 132 Nave P 8 11 45007 Toledo Spain Tel 34 925 232 002 Fax 34 925 337 310 www zennio com...

Reviews: