background image

O P E R AT I O N

P A G E   1 6

Your remote

control

operates the

common

features of

most, but not

all, models

and brands of

IR (infrared)

controlled TVs

and cable

converters

(DBS).

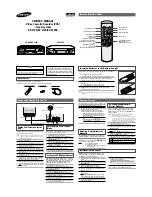
Programming Your Remote

Some functions of your products may not be controlled by
this remote. In such cases, use the original remote control
furnished with the product.

If you are using Zenith products, the remote comes
programmed for the most commonly used codes. For other
brands — or if your remote fails to control your Zenith
product — you will have to program the remote.

Follow these steps for each product:

1. Locate the three-digit code for your brand and type of

equipment in the code tables below.

2. Slide VCR/CBL(DBS)/TV/DVD to choose TV, cable box

(DBS) or DVD mode of operation.

3. Press and hold PROGRAM while entering the brand code

for your equipment.

4. Enter the three-digit brand code and then release

PROGRAM. If your equipment does not work, repeat steps
3 and 4, or try a different brand code.

5.  Write down the code that operates your equipment.

TV

, CATV

, DBS 

Note:

DVD mode is operated only with Zenith DVD.

tv dvd

cbl/

     dbs

vcr

vcr+

sel

adj

rev

fwd

power

play

stop

rew

f fwd

1

2

3

4

5

6

7

8

9

0

mute

program

cm skip

tv/vcr

memory

sp/ep

rec/itr

vol

vol

ch

pause

menu

quit/cc

enter

ch

sel

Program Button

VCR/DBS/TV/DVD
Mode Selector

CBL

TV Codes by Brand

TV Brand Name Codes

Admiral

151, 152, 110, 144

Citizen

156, 157, 158, 160, 161, 162

Curtis Mathes

115, 130, 113, 118, 144, 151

Daewoo

145, 146, 147, 148, 149, 150

Daytron

130, 115

Emerson

110, 111, 115, 131, 140, 143

Fisher

116, 125

Funai

153, 154

General Electric

102, 118, 127, 128, 144, 151

Goldstar

115, 122, 130, 131, 133, 146

Hitachi

119, 131, 132

JCPenney

102, 115, 124, 130, 133

JVC

109, 141

KTV

115, 130, 131, 138

LXI

104, 116, 123, 124, 125, 131

Magnavox

100, 101, 106, 107, 109, 114
115, 121, 122, 130, 131, 133

MGA/Mitsubishi

103, 115, 130

Montgomery Wards 115, 129, 131, 103, 113, 121

NEC

115, 130

Panasonic

104, 122, 127, 128, 133, 163

Philco

115, 121, 122, 131, 130, 150

Philips

121, 122

Pioneer

134

Proscan

118, 144, 151

Quasar

127, 128

Radio Shack

110, 111, 129

RCA

118, 144, 151

Realistic

110, 111, 129

Samsung

104, 115, 130, 131

Sanyo

116, 125

Cable Converter Codes by Brand

Cable Decoder

Codes

Brand Name 

Arccher

336

Cableview

336

Citizen

336

Curtis Mathes

317

Eagle

306, 307, 310

GE

353

Gemini

302, 328, 333

General Instrument 327, 328

Gobrand

336

Hamlin

314, 330, 331

Jerrold

323, 324, 325, 326, 329

Kale Vision

334

Macom

311, 312, 342

Magnavox

307, 310, 337, 338

NSC

332, 334

OAK

301, 321, 322

TV Codes by Brand

TV Brand Name Codes

Scott

115, 130

Sears

104, 116, 123, 124, 125, 131

Sharp

112, 129, 131, 139

Sony

105

Sylvania

106, 107, 115, 121, 122, 130
133

Symphonic

153, 154

Toshiba

104, 123, 124

Wards

102, 113, 114, 115, 121, 130
131

XR1000

155

Zenith

100, 101

DVD Code

Zenith

Pre-programmed Zenith

exclusively.

Cable Converter Codes by Brand

Cable Decoder

Codes

Brand Name

Panasonic

313, 320

Paragon 300

Philips

306, 307, 308, 309, 310

Pioneer

318, 319

Pluser

336

RCA

318

Regal

310

Regency

304

Samsung

334

Scientific Atlanta

317, 347, 335, 354

Simarx

318, 327

Sprucer

318, 320, 327

Standard

334

Components

Stargate

318, 327, 328

Teleview

336

Texscan

303

Tocom

315, 316

Uniden

348

Unika

336

Universal

351, 352

Vid Tech

339

Video Way

349

Viewstar

306, 307, 310

Zenith

300, 305, 311

DBS Codes by Brand

DBS Brand Name Codes

RCA

356

Sony

355

Summary of Contents for VRS428

Page 1: ...Operating Guide and Warranty for your new Zenith Entertainment Machine Models VRS418 VRS428 thanks for choosing zenith R...

Page 2: ...harmful interference when the equipment is operated in a residential installation This equipment generates uses and can radiate radio frequency energy and if not installed and used in accordance with...

Page 3: ...Speeds SP LP EP X X Auto Playback System X X Auto Manual Digital Tracking X X Instant Recording X X Timer Controlled Recording X X Auto Playback Tape Speed Adjust X X Forward Reverse Slow Motion X X...

Page 4: ...IN OUT OUT IN R L AUDIO VIDEO VHF UHF CATV ANT IN ANT IN OUT TO TV VHF UHF CATV VIDEO R AUDIO L OUT IN OUT CH3 CH4 IN Turn off power or unplug VCR before making any connections Back Panel of Typical C...

Page 5: ...IO VIDEO IN VHF UHF CATV Back Panel of Typical Monaural TV Note If the back panel on your TV is different refer to the TV s operating guide A V cable is not provided with VCR ANT IN OUT TO TV VHF UHF...

Page 6: ...e remote or on the VCR s front panel Do not plug the VCR into a switched power outlet Otherwise when the power is switched off the VCR turns off You may then have to reset the time and date and reprog...

Page 7: ...ee the LANGUAGE SELECT option on the SETUP menu for details tv dvd cbl dbs vcr vcr sel adj rev fwd power play stop rew f fwd 1 2 3 4 5 6 7 8 9 0 mute program cm skip tv vcr tv vcr memory sp ep rec itr...

Page 8: ...V connected to the VCR See SOURCE option on SETUP menu for details Use Auto Program to Find Channels Required Use AUTO PROGRAM to find active channels in your broadcast area AUTO PROGRAM stores the a...

Page 9: ...d using STEREO See the RECORD MODE option on the AUDIO Menu for details Press number keys QUIT exit SETUP MENU AUTO PROGRAM 1 CH ADD DEL 2 SOURCE 3 ON SCREEN DISPLAY 4 LANGUAGE SELECT 5 Press number k...

Page 10: ...Y STEPS 1 Turn on VCR TV and cable box if used 2 Select TV or CATV for SOURCE on SETUP menu 3 Obtain listing of PlusCode channels CHANNEL MAPPING 1 Complete Channel Mapping Worksheet 2 Press VCR on re...

Page 11: ...TV channel 3 TM Are your channels on TV the same as in TV listing 1 Yes 2 No Press number keys QUIT exit Do you have a Cable Box or DBS receiver 1 Yes 2 No Press number keys QUIT exit Is the Cable Box...

Page 12: ...via Auto Channel Station ID PlusCodeTM TV Ch Cable Ch Channel VCR Ch Channel found Network or Published via Auto Channel Station ID PlusCodeTM TV Ch Cable Ch Channel VCR Ch NOTE Two PlusCodeTM channe...

Page 13: ...lector REC ITR Instant Timer Record Selector A Cassette is in the VCR VCR is Recording Clock Time Time is PM Time is AM VCR is in timer recording VCR functions are available and channels are selected...

Page 14: ...NTER repeatedly to see abbreviated displays as follows 1 Press ENTER to see Status Display 2 Press ENTER a second time to show only the tape counter position 3 Press ENTER a third time to show only th...

Page 15: ...ote with brand codes for your brand of TV and or cable box DBS DVD QUIT CC Exits menu system Selects closed caption for some TVs while in TV mode REC ITR Begins tape recording REV FWD Reverse Forward...

Page 16: ...116 125 Funai 153 154 General Electric 102 118 127 128 144 151 Goldstar 115 122 130 131 133 146 Hitachi 119 131 132 JCPenney 102 115 124 130 133 JVC 109 141 KTV 115 130 131 138 LXI 104 116 123 124 125...

Page 17: ...D to advance tape frame by frame or toward REV to reverse tape frame by frame Movement of the jog wheel one click moves the tape by one frame How fast you move the jog wheel deter mines how fast the f...

Page 18: ...ration is easy just follow the instructions shown at the bottom of the menu 1 Press MENU to see main menu 2 Press NUMBER 1 2 3 or 4 to see desired sub menu to be used 3 Press NUMBER to choose desired...

Page 19: ...ou use your VCR See MANUAL option for details The clock must be set before you can record by using the TIMER Menu Manual Clock Set The CLOCK Menu sets the clock in the VCR to the current date and time...

Page 20: ...cess Menus 2 Press NUMBER 1 8 to select desired PROGRAM to be erased 3 Press 0 to erase the program 4 Press QUIT CC to exit the menu system SpeakEZ CLOCK 1 TIMER 2 SETUP 3 AUDIO 4 Press number keys QU...

Page 21: ...to select the channel to be edited e g to ADD channel 3 press 3 then ENTER Press ENTER to ADD or DEL Delete channels to create your own list of favorite channels SOURCE Selects TV CATV or AUX as the...

Page 22: ...o format present on the tape RECORD Select the STEREO MONO or SAP for recording a program STEREO records sound from the left and right audio tracks in stereophonic format MONO Monaural records sound i...

Page 23: ...able box Selecting Channels at the VCR when VCR is ON 1 Turn TV and VCR on 2 Place VCR in VCR mode by pressing TV VCR on remote repeatedly until the VCR indicator appears in the VCR front panel 3 Sele...

Page 24: ...VCR Channel Down lower than the lowest channel or Channel Up above the highest to select AUX Or you may Choose the SETUP menu as described in How to Access Menus Press 3 for the SETUP menu s SOURCE it...

Page 25: ...s AUX Auxiliary source to see the picture if you are using the A V jacks Unloading the Cassette from the VCR 1 Press STOP if the tape is playing 2 Press STOP EJECT at the VCR until the cassette is ej...

Page 26: ...during slow motion Press PLAY to resume normal tape playing Note When the reverse slow mode continues for more than 30 secondes the VCR will auto matically change to play mode Tape Rewind and Fast Fo...

Page 27: ...box select the cable box output channel usually 3 or 4 at the VCR Select cable box channels at the cable box 5 Insert a VHS cassette tape into the VCR 6 Press SP EP to select recording speed if desire...

Page 28: ...anel Select channel 3 or 4 at the TV If you have connected your VCR to the TV s A V input jacks select the A V source at the TV for a better picture Select the channel to be watched and recorded at th...

Page 29: ...Insert a VHS cassette tape into the VCR Press SP EP to select recording speed if desired Recording speed is always SP unless you select EP Press REC ITR until recording begins REC indicator appears in...

Page 30: ...annel to be record ed Keep your cable box on when using the Timer to record Enable the Timer by pressing POWER to turn off the VCR The TMR indicator appears in the VCR front panel to indi cate the VCR...

Page 31: ...timer controlled recording if an event is Scheduled in the Timer All other VCR operations can be used as desired Enables timer controlled recording if an event is scheduled in the Timer You cannot be...

Page 32: ...rce on TV to Audio Video In or tune TV to Channel 3 or 4 as appropriate Press TV VCR on remote repeat edly to choose VCR mode VCR indicator appears in VCR front panel Disconnect VCR power cord for thr...

Page 33: ...e VCR is in TIMER mode If needed disable TIMER by turning VCR on Channel Tuning Problems Observed Condition Some channels are skipped over when using Channel Up Down Picture and sound are weak or miss...

Page 34: ...n the outside surfaces of the VCR with a soft lint free cloth as required Use care not to scratch the VCR during cleaning Moisture Condensation Moisture condensation can occur When the video recorder...

Page 35: ...Diagram 13 Instant Recording 27 29 Language Menu 21 Main Menu 18 Maintenance 34 Playback Jog Shuttle Operation 17 Playing Tapes 25 26 Remote Control 15 16 Safety Information 2 Setup for VCR Plus Recor...

Page 36: ...NOTES P A G E 3 6 Use this page to makes notes Notes...

Page 37: ...NOTES P A G E 3 7 Use this page to makes notes Notes...

Page 38: ...NOTES P A G E 3 8 Use this page to makes notes Notes...

Page 39: ...Korea Zenith Part No 206 3439 GS 3835RM0024Q Issue O Printed in Korea Zenith Part No 206 3439 GS 3835RM0024Q Issue O Printed in Indeonesia Zenith Part No 206 3439 GS 3835RM0024R Issue O Printed in Ind...

Reviews: