


O P E R AT I O N
P A G E 2 3
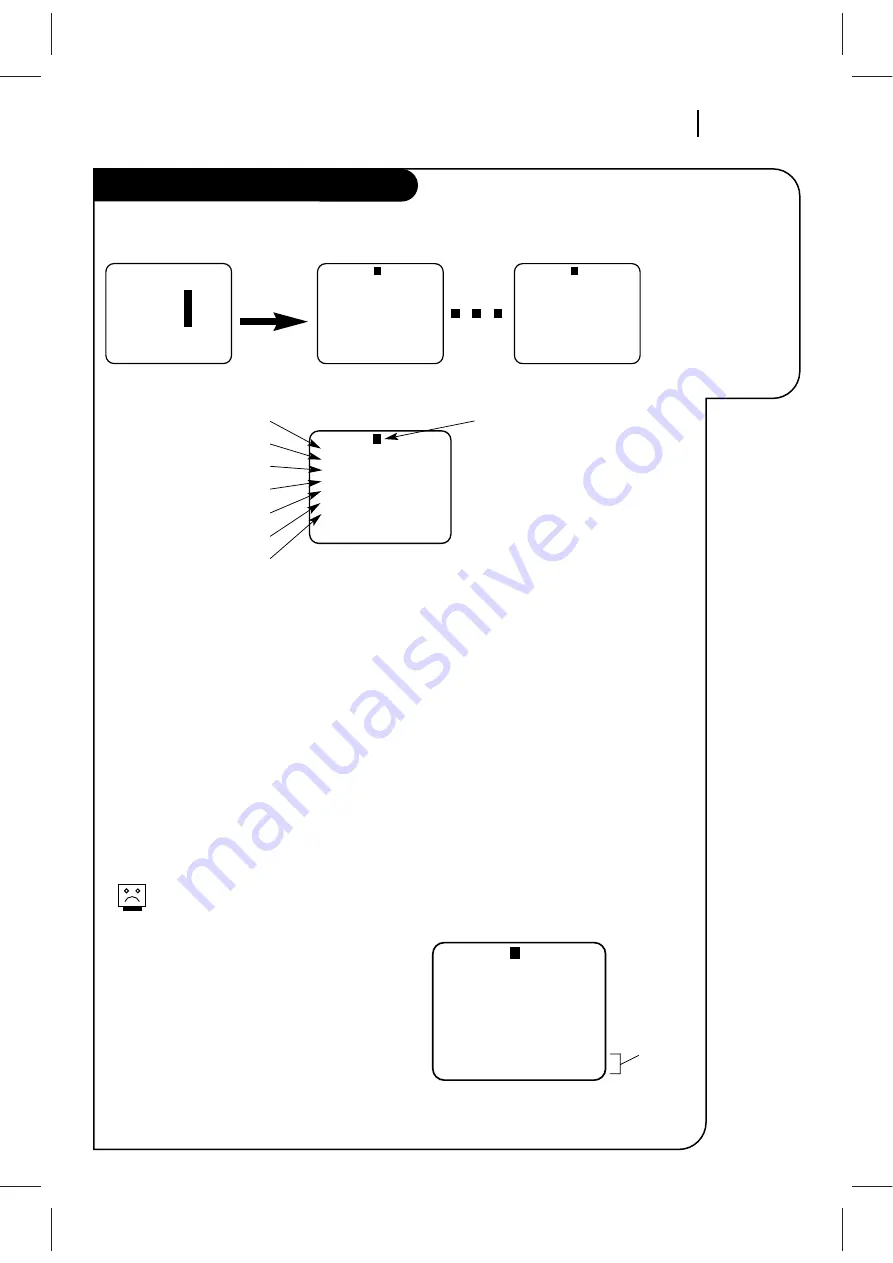
The TIMER
Menu tells the
VCR when to
record a pro-
gram on a day
and at a time
you specify
Timer Menu
PROGRAM
1
MONTH : 7 JULY
DAY
: 20 MON
START : 11:16 AM
STOP
: 11:46 AM
CHANNEL : 20 TV
SPEED
: EP
REPEAT
: ONCE
( 1 - 8 ) to select program
to erase press (0)
PROGRAM
1
MONTH : 7 JULY
DAY
: 20 MON
START : 11:16 AM
STOP
: 11:46 AM
CHANNEL : 20 TV
SPEED
: EP
REPEAT
: ONCE
( 1 - 8 ) to select program
to erase press (0)
You can specify eight different events to be recorded in a one-year period.
How to Use Timer
1. Choose TIMER menu as described in “How to
Access Menus.”
2. Press NUMBER(0-9) then ENTER to set the timer.
3. Press QUIT/CC to exit the menu system.
Note:
Set the VCR in TIMER mode by pressing POWER to
turn off the VCR. The TIMER SET appears in the front
panel of the VCR.
You cannot operate the VCR manually while
it is recording. Pressing POWER stops the
recording.
To Erase a Program
1. Choose TIMER menu as described in “How to
Access Menus.”
2. Press NUMBER(1-8) to select desired PROGRAM to
be erased.
3. Press 0 to erase the program.
4. Press QUIT/CC to exit the menu system.
SpeakEZ
CLOCK :
1
TIMER
:
2
SETUP :
3
AUDIO
:
4
Press number keys
QUIT = exit
PROGRAM
1
MONTH :
DAY
:
START :
STOP
:
CHANNEL :
SPEED
:
REPEAT
:
( 1 - 8 ) to select program
ENTER to adjust program
PROGRAM
8
MONTH :
DAY
:
START :
STOP
:
CHANNEL :
SPEED
:
REPEAT
:
( 1 - 8 ) to select program
ENTER to adjust program
Press 2
Month of Recording
Day of Recording
Start Time of Recording
Stop Time of Recording
Channel of Recording
Speed of Recording
Frequency of Recording
Program Number
When highlighted, press NUMBER (1-
8) to choose program Number.
REPEAT OPTIONS
ONCE — Records once.
WEEKLY — Records once each week.
DAILY — Records one time each day,
Monday - Friday.
CHANNEL OPTIONS
To select an AUX channel, select the
next highest or lowest channel pro-
grammed in the VCR with the CHAN-
NEL Up/Down arrows.
SPEED OPTIONS (SP or EP)
The SP mode determines how much
tape is left and switches speed from
SP to EP, if necessary, to complete
recording the program. There will be
some picture and sound distortion at
the point of the speed change.
Press 0 to erase program
Follow
these
steps


