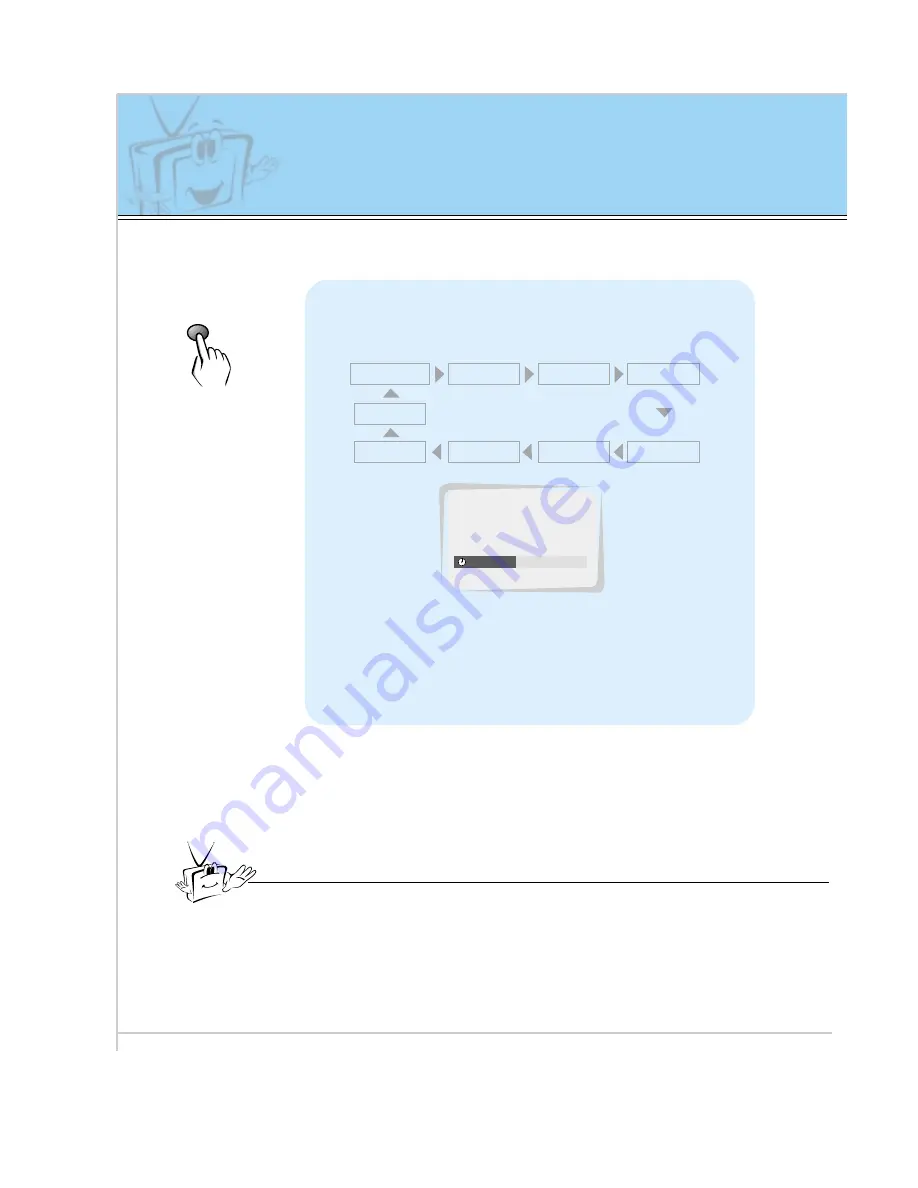
Zenith P40V22 Owner'S Manual Download Page 32

32

Setting sleep time

This feature automatically turns the Monitor off after a preset time.

Press the sleep button to set sleep time.
Each time you press the next preset setting
time is changed as shown below.

• To release sleep time setting, press sleep or vol

button repeatedly to select 

--- 

F G

• ‘

SLEEP 1

’ is displayed, one minute before the

Monitor is due to switch off.

sleep

--- 

F G

10 

F G

20 

F G

30 

F G

120 

F G

180 

F G

240 

F G

90 

F G

60 

F G

Tips

• When the sleep time you want is displayed on the screen, don’t press the

sleep button. The screen display disappears and sleep time is set.

• To check remaining sleep time after setting, press the sleep or enter button

just once.

• If you turn the Monitor off after setting the sleep timer, the setting will be

erased. The sleep timer will then have to be set again.

30   

F G

SLEEP

z

z

Summary of Contents for P40V22

Page 1: ...read this owner s manual carefully before operating the Monitor Keep the owner s manual with the Monitor Write down the serial number located on the back of the Monitor in the space provided below Mo...

Page 2: ...andard is regarded as acceptable It means that it could not be changed or refunded We promise that we ll do our best to develop our technology to minimize the cell defects WARNING TO REDUCE THE RISK O...

Page 3: ...ter Display Setup 18 PC Mode Functions Check 20 PC Mode Adjustments 21 Remote Control Battery Installation and Operating Hints 24 Basic Features Setup and Operation Turning on the Monitor 25 Selecting...

Page 4: ...for a Class B digital device pursuant to Part 15 of the FCC Rules These limits are designed to provide reason able protection against harmful interference in a residential installation This equipment...

Page 5: ...eaning Unplug this product from the wall outlet before cleaning Do not use liquid cleaners or aerosol cleaners Use a damp cloth for cleaning 6 Water and Moisture Do not use this product near water for...

Page 6: ...so as to provide some protection against voltage surges and built up static charges Article 810 of the National Electrical Code U S A ANSI NFPA 70 provides information with regard to proper grounding...

Page 7: ...an improper adjustment of other controls may result in damage and will often require extensive work by a qualified technician to restore the product to its normal operation e If the product has been...

Page 8: ...8 Front Panel Controls ON OFF VOLUME INPUT SELECT ON OFF INPUT VOLUME SELECT Front Panel Controls Main power button INPUT SELECT button Remote control sensor Sub power button VOLUME buttons...

Page 9: ...L AUDIO MONO VIDEO COMPONENT 480i 480p 720p 1080i DVD DTV INPUT PB Y R P AC INPUT EXTERNAL SPEAKER 8 AV INPUT DVD DTV INPUT COMPONENT 480i 480p 720p 1080i RGB DTV INPUT 480p 720p 1080i RGB PC INPUT V...

Page 10: ...e sound on or off video pc button number buttons system off button menu button enter button up down buttons vol buttons cc button Refer to p 38 40 video pc button on the remote control Each press of t...

Page 11: ...shown on the next page This plasma display is designed to be mounted horizontally wide viewing Wall Mount Installation MULTIMEDIA ON OFF TV AV MENU ENTER VOL CH The monitor can be installed on a wall...

Page 12: ...a desk as shown above For further information refer to the optional Desktop stand Installation and Setup Guide 4inch 4inch 2 36inch 4inch 1 18inch b Pedestal mount minimum allowable clearances for ad...

Page 13: ...visi ble on the screen S VIDEO OUT IN R AUDIO L VIDEO PB R Y P AC INPUT EXTERNAL SPEAKER 8 AV INPUT RGB PC INPUT VGA SVGA RGB DTV INPUT 480p 720p 1080i R R L L R AUDIO INPUT RGB INPUT CONTROL L AUDIO...

Page 14: ...0p 1080i DVD DTV INPUT PB Y R P EXTERNAL SPEAKER 8 AV INPUT DVD DTV INPUT COMPONENT 480i 480p 720p 1080i RGB DTV INPUT 480p 720p 1080i RGB PC INPUT VGA SVGA R R L L R AUDIO INPUT RGB INPUT CONTROL L A...

Page 15: ...i RGB DTV INPUT 480p 720p 1080i RGB PC INPUT VGA SVGA R R L L R AUDIO INPUT RGB INPUT CONTROL L AUDIO VIDEO MONO Camcorder Video game set DDR R L AUDIO VIDEO To watch external AV source Press video pc...

Page 16: ...acks to Monitor Component input jacks as indicated below PB R Y P AC INPUT EXTERNAL SPEAKER 8 AV INPUT RGB PC INPUT VGA SVGA RGB DTV INPUT 480p 720p 1080i R R L L R AUDIO INPUT RGB INPUT CONTROL L AUD...

Page 17: ...8 AV INPUT DVD DTV INPUT COMPONENT 480i 480p 720p 1080i RGB DTV INPUT 480p 720p 1080i RGB PC INPUT VGA SVGA R R L L R AUDIO INPUT RGB INPUT CONTROL L AUDIO VIDEO MONO R AUDIO L R AUDIO L DTV OUTPUT Tu...

Page 18: ...low connect the video output of the PC to the Monitor RGB PC INPUT VGA SVGA RGB DTV INPUT 480p 720p 1080i Connect the audio out from the PC to the Audio jacks on the Monitor Audio cables are not inclu...

Page 19: ...fications 640x400 37 861 85 08 720x400 31 469 70 08 31 469 59 94 35 000 66 66 37 861 72 80 37 500 75 00 43 269 85 00 45 913 90 03 53 011 100 04 64 062 120 00 35 156 56 25 37 879 60 31 48 077 72 18 46...

Page 20: ...up down button to select menus Each press will cycle through the different menus as shown below menu up down up down vol vol APC G USER CONTROL G CH MOVE GNEXT AEXIT PICTURE D E DASP G USER CONTROL G...

Page 21: ...he menu button and then press the up down button to select SPECIAL menu Press the vol G button menu up down vol up down vol LANGUAGE G CAPTION G AUTO OFF G SCREEN G RGB OUTPUT G SPECIAL 2 Press the up...

Page 22: ...st until you get desired horizontal or vertical position and then press the enter button to remove menus Press the menu button and then press the up down button to select SPECIAL menu Press the vol G...

Page 23: ...nd then press the vol G button Use the up down button to select PHASE and then press the vol G button The adjustment range of PHASE is 0 31 Press the vol button to adjust phase and then press the ente...

Page 24: ...used batteries with new batteries Notes for using the remote control Make sure these are no objects between the remote control and its sensor on the monitor Don t place the remote control near a heat...

Page 25: ...Monitor will be turned on Press the button on the Monitor or press the power on button on the remote control to turn on the Monitor If the Monitor was turned off with the button on the Monitor Press...

Page 26: ...and then press the up down button to select SPECIAL menu Press the vol G button up down vol up down LANGUAGE G CAPTION G AUTO OFF G SCREEN G RGB OUTPUT G SPECIAL LANGUAGE G CAPTION TEXT G CAPTIONS G...

Page 27: ...ss the up down or vol button to select a feature you want to use Press the enter button to remove menus up down up down vol vol APC G USER CONTROL G CH MOVE GNEXT AEXIT PICTURE D E DASP G USER CONTROL...

Page 28: ...ct AM 10 and then press the vol G button Press the MENU button and then press the up down button to select TIMER menu Press the vol G button LANGUAGE G CAPTION G AUTO OFF G SCREEN G RGB OUTPUT G TIMER...

Page 29: ...ers 4 3 Setting minute Press the up down button to select 30 and then press the enter button Removing Menu Press the enter button again and the screen display disappears enter LANGUAGE G CAPTION G AUT...

Page 30: ...rrent time has been already set If On Timer feature is active the current channel will change to the set channel when the On Timer setting is reached SLEEP 1 is displayed one minute before the Monitor...

Page 31: ...tton to com plete the setting Unless a button is pressed within two hours after turning on the Monitor with the On Timer feature the Monitor automatically turns off To cancel On Off Timer function Pre...

Page 32: ...layed one minute before the Monitor is due to switch off sleep F G 10 F G 20 F G 30 F G 120 F G 180 F G 240 F G 90 F G 60 F G Tips When the sleep time you want is displayed on the screen don t press t...

Page 33: ...ss the enter button Press the menu button and then press the up down button to select PICTURE menu Press the vol G button up down vol enter up down LANGUAGE G CAPTION G AUTO OFF G SCREEN G RGB OUTPUT...

Page 34: ...t other items Press the menu button and then press the up down button to select PICTURE menu Press the vol G button LANGUAGE G CAPTION G AUTO OFF G SCREEN G RGB OUTPUT G PICTURE APC G USER CONTROL G C...

Page 35: ...ss the menu button and then press the up down button to select SOUND menu Press the vol G button up down vol up down LANGUAGE G CAPTION G AUTO OFF G SCREEN G RGB OUTPUT G SOUND DASP G USER CONTROL G N...

Page 36: ...t and then press the enter button to remove menu Press the menu button and then use the up down button to select SOUND menu Press the vol G button LANGUAGE G CAPTION G AUTO OFF G SCREEN G RGB OUTPUT G...

Page 37: ...ess the vol G button 2 1 Use the up down button to select AUTO OFF and then press the vol G button Use the up down button to select ON or OFF and then press the enter button to remove menu LANGUAGE G...

Page 38: ...on the same channel By selecting from cc 1 to cc 4 you can choose which signal you view cc 1 is usually the signal with the captions while another mode might show demonstration or pro gramming informa...

Page 39: ...nd then press the vol G button Use the up down button to select a caption text option and then press the enter button LANGUAGE G CAPTION G AUTO OFF G SCREEN G RGB OUTPUT G SPECIAL LANGUAGE G CAPTION T...

Page 40: ...c but ton on the remote control LANGUAGE G CAPTION G AUTO OFF G SCREEN G RGB OUTPUT G SPECIAL LANGUAGE G CAPTION TEXT G CAPTIONS G AUTO OFF G SCREEN G OFF ON EZ MUTE CH CAPTIONS G LANGUAGE G CAPTION G...

Page 41: ...is off the screen and then let it air dry before you turn on your Monitor Cleaning the cabinet To remove dirt or dust wipe the cabinet with a soft dry lint free cloth Please be sure not to use a wet c...

Page 42: ...the wall outlet where the Monitor s power cord was plugged in No or Poor color or Poor picture Select COLOR in the USER CONTROL mode of the PIC TURE menu and press the VOLUME G button Keep a certain...

Page 43: ...Others Product specifications MODEL Width inches Height inches Depth inches Weight pounds Power requirement Resolution Color P40V22 36 6 28 3 1 71 8 AC120V 60Hz 640 x 480 Dot 16 770 000 256 steps of...

Reviews: