background image

PREP

ARA

TION

11

Connections (Continued)

Optional Equipment Connections

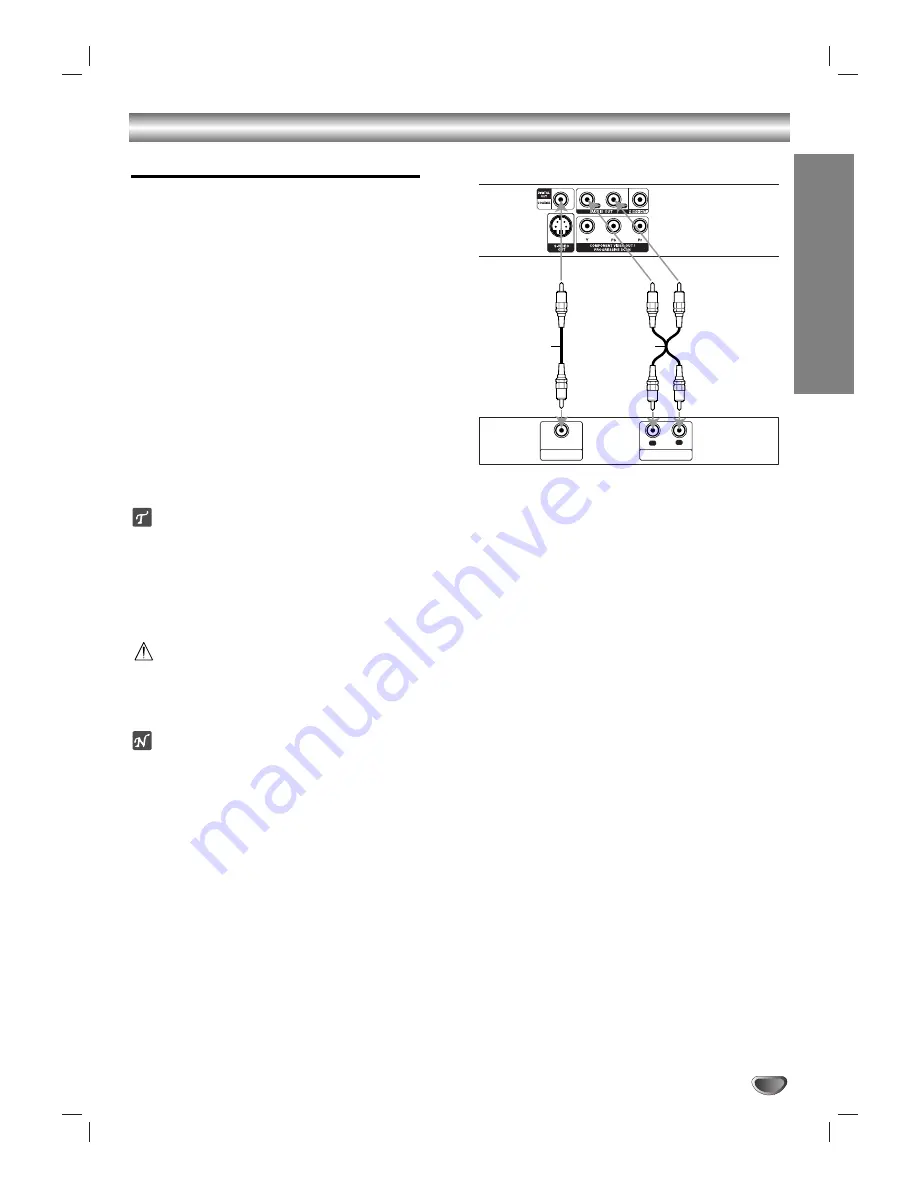
Connecting to an amplifier equipped with 
2-Channel analog stereo or Dolby Pro Logic ll/
Pro Logic

Connect the Left and Right AUDIO OUT jacks on the
DVD Player to the audio left and right in jacks on your
amplifier, receiver, or stereo system, using the audio
cables (A).

Connecting to an amplifier equipped with 
2-Channel digital stereo (PCM) or to an Audio/
Video receiver equipped with a multi-channel
decoder (Dolby Digital™, MPEG 2, or DTS)

11

Connect one of the DVD Player’s DIGITAL AUDIO
OUT jacks (COAXIAL X) to the corresponding in
jack on your amplifier. Use an optional digital 
(coaxial X) audio cable.

22

You will need to activate the player’s digital output.
(See “Digital Audio Output” on page 14).

Digital Multi-channel sound

A digital multi-channel connection provides the best
sound quality. For this you need a multi-channel
Audio/Video receiver that supports one or more of the
audio formats supported by your DVD Player (MPEG 2,
Dolby Digital and DTS). Check the receiver manual and
the logos on the front of the receiver.

Caution:

Due to the DTS Licensing agreement, the digital output
will be in DTS digital out when DTS audio stream is
selected.

otes

– If the audio format of the digital output does not match

the capabilities of your receiver, the receiver will 
produce a strong, distorted sound or no sound at all.

– Six Channel Digital Surround Sound via digital con-

nection can only be obtained if your receiver is
equipped with a Digital Multi-channel decoder.

– To see the audio format of the current DVD in the on-

screen display, press AUDIO.

Amplifier (Receiver)

DVD Connections Panel

A

X

R

L

AUDIO INPUT

DIGITAL INPUT

COAXIAL

Summary of Contents for DVB312 - Progressive-Scan Slim Design DVD...

Page 1: ...Installation and Operating Guide Warranty Model Number DVB312 DVD Player Copyright 2003 Zenith Electronics Corporation...

Page 2: ...in a particular installation If this product does cause harmful interference to radio or television reception which can be determined by turning the product off and on the user is encouraged to try to...

Page 3: ...wider than the other A ground ing type plug has two blades and a third ground ing prong The wide blade or the third prong are provided for your safety If the provided plug does not fit into your outle...

Page 4: ...18 Disc Menu 18 Camera Angle 18 Changing the Audio Language 18 Subtitle 18 Audio CD and MP3 WMA Operation 19 20 Playing an Audio CD or MP3 WMA Disc 19 Notes on MP3 WMA Recordings 19 Pause 20 Moving to...

Page 5: ...on the unit Regional code of the DVD player and DVDs This DVD player is designed and manufactured for playback of region 1 encoded DVD software The region code on the labels of some DVD discs indi cat...

Page 6: ...ion and maintenance are recommended after every 1 000 hours of use This depends on the operating environment For details please contact your nearest dealer Notes on Discs Handling discs Do not touch t...

Page 7: ...repeat mode Forward Skip Scan M Go to NEXT chapter track Press and hold for two seconds for a fast forward search Reverse Skip Scan m Go to beginning of current chapter track or to PREVIOUS chapter tr...

Page 8: ...tions in a menu AUDIO Selects an audio language DVD or an audio channel CD SUBTITLE Selects a subtitle language ANGLE Selects a DVD camera angle if available SETUP Accesses or removes setup menu MARKE...

Page 9: ...unit COAXIAL Digital audio out jack Connect to digital coaxial audio equipment AUDIO OUT Left Right Connect to an amplifier receiver or stereo system VIDEO OUT Connect to a TV with video inputs AC Po...

Page 10: ...deo in jack on the TV using the supplied S Video cable S 2 2 Connect the DVD Player s Left and Right AUDIO OUT jacks to the audio left right in jacks on the TV using the supplied audio cables A Compon...

Page 11: ...utput on page 14 Digital Multi channel sound A digital multi channel connection provides the best sound quality For this you need a multi channel Audio Video receiver that supports one or more of the...

Page 12: ...y not provide all of the features on the on screen display example shown below If no button is pressed for 10 seconds the on screen display disappears OFF A B CHAPT TITLE 12 Menu Options Title Number...

Page 13: ...s flickering If you are using the COMPONENT VIDEO OUT PROGRESSIVE SCAN jacks but are connecting the DVD Player to a standard analog television set Progressive Scan to Off If you are using the Componen...

Page 14: ...Auto Play settings can be changed Use 3 3 4 4 to select the desired option and press SELECT ENTER The setting of the selected option can be changed between On and Off Dynamic Range Control DRC With th...

Page 15: ...ble alternative is found play back will stop You must enter the 4 digit password or change the rating level in order to play the disc 5 5 Press SELECT ENTER to confirm your rating selection then press...

Page 16: ...m your player The region code for this player is 1 one General Features ote Unless stated otherwise all operations described use the remote control Some features may also be available on the Setup men...

Page 17: ...point A appears briefly on the TV screen 2 Press A B again at your chosen end point A B appears briefly on the TV screen and the repeat sequence begins AsB appears the display window 3 To cancel the...

Page 18: ...rker number that you want to erase 3 Press CLEAR The Marker number will be erased from the list 4 Repeat steps 2 and 3 to erase additional Marker numbers 5 To remove the MARKER SEARCH menu press SEARC...

Page 19: ...MP3 format MP3 WMA Disc compatibility with this player is limited as follows 1 Sampling Frequency only at 44 1kHz MP3 22 05 44 1kHz WMA 2 Bit rate within 32 320kbps MP3 32 128kbps WMA 3 CD R physical...

Page 20: ...e press PLAY Random 1 Press RANDOM during playback or in stop mode The unit automatically begins Random Playback and RANDOM or RAND appears on the display window and menu screen 2 To return to normal...

Page 21: ...s file Still Picture 1 Press PAUSE STEP during slide show The player will now go into PAUSE mode 2 To return to the slide show press PLAY or press PAUSE STEP again To flip the picture Use 3 3 4 4 whil...

Page 22: ...list and then press SELECT ENTER PROG indicator disappears on the menu screen Repeat Programmed Tracks To repeat the track currently playing press REPEAT The Repeat icon and TRACK appears on the menu...

Page 23: ...ut 3 seconds during disc playback The new video mode number selected is displayed on the TV screen Check whether the video quality has improved If not repeat the above procedure until pic ture quality...

Page 24: ...rom the DVD player There is an obstacle between the remote control and the DVD player The batteries in the remote control are exhausted Solution Plug the power cord into the wall power outlet securely...

Page 25: ...erlingua 7165 Irish 7384 Italian 7465 Japanese 7487 Javanese 7578 Kannada 7583 Kashmiri 7575 Kazakh 7589 Kirghiz 7579 Korean 7585 Kurdish 7679 Laothian 7665 Latin 7686 Latvian Lettish Code Language 76...

Page 26: ...ds KZ Kazakhstan LA Laos LB Lebanon Code Country LC Saint Lucia LI Liechtenstein LK Sri Lanka LR Liberia LS Lesotho LT Lithuania LU Luxembourg LV Latvia LY Libya MA Morocco MC Monaco MD Moldavia MG Ma...

Page 27: ...Outputs VIDEO OUT 1 Vp p 75 sync negative RCA jack x 1 S VIDEO OUT Y 1 0 V p p 75 negative sync Mini DIN 4 pin x 1 C 0 3 V p p 75 COMPONENT VIDEO OUT Y 1 0 V p p 75 negative sync RCA jack x 1 Pb Pr 0...

Page 28: ...NUMBERS FOR WARRANTY SERVICE You must call 1 800 984 9349 Monday Friday 7 AM to 8 PM CT and select appropriate option from the menu to confirm the product is defective and to obtain Return Authorizat...

Reviews: