background image

8

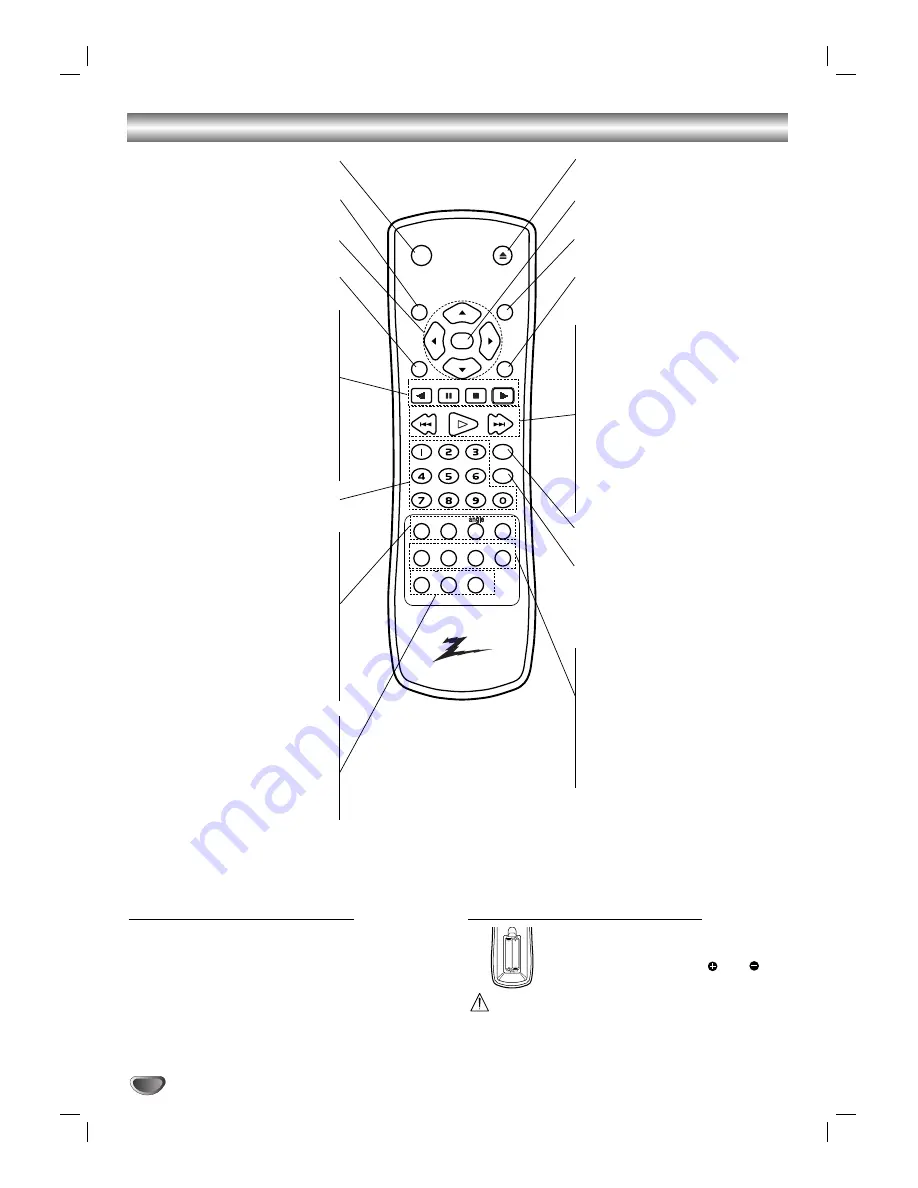
Remote Control

Remote Control Operation Range

Point the remote control at the remote sensor and press
the buttons.

Distance:

About 23 ft (7 m) from the front of the

remote sensor.

Angle:

About 30° in each direction of the front of the

remote sensor.

Remote control battery installation

Detach the battery cover on the rear of
the remote control, and insert two R03
(size AAA) batteries with 

and 

aligned correctly.

Caution

Do not mix old and new batteries. Never mix different
types of batteries (standard, alkaline, etc.).

AAA

AAA

open / close

power

display

return

title

menu

slow

skip / scan

play

skip / scan

program

clear

pause / step stop

slow

select

enter

audio subtitle

repeat

a - b

random

marker search disc skip

setup

zoom

POWER

Switches DVD Player ON and OFF.

DISPLAY

Accesses On-Screen Display.

1

 2

 3

 4


(left/right/up/down)

Select a menu option.

MENU

Accesses menu on a DVD disc.

Reverse SLOW ( 

,


) •

Reverse slow playback.

PAUSE ( 

;

;

) • 

Pauses playback temporarily/ press

repeatedly for frame-by-frame 

playback.

STOP ( 

9

9

) •

Stops playback.

Forward SLOW ( 

.


) •

Forward slow playback.

0-9 number buttons

Selects numbered options on a

menu.

AUDIO •

Selects an audio language (DVD) or

an audio channel (CD). 

SUBTITLE •

Selects a subtitle language.

ANGLE •

Selects a DVD camera angle if 

available.

SETUP •

Accesses or removes setup menu.

MARKER •

Marks any point during playback.

SEARCH •

Displays MARKER SEARCH menu.

DISC SKIP •

Moves to the next available disc tray.

OPEN/CLOSE

Opens and closes the disc tray.

SELECT/ENTER

Acknowledges menu selection.

RETURN

Removes the setup menu.

TITLE

Displays the discs Title menu, if
available.

• Forward SKIP/SCAN ( 

T


)

Search forward*/ go to next chapter
or track.

• PLAY ( 

2

2

)

Starts playback.

• Reverse SKIP/SCAN ( 

S


)

Search backward*/ go to beginning
of current chapter or track or go to
previous chapter or track.

* Press and hold button for about
two seconds.

PROGRAM

Accesses or removes Program
menu.

CLEAR

Removes a track number on the 
program menu or a mark on the
MARKER SEARCH menu.

• REPEAT

Repeat chapter, track, title, all.

• A-B

Repeat sequence.

• RANDOM

Plays tracks in random order.

• ZOOM

Enlarges video image.

Summary of Contents for DVB251

Page 1: ...Copyright 2002 Zenith Electronics Corporation Installation and Operating Guide Warranty Model Number DVB251 DVD Player...

Page 2: ...occur in a particular installation If this product does cause harmful interference to radio or television reception which can be determined by turning the product off and on the user is encouraged to...

Page 3: ...wider than the other A ground ing type plug has two blades and a third ground ing prong The wide blade or the third prong are provided for your safety If the provided plug does not fit into your outle...

Page 4: ...Repeat 18 Repeat A B 18 Time Search 18 3D Surround 18 Zoom 18 Marker Search 19 Special DVD Features 19 Title Menu 19 Disc Menu 19 Camera Angle 19 Changing the Audio Language 19 Changing the Audio Chan...

Page 5: ...k of region 1 encoded DVD soft ware The region code on the labels of some DVD discs indicates which type of player can play those discs This unit can play only DVD discs labeled 1 or ALL If you try to...

Page 6: ...ns and disc drive parts are dirty or worn down the picture quality will be poor Regular inspection and maintenance are recommended after every 1 000 hours of use This depends on the operating environm...

Page 7: ...Opens or closes the disc tray STANDBY ON indicator Lights red when the player is in Standby mode off Remote Sensor Point the DVD Player remote control here Display window Shows the current status of t...

Page 8: ...mporarily press repeatedly for frame by frame playback STOP 9 9 Stops playback Forward SLOW Forward slow playback 0 9 number buttons Selects numbered options on a menu AUDIO Selects an audio language...

Page 9: ...coaxial audio equipment VIDEO OUTPUT Switch Select either S VIDEO or COMPONENT depending on how you connect DVD Player to the TV COMPONENT VIDEO OUT Y PB PR Connect to a TV with Y PB PR inputs ANALOG...

Page 10: ...VIDEO Video connection Good 1 1 Connect the VIDEO OUT jack on the DVD Player to the video in jack on the TV using the video cable supplied V 2 2 Connect the Left and Right AUDIO OUT jacks of the DVD P...

Page 11: ...uality For this you need a multi channel Audio Video receiver that supports one or more of the audio formats supported by your DVD Player MPEG 2 Dolby Digital and DTS Check the receiver manual and the...

Page 12: ...ime search Audio language and Digital Audio Output mode Subtitle language Angle Sound Function Use 3 3 4 4 to select desired option Displays the current title number and total number of available titl...

Page 13: ...ture TV Aspect 4 3 Letterbox Select when a standard 4 3 TV is con nected Displays theatrical images with masking bars above and below the picture 4 3 Panscan Select when a standard 4 3 TV is con necte...

Page 14: ...them If your receiver or amplifier is capable of handling 96KHz signals select 96KHz When this choice is made the DVD player will pass all signals through with out down conversion or processing Others...

Page 15: ...ou must enter your 4 digit password or change the rating level in order to play the disc 5 5 Press SELECT ENTER to confirm your rating selection then press SETUP to exit the menu Country Code Enter th...

Page 16: ...st be entered and or the disc must be authorized see Parental Control on page 15 DVDs may have a region code Your player will not play discs that have a region code different from your player The regi...

Page 17: ...Pause 1 Press PAUSE STEP during playback 2 To return to playback press PLAY or press PAUSE STEP again Slow Motion 1 Press SLOW t or T during playback The player will enter SLOW mode 2 Use the SLOW t...

Page 18: ...sc 2 Within 10 seconds press 3 3 4 4 to select the Time Search icon in the on screen display The appears in the Time Search box 3 Within 10 seconds use the number buttons to enter the required start t...

Page 19: ...us DVDs may contain menus that allow you to access spe cial features To access the disc menu press MENU Then press the appropriate number button to select an option Or use the 1 2 3 4 buttons to highl...

Page 20: ...ack currently playing press REPEAT The Repeat Track icon appears on the menu screen To repeat all tracks on the program list press REPEAT a second time The Repeat All icon appears on the menu screen T...

Page 21: ...tension mp3 MP3 Disc compatibility with this player is limit ed as follows 1 Sampling Frequency only at 44 1kHz 2 Bit rate within 32 320kbps 3 CD R physical format should be ISO 9660 4 If you record M...

Page 22: ...programmed tracks are cleared when the power is turned off or the disc is removed Repeat Programmed Tracks All To repeat the track currently playing press REPEAT The Repeat Track icon appears on the...

Page 23: ...at means Vertical interpolation or De interlace is not perfectly matched with the disc In this case the picture quality may be improved by changing the video mode To change the video mode press and ho...

Page 24: ...an obstacle in the path of the remote control and the DVD player The batteries in the remote control are exhausted Correction Plug the power cord into the wall outlet securely Insert a disc Check tha...

Page 25: ...da 7579 Korean 7583 Kashmiri 7585 Kurdish 7589 Kirghiz 7665 Latin Code Language 7678 Lingala 7679 Laothian 7684 Lithuanian 7686 Latvian Lettish 7771 Malagasy 7773 Maori 7775 Macedonian 7776 Malayalam...

Page 26: ...ds KZ Kazakhstan LA Laos LB Lebanon Code Country LC Saint Lucia LI Liechtenstein LK Sri Lanka LR Liberia LS Lesotho LT Lithuania LU Luxembourg LV Latvia LY Libya MA Morocco MC Monaco MD Moldavia MG Ma...

Page 27: ...dB CD Outputs VIDEO OUT 1 Vp p 75 ohms sync negative RCA jack x 1 S VIDEO OUT Y 1 0 V p p 75 negative sync Mini DIN 4 pin x 1 C 0 3 V p p 75 ohms COMPONENT VIDEO OUT Y 1 0 V p p 75 negative sync RCA j...

Page 28: ...product is defective and to obtain a Return Authorization RA During the Warranty Period Zenith will send you a return shipping label After you obtain a RA for return please box your unit with a copy o...

Reviews: