background image

P A G E   9

206-3371-A

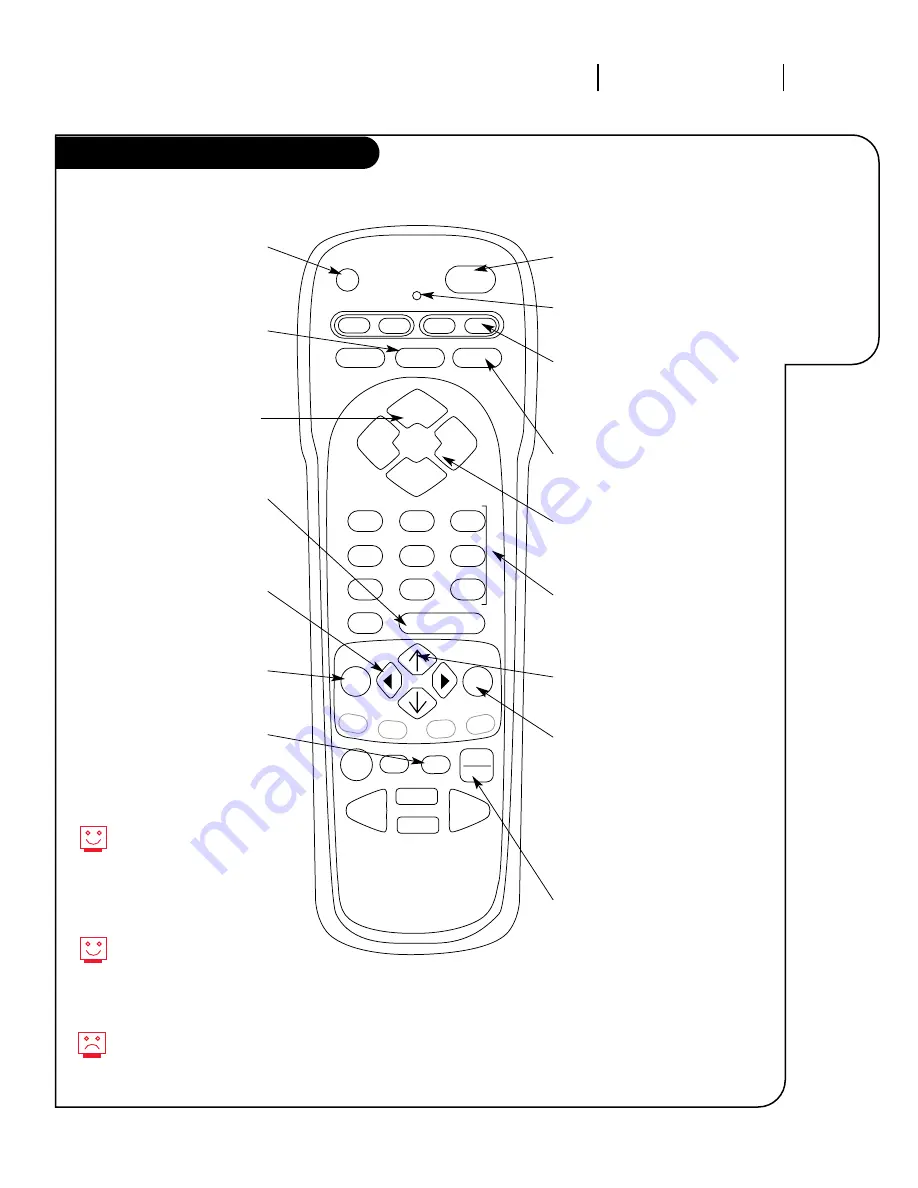
O P E R AT I O N           B U T TO N   F U N C T I O N S

A quick list 
of all the 
buttons on
your remote
and what 
they do.

Button Functions on your Remote

PRG

POWER

CABLE

VCR

AUX

TV

A

ENTER

FLASHBK

MUTE

CHANNEL

CHANNEL

VOLUME

VOLUME

1

2

3

4

5

6

7

0

8

9

MENU

REWIND

FFWD

RECORD

QUIT

B

C

D

E

TV/VCR

SOURCE

PAUSE

TIMER

PLAY

STOP

PRG (PROGRAM)

Programs your remote to

operate other products.

See page 23.

FLASHBK

(FLASHBACK)

Return to the 

last channel viewed.

POWER

Turns TV On or Off

.

CABLE/VCR/AUX/TV

Switch between available input
sources. AUX is for any optional
device.

CHANNEL

(UP/DOWN)

Flip through 

available channels.

MUTE

Turns sound Off and On 
while the picture remains.

ENTER

Shows the Channel/Time 

display. Press after channel

numbers for instant selection.

NUMBER KEY PAD

Selects channels directly and
enters numeric values for
some options

.

MENU

Displays on-screen

menus for TV mode.

UP/DOWN ARROWS

The Up/Down arrows 

select 

options.

remote control part number

MBR3446

TIMER

Displays the Sleep Timer

Menu. See “Timer Setup” 

on page 18 for 

more information.

VOLUME LEFT/RIGHT

Adjusts the sound levels on
your Entertainment Machine.

QUIT

Remove on-screen display from 
view. If no display is on, switches
front speaker surround sound
On and Off from some TVs.

TV/VCR-SOURCE

Switches between watching TV
through your antenna/cable, or
through your VCR.

Your remote has Night Vision
Glow-In-The-Dark keys! It must
be exposed to light before the
keys will glow in the dark.
Longer exposure—longer glow.

Keys dedicated to VCR 
functions will still operate your
VCR while the remote is in TV
mode.

Grey keys indicate that they may
not function on your model of
TV.

LEFT/RIGHT ARROWS

The Left/Right arrows

adjust

options.

LED INDICATOR LIGHT

Lights when keys are pressed.

Summary of Contents for A20A22D

Page 1: ...Thanks for choosing Zenith machine numbers A20A22D o p e r a t i n g g u i d e w a r r a n t y h o o k u p d i r e c t o r y p a g e 3...

Page 2: ...ctric Code U S A The code provides guidelines for proper grounding and in particular specifies that the cable ground shall be connected to the grounding system of the building as close to the point of...

Page 3: ...First find the line below that best describes what you want to do then go to that page number Cable TV wall jack Cable box In Out Cable TV wall jack Cable box In Out If you are using an antenna and no...

Page 4: ...lat wire 300 ohm Antenna 300 75 ohm Adapter TV back panel expanded view Antenna Cable Audio In Video Audio In Video If you have a 75 ohm RF cable then you don t need any adapters Remember when screwin...

Page 5: ...jacks clockwise tight ens and counterclockwise loosens If you re using a cable box Auto Program might only find the chan nel your cable service is on usual ly channel 3 or 4 Don t worry that s all you...

Page 6: ...our TV TV back panel expanded view Antenna Cable TV back In Out Audio Video 3 4 VCR back VCR back AV panel Flat wire 300 ohm Antenna 300 75 ohm Adapter RF coaxial wire 75ohm not included with TV outpu...

Page 7: ...se the cable box to change channels Remember when screwing in RF cables onto jacks clockwise tight ens and counterclockwise loosens No A V cables are included with your Entertainment Machine Without A...

Page 8: ...ent Machine Press the MENU key so the Setup menu appears Using the UP DOWN arrows on the remote control select Auto Program on your screen Press a RIGHT or LEFT arrow to reach the Auto Program screen...

Page 9: ...channels directly and enters numeric values for some options MENU Displays on screen menus for TV mode UP DOWN ARROWS The Up Down arrows select options remote control part number MBR3446 TIMER Display...

Page 10: ...Language on your screen Press the VOLUME Right Left arrows to adjust the language you want your on screen menus to appear in Repeat the above steps for the other options in the Setup and Video menus...

Page 11: ...display should appear in the upper right hand cor ner of the screen If the display reads Video then the source is an A V input If the display reads a channel number then the source is your Cable or An...

Page 12: ...age too especially if your cable provider requires you to use their cable box to descramble their stations Setting Up a Tuner 1 2 3 4 5 Based on the advantages listed above decide what device you want...

Page 13: ...hut down On Off timer controls automatic power on and power off Must be set to On for above functions to work Captions Text Displays closed captions or text when available Options are Off Caption 1 Ca...

Page 14: ...STOP FFWD TV VCR SOURCE Setting Ch Add Del Press the MENU key on the remote so the Setup menu appears Select the Ch Add Delete menu using the UP DOWN arrows Using either the NUMBER key pad or the CHAN...

Page 15: ...ess a RIGHT or LEFT arrow to adjust the time Press the TIMER button to select AM or PM Press ENTER or QUIT to return to TV viewing 1 2 3 4 5 PRG POWER CABLE VCR AUX TV A ENTER FLASHBK MUTE CHANNEL CHA...

Page 16: ...LEFT arrows to adjust the length of time until the TV shuts down select a countdown from ten minutes to four hours At this point continue to step five to set the On Time or press ENTER or QUIT to ret...

Page 17: ...following options Caption 1 Caption 2 Caption 3 Caption 4 Text 1 Text 2 Text 3 or Text 4 Press ENTER or QUIT to return to TV viewing Standard closed captioning is avail able using the Caption 1 option...

Page 18: ...CHANNEL CHANNEL VOLUME VOLUME 1 2 3 4 5 6 7 0 8 9 MENU REWIND RECORD QUIT B C D E PAUSE TIMER PLAY STOP FFWD TV VCR SOURCE Choose between stereo sound and mono sound Audio Mode Press the MENU key on t...

Page 19: ...OWN arrows on the remote control select Language on your screen Press a RIGHT LEFT arrow to choose any of the following options English Spanish or French Press ENTER or QUIT to return to regular TV vi...

Page 20: ...Picture Preference Choose either Custom Preset Daylight or Nighttime Custom allows you to set the picture the way you want Preset moves all the above options back to their original factory set levels...

Page 21: ...code found on the chart in the Reference section Press ENTER to save the code The indicator light will flash three times and turn off if the code was accepted Aim the remote at the device and push th...

Page 22: ...rol your amplifier while all the other keys still operate the Entertainment Machine To put everything back to normal reprogram all buttons with their original codes see the Programming Your Remote sec...

Page 23: ...NUMBER key pad enter the three digit code for the device you ve selected Press ENTER to save the code Aim the remote at the device and press POWER It should turn off Repeat the steps for AUX 2 and AU...

Page 24: ...Aim the remote at the correct device and press the POWER button Allow a second to pass then push the POWER button again Repeat until the device turns off This is a trial and error process so it may be...

Page 25: ...3 114 119 121 130 133 Sony 115 143 151 170 Soundesign 139 Sylvania 112 113 117 119 127 128 139 Symphonic TV VCR 154 Tatung 106 Teknika 103 112 121 124 139 Telerent 103 121 Toshiba 110 111 134 171 XR 1...

Page 26: ...374 Zenith Satellite 312 328 330 351 378 Pioneer 402 403 Sanyo 401 Sony 404 Zenith 401 Akai 409 424 Crown 410 Denon 411 Fisher 412 438 Goldstar 460 Harman Kardon 413 JVC 415 Kenwood 412 416 417 441 M...

Page 27: ...git 7 VCR Digit 7 Cable Digit 7 AUX Digit 7 8 TV Digit 8 VCR Digit 8 Cable Digit 8 AUX Digit 8 9 TV Digit 9 VCR Digit 9 Cable Digit 9 AUX Digit 9 0 TV Digit 0 VCR Digit 0 Cable Digit 0 AUX Digit 0 ENT...

Page 28: ...re turning the Entertainment Machine on Use a quality wood cleaner and polish This will protect the Entertainment Machine from dirt and dust as well as keep the cabinet looking new If you leave your E...

Page 29: ...Machine Are the Audio A V cables properly installed Are the wires for external speakers if you have external speakers properly installed Are you in TV or Cable tuning mode See Auto Program on page 9...

Page 30: ...r stereo playback of videocassettes and for higher quality picture and sound from other A V devices A V DEVICE Any device that produces video or sound VCR DVD cable box or television ADD This function...

Page 31: ...sends a signal out of a VCR DVD or other A V device SECOND AUDIO Second Audio Programming SAP is another separate audio channel PROGRAMMING SAP available with some programming Choosing SAP often refe...

Page 32: ...2 AUX 3 23 Basic Television Operation 11 12 Batteries 4 7 Button Functions 9 Cable 5 7 Captions and Text Menu 17 Ch Add Del 14 Clock Set 15 Front Panel 11 12 Glossary 30 31 Hook up Directory 3 Languag...

Page 33: ...und Sound compatible TV These speakers create a sound so real it s as if you were part of the action The convenient space saving shelf design make these speakers an ideal addition to any Home Theater...

Page 34: ...home antenna or faulty antenna connections are the owner s responsibility Important Product Registration Please fill out and mail your Product Registration Card It is imperative that Zenith know how...

Reviews: