background image

9

ZE-NC526

RADIO MODE

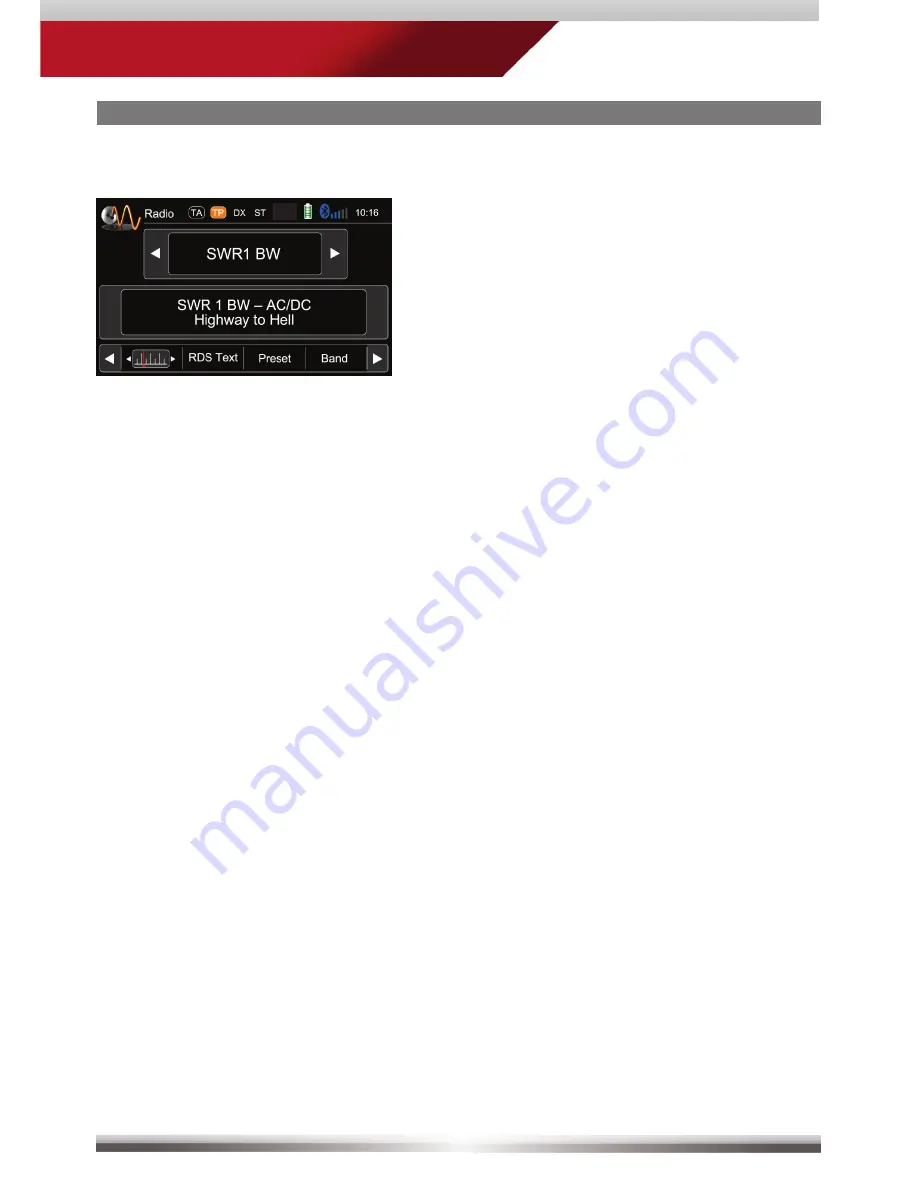
RDS text allows a radio station to transmit 

free-form textual information that can be 

either static e.g. station slogans or in sync 

with the programming such as the title 

and artist of the currently playing song or 

even short ads. Availability depends on 

region, reception quality and carrier.


Summary of Contents for ZE-NC526

Page 1: ...USER MANUAL BEDIENUNGSANLEITUNG ZE NC526 2 DIN NAVICEIVER ...

Page 2: ...eserves the right to revise this document at any time without prior notice CONTENTS SAFETY INSTRUCTIONS 3 FRONT PANEL BUTTONS 4 5 BASIC OPERATION 6 7 RADIO MODE 8 11 PLAYBACK PLAYLIST AUDIO VIDEO 12 17 BLUETOOTH MODE 18 25 NAVIGATION MODE 26 27 SETUP 28 35 REMOTE CONTROL 36 37 EXTERNAL PLAYBACK SOURCES 38 39 GLOSSARY 40 TROUBLESHOOTING 41 42 SPECIFICATIONS 43 WARRANTY 86 87 Navigation manual is se...

Page 3: ...the cause for the short circuit Please pay attention to the cables of the power supply If the short circuit doesn t result from a failure of the power supply or wiring you can replace the defective fuse with a new one same value If the short circuit is still existing please contact an authorized ZENEC dealer 11 When connecting to any other device read its user s guide for detailed safety instructi...

Page 4: ...4 FRONT PANEL BUTTONS Front Panel NAV ZE NC526 ...

Page 5: ...or software updates navi files 5 USB AND SD CARD SLOT RESET Open the hatch to access the two slots and the RESET button Press to initiate a hardware reset 6 NAV Short press to start navigation Press and hold to adjust the TFT screen brightness 7 VOLUME EQUALIZER Rotate to increase decrease volume Press to open Equalizer page 8 HOME Press to open main menu FRONT PANEL BUTTONS FRONT PANEL BUTTONS ...

Page 6: ... on top of the screen to navigate through the main menu pages M Zone included Entering the main menu you have access to all playback sources and settings ADJUST LOCAL LANGUAGE Tap center header button or slide to second main menu page Choose SETUP LANGUAGE and adjust to your likings You might want to adjust some other basic settings See chapter Setup BASIC OPERATION POWER ON OFF Main menu 1 Main m...

Page 7: ...6 BASIC OPERATION BASIC OPERATION Display control elements Indicates current source Tap to enter main menu Connected cellphone battery status Cellphone reception field strength Basic elements all playback sources ...

Page 8: ...y or station name Traffic announcement status Traffic announcements on carrier LOC DX status Stereo reception status Control elements Scroll left Previous station Tap to select center display content Next station Scroll right 100 kHz down Drag to adjust frequency 100 kHz up ...

Page 9: ...o transmit free form textual information that can be either static e g station slogans or in sync with the programming such as the title and artist of the currently playing song or even short ads Availability depends on region reception quality and carrier ...

Page 10: ...10 RADIO MODE Select preset or save a preset Press and hold a center button to set a new frequency as preset To select a radioband tap on a center button ...

Page 11: ...ange onscreen AF ON OFF When activated AF function automatically switches to an alter native frequency AF of your chosen station in order to always offer the best possible reception quality TA ON OFF When activated the radio temporarily switches for the duration of the traffic announcement to tuner mode AS Searches for the six strongest stations and saves them as preset SCAN Intro scan of all stati...

Page 12: ...play elements Source Current folder playlist ID3 tag info Progress bar Album Art PLAYBACK IPOD USB SD Control elements Previous track Play Pause Next track Repeat Shuffle Switch to playlist page Playback page ...

Page 13: ...at Shuffle Cursor up Cursor down Switch to playback page Switch to iPod audio mode Switch to iPod video mode Go to root directory Search Folder playlist up Playlist page iPod NOTE All files on the inserted media get sorted according to their file extension Types can be separately played handled Directories containing a single file type only are also displayed ...

Page 14: ...ements Track folder Current folder Control elements Previous track Play Pause Next track Repeat track Shuffle Cursor up Cursor down Switch to playback page Go to root directory Search Folder up Select media file type Playlist page USB SD ...

Page 15: ... up an alphabetic keyboard allowing you to enter an initial letter Alphabetical search is unique for iPod mode USB SD modi search Tapping on Search pops up an numeric keyboard allowing you to enter track numbers Numeric search is unique for USB SD modi Search function ...

Page 16: ...le track file Play Pause Next title track file To playlist menu Full screen mode Display elements Current temporal position in track Total duration of track Elements to control playback of video files Elements to control playback of video and picture files ...

Page 17: ...peak current Otherwise they must be considered incompatible and can t be used with the device The display of album covers depends on the used file format and may be served delayed depending on the file size iPod mode The device sports two USB ports One port is located at the front panel and the other at the rearside They are generic USB ports which both allow connection to USB data carriers as wel...

Page 18: ...s Bluetooth settings Control elements Tap icon to enter NOTE If you are trying to pair a cell phone Switch off the auto connect function while pairing additional mobile phones with the device You may try to initiate pairing from your phone if the following procedure fails ...

Page 19: ... Dialled number Accept call dial hang up switch between calls Control elements Keypad Deletes last digit Pick up call Switch to second call Toggle to shift call between handsfree and mobile phone privacy mode Hang up active call Back to first call Back to BT main menu Caller II Caller I ...

Page 20: ...er a search for BT devices 2 Enter BT settings Device 1 Control elements Pair a mobile phone and input PIN for pairing Back to BT settings Tap to select mobile phone Browse list up down Choose your mobile phone from the list or retry searching Press Pair 3 Pair ...

Page 21: ...evice paired successfully 5 Pin code Deletes the last digit Acknowledge pincode and continue Enter pin code and tap OK or retry 4 NOTE If you are trying to pair more than one cell phone Switch off the auto connect function while pairing additional mobile phones with the device Use different pin code twins for each paired cell phone ...

Page 22: ...ose contact name from list Browse contact list up down Contacts Manage phonebook Control elements No function when keypad is active Quit keypad Display input Tap to delete last character Switch to next page of keypad Search for an entry NOTE You may search for up to 15 leading characters ...

Page 23: ...display of the phone book entries depend on the mobile phone brand and model If the synchronisation doesn t work properly disconnect the cell phone and repeat the pairing process If automatic phone book synchronisation does not work consult the manual of your mobile phone Some mobile phones require explicit activation of that function After entering the BT main menu press hold either the Contacts ...

Page 24: ...24 BLUETOOTH MODE Setup settings Back to BT main menu Options BT device settings Microphone selection Tap to adjust microphone gain ...

Page 25: ...n the way may shorten the distance You can pair up to five cell phones and synchronise up to a thousand phonebook contacts each In order to use the built in handsfree device you need to pair your mobile phone first It cannot be guaranteed that all mobile phones can be paired and that all functions will work For the BT compatibility list of tested and compatible mobile phones as well as the latest ...

Page 26: ...d Choose your preferred destination search method Here in our example choose Find address Type in a city street name house number and confirm each step by tapping The program is now calculating the desired route Once route calculation has completed just tap GO to start route guidance ...

Page 27: ... listen to any playback source during navigating The navigation software automatically manages volume levels during voice guidance If you change the volume level during voice guidance the chosen volume level gets stored for later route guidance Audio playback is during voice guidance capped to volume 10 If the preset audio volume is below 10 it will be muted ...

Page 28: ...per row Set OSD language Go to Setup Language to choose the desired OSD language Set button background illumination Go to Setup General Illumination and select the desired color Set date and time Go to Setup Time Tap to adjust date and time Settings to be made directly after mounting and initial startup ...

Page 29: ...ptor Function Choice Range Aspect ratio Video display setting TV Shape Normal Full A V In PAL NTSC adjustment TV system setting for A V In Auto NTSC PAL Rear view camera Signal will be internally mirrrored Picture mirroring Normal Mirror ...

Page 30: ...oose between different colors Red White Beep Beep to ack nowledge Beep on touch On Off Wallpaper Preset only Select presets Various Anti theft Anti theft function De or activate code input On Off Password Code input Password Standard code 000000 Use an arbitrary 6 digit code To reset the code enter the standard code instead Calibration Screen calibration Set points Start Load factory Ex factory De...

Page 31: ...31 ZE NC526 SETUP TIME Name Descriptor Function Choice Range Date YYYY MM DD Sets date As usual Clock mode Time format Set time display 12 H 24 H Time Time display Set time As usual ...

Page 32: ...hoice Range Subwoofer Subwoofer output De or activate subwoofer output On Off Subwoofer filter Subwoofer output Sets low pass filter frequency 80 Hz 120 Hz 160 Hz Loudness Spectral adaption Spectral adaption the acoustic range of the ear On Off ...

Page 33: ...33 ZE NC526 SETUP LANGUAGE Name Descriptor Function Choice Range OSD OSD language Selection of the OSD language English German French Italian Turkish Dutch Spanish Czech Serbian Polish ...

Page 34: ...34 SETUP VERSION Name Descriptor Function Choice Range Version Installed soft ware versions Display the in stalled software versions OS MPU MCU MPEG ...

Page 35: ...35 ZE NC526 SETUP VOLUME Name Descriptor Function Choice Range Volume Level ad justment of sources USB 0 12 SD Card 0 12 Radio 0 12 Bluetooth 0 12 AV In 0 12 DVB T 0 12 Navigation 0 12 iPod 0 12 ...

Page 36: ...36 REMOTE CONTROL Remote Control Buttons ...

Page 37: ...back mode NOTE Some functions may not be available depending on your chosen mode and type of media REMOTE CONTROL REMOTE CONTROL 16 NUMERIC KEYPAD Input track title time index 17 BT Bluetooth main menu 18 FM AM Tuner mode next radio band 19 RPT Repeat track title folder 20 EQ Open Equalizer 21 MUTE Mute Un mute audio output 22 DIRECTIONAL PAD Press to pause the playback Cursor keys 23 FRONT REMOTE...

Page 38: ...ed by the headunit Use the control elements of the connected peripherals i e roof monitor instead to adjust the volume Control elements Direct access to main menu Choose DVB T Choose Front USB Choose SD Card Deactivate M Zone signal Control elements Direct access to M Zone M Zone setup allows you to issue different content to the front and head rest monitors optional ...

Page 39: ...an external ZENEC DVB T receiver For a perfect compatibility match check out the manual and the compatibility list in advance Compatible DVB T devices provide easy operation by using the touchscreen of the headunit Control elements Tap into the upper right corner to return to the main menu ...

Page 40: ... IF Interface to communicate with CAN Bus DVB T Digital Video Broadcasting Terrestrial TV transmission standard EQ Equalizer FAT32 File allocation table 32 bit GUI Graphical User Interface HMI Human Machine Interface graphical part GUI ID3 Tag Format to display additional info together with MP3 audio files M Zone Rear seat entertainment area OSD On Screen Display ...

Page 41: ...aker wiring is in contact with metal part of car Insulate all speaker wiring connections or replace the speaker cable Mute is activated Turn off the Mute function Speaker impedance rating not compatible with unit Connect proper speakers Speaker is shorted Check speaker connections TFT MONITOR No image The parking brake is not engaged Stop vehicle in a safe place and apply parking brake The parking...

Page 42: ...ivated Turn REG function off The adapter with antenna power supply is not connected Connect the antenna power supply adapter properly The AF function is not activated Activate the AF function MP3 The ID3 tags are shown incorrectly Message is longer than LCD can display or ID3 tag is not compatible Use proper ID3 tag information ...

Page 43: ...nternal and external microphone Future proof upgradable Bluetooth firmware MULTIMEDIA PLAYER Front and rear USB 2 0 port SD SDHC card reader up to 32 GB Made for iPod Made for iPhone Playback SD USB MP3 WMA AVI Xvid and JPEG GENERAL FEATURES Intuitive user friendly HMI in 10 different languages 6 2 15 7 cm 16 9 HD TFT LCD display with 800x480 pixel resolution and touchscreen control RDS tuner with...

Page 44: ...vorhergehende Hinweise zu ändern INHALTSVERZEICHNIS SICHERHEITSHINWEISE 45 TASTEN DES BEDIENTEILS 46 47 GRUNDLEGENDE BEDIENUNG 48 49 RADIO MODUS 50 53 WIEDERGABE 54 59 BLUETOOTH MODUS 60 67 NAVIGATIONS MODUS 68 69 SYSTEM SETUP ERSTE EINSTELLUNGEN 70 77 FERNBEDIENUNG 78 79 EXTERNE WIEDERGABE UND QUELLEN 80 81 GLOSSAR 82 FEHLERSUCHE 83 84 SPEZIFIKATIONEN 85 GARANTIE 86 87 Die Bedienungsanleitung für...

Page 45: ...n Kurzschluss war Achten Sie dabei besonders auf die Kabel der Spannungsversorgung Wenn der Kurzschluss nicht durch einen Fehler in der Spannungsversorgung verursacht wurde müssen Sie die defekte Sicherung gegen ein neues Exemplar mit identischen Werten austauschen Sollte der Kurzschluss immer noch vorhanden sein wenden Sie sich bitte an einen autorisierten ZENEC Fachhändler 11 Lesen Sie die Bedie...

Page 46: ...46 TASTEN DES BEDIENTEILS Bedienteil NAV ZE NC526 ...

Page 47: ...tware Updates Navi Daten 5 USB und SD KARTENSLOT RESETKNOPF Zugang durch Öffnen der Abdeckklappe Drücken Sie den Resetknopf um einen Hardware Reset durchzuführen 6 NAV Kurz drücken um zwischen Navigations und Wiedergabeanzeige zu wechseln Gedrückt halten zum Einstellen der Bildschirm Helligkeit 7 LAUTSTÄRKE EQUALIZER Drehen verändert die Lautstärke Drücken um das Equalizermenü zu öffnen 8 HOME Drü...

Page 48: ... Markierungen im oberen Bildschirmbereich des Hauptmenüs Sie gelangen von hier in alle drei Seiten des Hauptmenüs inklusive der M Zone Vom Hauptmenü aus haben Sie Zugriff auf sämtliche Wiedergabequellen und Einstelllungen LANDESSPEZIFISCHE SPRACHE EINSTELLEN Tippen Sie auf die mittlere der drei flachen Markierungen oder sliden Sie auf die zweite Hauptseite Wählen Sie SETUP LANGUAGE und dann die vo...

Page 49: ...NDLEGENDE BEDIENUNG Anzeige Bedienelemente Momentan aktive Quelle Tippen Sie hier um ins Hauptmenü zu gelangen Akkuzustand des gekoppelten Mobiltelefons Empfangsqualität des Mobilfunknetzes Grundlegende Elemente bei allen Wiedergabequellen ...

Page 50: ...e Status der Verkehrsnachrichten TA Sender trägt Verkehrsnachrichten LOC DX Status Stereo Empfangsstatus Bedienelemente Nach Links scrollen Vorherige Station Inhaltsauswahl des mittleren Balkens Nächste Station Nach Rechts scrollen 100 kHz runter Ziehen zur Frequenzeinstellung 100 kHz hoch ...

Page 51: ...526 RADIO MODUS Der RDS Text übermittelt vom Sender frei definierbare Zusatzinformationen z B den aktuellen Musiktitel und Interpreten oder kurze Mitteilungen Die Verfügbarkeit hängt von der Empfangsqualität ab ...

Page 52: ...n oder speichern Wenn Sie eines der Preset Felder länger gedrückt halten wird die momentan eingestellte Frequenz dort als neuer Preset abgespeichert Wählen Sie das gewünschte Frequenzband durch Tippen auf eines der mittleren Felder ...

Page 53: ...lls gerade aktiv s Kopfleiste AF EIN AUS Nach Aktivierung schaltet das Gerät automatisch auf die am besten zu empfangende Frequenz des Senders TA EIN AUS Automatische Umschaltung auf Sender mit Verkehrsdurch sagen Das Gerät schaltet automatisch in den Tuner Modus AS Automatische Suche und Abspeicherung der sechs stärksten Sender als Preset SCAN Anspielen aller empfangbaren Sender Durch ein nochmali...

Page 54: ...lle Aktuelles Verzeichnis Playlist ID3 Tag Info Fortschrittsbalken Album Art WIEDERGABE IPOD USB SD Bedienelemente Track zurück Wiedergabe Pause Track vor Wiederholen Shuffle Zufallswiedergabe Zur Playlist Seite wechseln Playback Seite ...

Page 55: ...Dateityp gefiltert und dargestellt WIEDERGABE IPOD USB SD Anzeigeelemente iPod Modus Track Ordner Playlist Aktuelles Verzeichnis Bedienelemente Track zurück Wiedergabe Pause Track vor Wiederholen Shuffle Zufallswiedergabe Cursor hoch Cursor runter Zur Playback Seite wechseln iPod Audio Modus iPod Video Modus Direktzugriff Hauptverzeichnis Suchen Ordner Playlist Ebene höher Playlist Seite iPod ...

Page 56: ...es Verzeichnis Bedienelemente Track zurück Wiedergabe Pause Track vor Wiederholen Shuffle Zufallswiedergabe Cursor hoch Cursor runter Zur Playback Seite wechseln Direktzugriff Hauptverzeichnis Suchen Ordner Playlist Ebene höher Medientyp auswählen Playlist Seite USB SD ...

Page 57: ...alphabetische Tastatur zur Eingabe des Anfangsbuchstabens Nur der iPod Modus bietet eine alphabetische Suche USB SD Suche Nach Tippen auf Suche erscheint eine numerische Tastatur zur Eingabe von Tracknummern Die numerische Suche steht nur in den USB SD Modi zur Verfügung Suchfunktion ...

Page 58: ...Track Kapitel zurück Wiedergabe Pause Titel Track Kapitel vor Zur Playlist Seite Hauptmenü Vollbild Anzeigeelemente Spieldauer aktuell Spieldauer total Bedienelemente zum Video abspielen Bedienelemente um Video und Bilddateien abzuspielen anzuzeigen ...

Page 59: ...nd kann je nach Dateigröße verzögert erfolgen iPod Modus Das Gerät verfügt über zwei USB Anschlüsse welche sich an der Vorder und Rückseite des Gerätes befinden Beide können universell verwendet werden d h USB Datenträger und iPod iPhone Geräte können wahlweise an beiden USB Anschlüssen angeschlossen und betrieben werden Mit der Einschränkung dass keine zwei iPod iPhone Geräte gleichzeitig angesch...

Page 60: ...nte Tippen Sie auf ein Icon um es auszuwählen HINWEIS Koppeln eines Mobiltelefons Achten Sie darauf daß die auto connect Funktion ausgeschaltet ist wenn Sie versuchen weitere Mobiltelefone zu koppeln Falls der nachfolgend beschriebene Vorgang fehlschlägt versuchen Sie das Koppeln vom Mobiltelefon aus einzuleiten ...

Page 61: ...ente Eingabetastatur Löscht die zuletzt eingeg Ziffer Anruf annehmen Anrufe makeln Schaltet Anruf zwischen Freisprech einrichtung und Mobiltelefon Privat modus um Aktives Gespräch beenden ggf zum ersten Gespräch zurück Zum BT Hauptmenü zurück Anruf annehmen wählen auflegen makeln BLUETOOTH MODUS Caller II Caller I ...

Page 62: ...uchen 2 Tippen Sie auf BT Settings Einstellungen Devices Geräte 1 Bedienelemente Gewähltes Mobiltelefon zwecks Koppeln bestätigen Zurück zu den Bluetooth Einstellungen Tippen Sie auf das gewünschte Handy In der Liste blättern Wählen Sie Ihr Gerät aus der Liste Bestätigen Sie mit Pair Hinzufügen 3 Pair ...

Page 63: ...Pin Code Löscht die zuletzt eingegebene Ziffer Pin Code bestätigen Geben Sie hier den Pin Code ein und bestätigen mit OK 4 HINWEIS Falls Sie mehrere Mobiltelefone verbinden möchten beachten Sie bitte Schalten Sie die automatische Verbindungsfunktion aus während Sie weitere Mobiltelefone zum ersten Mal koppeln Verwenden Sie unterschiedliche Pin Code Paare für jedes neu verbundene Mobiltelefon ...

Page 64: ...ier den Namen aus In der Liste blättern Kontaktmanagement Bedienelemente Keine Funktion während der Nummerneingabe Eingabemaske beenden Anzeige der Eingabe Löscht den zuletzt eingegebenen Buchstaben Nächste Seite der Eingabemaske Keypad aufrufen Suche nach einem Eintrag HINWEIS Es ist möglich mit bis zu 15 Anfangsbuchstaben zu suchen ...

Page 65: ...dell und markenspezifische Unterstützung Ihres Handymodells angewiesen Bei Synchronisierungsproblemen beenden Sie die Verbindung und wiederholen die Kopplung Der automatische Synchronisierungsvorgang erfordert bei manchen Handys eine explizite Autorisierung Beachten Sie hierzu die Hersteller angaben in der Betriebsanleitung des jeweiligen Handys Bei Synchronisierungsproblemen tippen Sie im Bluetoot...

Page 66: ...66 BLUETOOTH MODUS Setup Einstellungen Zum BT Hauptmenü zurück Optionen BT Geräteeinstellungen Auswahl Mikrofon Auf Tippen um die Empfindlichkeit des Mikrofons einzustellen ...

Page 67: ...isse bzw Sichtbarrieren können diesen Abstand verringern Sie können bis zu fünf verschiedenen Telefone mit jeweils 1000 Telefonbuch Kontakten koppeln und synchronisieren Zur Benutzung der Freisprecheinrichtung muss Ihr Handy vorher gekoppelt und verbunden werden Leider kann der volle Funktionsumfang nicht für jedes Mobiltelefon garantiert werden Auf www zenec com finden Sie eine aktuelle Liste der...

Page 68: ...ode Hier im Beispiel Adresse suchen Ort Strasse und Hausnummer eingeben Jeden Schritt mit bestätigen Das Programm berechnet nun die geplante Route Nach erfolgter Berechnung brauchen Sie zum Navigieren nur noch auf Los zu tippen So geben Sie ein Ziel ein und starten die Zielführung ...

Page 69: ...iesem Fall verringert die Navigation die Lautstärke des aktuellen Wiedergabemodus für die Dauer der Navigationsdurchsage Die Lautstärke der Navigationshinweise lässt sich mit dem PWR VOL Regler während einer Navigationsdurchsage einstellen Die eingestellte Lautstärke bleibt gespeichert Die Audio Wiedergabe wird bei Navigationsansagen auf Volume 10 heruntergeregelt Bei einer voreingestellten Lautst...

Page 70: ...ache einstellen Unter Setup Language wählen Sie die gewünschte OSD Sprache aus Tastenbeleuchtung einstellen Unter Einstellungen Generell Beleuchtung wählen Sie die gewünschte Farbe aus Datum und Uhrzeit einstellen Unter Setup Zeit verwenden Sie die Icons um das Datum und die Uhrzeit einzustellen Empfohlene Einstellungen bei Inbetriebnahme ...

Page 71: ...ion Einstellbereich Seiten verhältnis Videoanzeige Einstellungen Seitenverhältnis Normal Voll Videoeingang PAL NTSC Anpassung Formateinstellung Videoeingang Auto NTSC PAL Rückfahr kamera Signal wird in tern gespiegelt Bild spiegeln Normal Gespiegelt ...

Page 72: ...arbe auswählen Rot Weiss Beep Tonsignal Tastenton de oder aktivieren An Aus Hintergrund bild Gespeicherte Hintergrund auswählen Diverse Diebstahl schutz Diebstahl schutzfunktion De oder aktivieren An Aus Passwort Eingabe Code Passwort Standard code 000000 Benutzen Sie einen beliebigen 6 Pincode Zum Rückstellen geben Sie statt dessen den Standard code ein Kalibrierung Bildschirm Bildschirm kalibrie...

Page 73: ... ZE NC526 SETUP ZEIT Name Beschreibung Funktion Einstellbereich Datum JJJJ MM TT Datum einstellen Diverse Uhrzeit Modus Zeitformat Zeitformat auswählen 12 Hr 24 Hr Zeit Zeitanzeige Uhr einstellen Diverse ...

Page 74: ...ch Subwoofer Subwoofer Ausgang Subwoofer ausgang de oder aktivieren An Aus Subwoofer Filter Subwoofer Ausgang Einstellung der Tiefpass Filterfrequenz 80 Hz 120 Hz 160 Hz Loudness Frequenz anpassung Frequenzan passung an das Spektrum des Hörbereiches An Aus ...

Page 75: ...E NC526 SETUP SPRACHE Name Beschreibung Funktion Einstellbereich OSD OSD Sprache Auswahl der OSD Sprache Englisch Deutsch Französisch Italienisch Türkisch Holländisch Spanisch Tschechisch Serbisch Polnisch ...

Page 76: ...76 SETUP VERSION Name Beschreibung Funktion Einstellbereich Version Software Stand Anzeige der installierten Software Versionen OS MPU MCU MPEG ...

Page 77: ...E NC526 SETUP VOLUME Name Beschreibung Funktion Einstellbereich Volume Lautstärkean passung der Audioquellen USB 0 12 SD Karte 0 12 Radio 0 12 Bluetooth 0 12 AV In 0 12 DVB T 0 12 Navigation 0 12 iPod 0 12 ...

Page 78: ...78 FERNBEDIENUNG Tastenanordnung ...

Page 79: ... Funktionen hängt vom momentan ausgewählten Modus sowie dem eingelegten Medientyp ab FERNBEDIENUNG FERNBEDIENUNG 16 NUMMERNTASTEN Eingabe Track Titel Zeitindex 17 BT Bluetooth Hauptmenü 18 FM AM Tuner Modus nächstes Radioband 19 RPT Track Titel Ordner wiederholen 20 EQ Equalizer öffnen 21 MUTE Audio Stummschalten AN AUS 22 RICHTUNGSTASTEN Drücken um die Wiedergabe zu pausieren Auswahl treffen Curs...

Page 80: ...one kann mit dem Gerät nicht verändert werden Die gewünschte Lautstärke muss direkt an der angeschlossenen Peripherie Beispiel Deckenmonitor eingestellt werden Bedienelemente Direktwahl Hauptmenü Auswahl DVB T Auswahl Front USB Auswahl SD Karte M Zone deaktivieren Bedienelemente Direktwahl M Zone Die optionale M Zone ermöglicht ihnen die Ausgabe unterschiedlicher Inhalte auf die Front und Kopfstüt...

Page 81: ...ig Beachten Sie hierzu die Kompatibilitätsliste und die Bedienungsanleitung des gewünschten ZENEC DVB T Empfängers Kompatible DVB T Empfangsgeräte lassen sich einfach und komfortabel über den Touchscreen bedienen Bedienelemente Berühren Sie die linke obere Ecke um zum Hauptmenü zurückzukehren Siehe separates DVB T Handbuch ...

Page 82: ...elle mit 32 bit GUI Engl Graphical User Interface Graphische Benutzeroberfläche HMI Engl Human Machine Interface Schnittstelle Mensch Maschine ID3 Tag Erweiterte Informationen eingebunden in MP3 Dateien Icon Engl Bildzeichen Abbildung mit Funktion Makeln beim Telefonieren z B ein neues Gespräch annehmen während man das erste Gespräch vorrübergehend stummschaltet M Zone Back seat area Rücksitzberei...

Page 83: ...erkabel haben eine Verbindung zur Fahr zeugmasse Isolieren Sie die blanke Stelle oder tauschen Sie das Laut sprecherkabel Die Audiowiedergabe Mute wurde am Gerät stumm geschaltet Schalten Sie die Audiowiedergabe am Gerät wieder ein Schlechte Audioqualität oder Verzerrungen Die Impedanz der Lautsprecher passt nicht zum Gerät Verwenden Sie passende Laut sprecher Die Lautsprecherkabel haben eine Verb...

Page 84: ...tiviert Deaktivieren Sie die REG Funktion Die Phantomspeisung wurde nicht oder falsch angeschlossen Schließen Sie die Phantom speisung richtig an Die AF Funktion wurde nicht aktiviert Aktivieren Sie die AF Funktion MP3 Die ID3 Tags werden falsch angezeigt Das Dateiformat stimmt nicht oder die ID3 Tags sind fehlerhaft Verwenden Sie einen Datenträger mit anderen MP3 Dateien ...

Page 85: ...n Internes und externes Mikrofon Zukunftssichere aktualisierbare Bluetooth Firmware MULTIMEDIA PLAYER Front und rückseitiger USB 2 0 Anschluss SD SDHC Kartenleser bis 32 GB Made for iPod Made for iPhone Wiedergabe SD USB MP3 WMA AVI Xvid und JPEG GENERELLE MERKMALE Intuitiv bedienbare Bedienoberfläche in 10 verschiedenen Sprachen 6 2 15 7 cm 16 9 HD TFT LCD Display mit 800x480 Pixel Auflösung und ...

Page 86: ... and dealer stamp together with the original sales slip 2 JAHRE GARANTIE Sehr geehrter Kunde Vielen Dank dass Sie sich zum Kauf dieses Produktes von ZENEC entschlossen haben Wir bitten Sie die Originalverpackung aufzubewahren z B für den Transport im Garantiefall Wenn Sie Garantie Leistungen für dieses ZENEC Produkt beanspruchen wenden Sie sich bitte direkt an den Händler bei dem das Gerät gekauft...

Page 87: ...lease recycle where facilities exist Check with your Local Authority or retailer for recycling advice Waste Electrical and Electronic Equipment Directive Sollten Sie dieses Gerät eines Tages entsorgen müssen beachten Sie bitte dass elektrische Geräte nicht mit dem Haushaltsmüll entsorgt werden dürfen Führen Sie das Gerät wenn möglich dem Recycling zu Ihre lokalen Behörden oder Ihr Händler können S...

Page 88: ...icense Other trademarks and trade names are those of their respective owners Die Bluetooth Weltmarke und deren Logos sind Eigentum der Bluetooth SIG Inc und jeglicher Gebrauch dieser wurde von Parrot S A lizenziert Andere Marken und Markennamen sind Eigentum der entsprechenden Markeninhaber Le mot la marque et le logo Bluetooth sont la propriété de Bluetooth SIG Inc L utilisation de cette marque p...

Page 89: ...89 ZE NC526 NOTES NOTIZEN ...

Page 90: ...90 NOTES NOTIZEN ...

Page 91: ...91 ZE NC526 NOTES NOTIZEN ...

Page 92: ...ZENEC by ACR AG Bohrturmweg 1 Bad Zurzach Switzerland www zenec com Rev B ...

Reviews: