background image


44 
2.  Try to find the best temperature for your hair type – when the temperature is too low the hair will not straighten or the effect will not last long, 

when the temperature is too high the hair may be burned. 

3.  Start with a low temperature and check the way your hair looks and feels. If your hair is not straight enough increase the temperature and try 

again until you find the right temperature for your hair. 

4.  It is best to do hourly breaks between the attempts. 

Using the hair straightener 

The secret of shiny, straight hair lies in preparation. 
1.  Wash the hair with a shampoo and apply hair conditioner. 
2. Dry 

hair 

thoroughly. 

3.  If hair is very wavy or coarse, use a straightening lotion. 
4.  Run fingers through hair while drying or use a paddle brush. This will make your hair smoother even before straightening. 
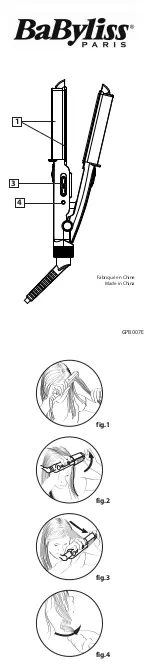
5.  Divide hair into strands starting from the back of your head. Lift the strand and slowly run the straightener down the hair. Hold the hair between 

the plates. You should run the straightener smoothly down the hair. 

6.  Do not touch the ”+” and ”-” buttons while straightening. 
7.  Run the straightener down the hair fast enough to straighten it but not to damage it. 
8.  The whole activity should not last longer than the time that is needed to count to five. 
9.  If necessary, repeat the whole process until the desired effect is achieved. 
10.  Before straightening the next strand check again if all waves are combed out. 
11.  For best results use the hair straightener before the next hair wash. 
12.  Allow hair to cool before combing or binding. 

After operation 

1.  Press and hold the 

 button for 2 seconds. 

2.  Unplug the appliance. 
3.  Place the appliance on a heat-resistant surface and allow to cool before cleaning and storing. 
4.  Store the appliance with the safety lock on, slide the safety lock to block the appliance. 

Cleaning and maintenance 

1.  Unplug the appliance and allow to cool completely. 
2.  Clean the plates after each use to avoid the accumulation of residue. 
3.  Wipe all surfaces with a soft, damp cloth. If necessary, use gentle dishwashing liquid. Wash off the dishwashing liquid. 
4.  If residue has accumulated, use a medium or soft brush to remove it (an old toothbrush is best for this purpose). Next, wipe the appliance with a 

soft, damp cloth. 

5.  Do not immerse the hair straightener into any liquid. 
6.  Do not use abrasive or corrosive agents or solvents. 


Summary of Contents for 33z022

Page 1: ...il zelmer zelmer sk www zelmer sk H HASZN LATI UTAS T S 16 20 HAJVASAL ZELMER 33Z022 T pus ASPICO KFT H 9027 Gy r Pusk s T u 4 Tel 36 96 511 291 Fax 36 96 511 293 RO INSTRUC IUNI DE UTILIZARE 21 25 PL...

Page 2: ...gdy nie pozostawiaj jej bez nadzoru Ryzyko po aru Podczas pracy nie k ad prostownicy na mokrej powierzchni lub ubraniu Urz dzenie odk adaj jedynie na powierzchni odporn na ciep o Nigdy nie zanurzaj pr...

Page 3: ...musi wystygn Nie kieruj gor cego powietrza w kierunku oczu r k lub innych miejsc wra liwych na ciep o Nie u ywaj urz dzenia wobec os b kt re pi Nie wyci gaj wtyczki zasilania przez ci gni cie za przew...

Page 4: ...y i na od ywk a nast pnie dok adnie wysusz 2 Je li w osy s grube szorstkie lub bardzo faluj ce u yj rodka prostuj cego Stosuj si do jego instrukcji u ycia 3 Uczesz lub wyszczotkuj w osy aby rozczesa w...

Page 5: ...5 Oddziel cz w os w zaczynaj c od ty u g owy podnie j i przesuwaj powoli ceramiczn prostownic od cebulek do ko c wek w os w Odpowiednio mocno zamknij p ytki na w osach W osy powinny prze lizgiwa si g...

Page 6: ...ska Nie wyrzucaj wraz z odpadami komunalnymi Importer ZELMER S A Polska ZAKUP CZ SCI EKSPLOATACYJNYCH AKCESORI W w punktach serwisowych sklep internetowy jak poni ej Telefony 1 Salon Sprzeda y Wysy ko...

Page 7: ...odoln p soben tepla Nikdy nepono ujte p stroj nap jec ru nebo z str ku do vody Nikdy neodkl dejte p stroj tak aby mohl je t zapnut spadnout do vody Neum s ujte ani nep echov vejte p stroj v m stech kd...

Page 8: ...te od nap jen Nenamot vejte nap jec ru kolem p stroje riziko p etr en P stroj nikdy ni m nezakr vejte m e doch zet ke kumulaci tepla uvnit p stroje P ed v te li p stroj jin osob p edejte ji ho i s n v...

Page 9: ...znamen to e desti ky ehli ky 1 se zah ly na pot ebnou teplotu Pulzuj li prou ky sm rem dol znamen to e desti ky ehli ky chladnou Nastaven teploty UPOZORN N M niteln nastaven teploty zaji uje irok rozs...

Page 10: ...t edn tuh nebo m kk kart ide ln jsou zubn kart ky Pot ukon ete i t n ot en m p stroje m kkou vlhkou ut rkou 5 Nepono ujte ehli ku v dn ch kapalin ch 6 Nepou vejte agres vn nebo abrazivn p pravky nebo...

Page 11: ...k je ehli ka zapnut nenech vajte ju bez doh adu Riziko vzniku po iaru Po as prev dzky sa ehli ka nesmie odklada na mokr povrch alebo odev Zariadenie odkladajte iba na povrchy ktor s odoln vo i teplu N...

Page 12: ...o o nezavadil ehli ka je po as prev dzky hor ca Neodkladajte ehli ku bl zko hor av ch materi lov Pred ulo en m nechajte ehli ku na vlasy vychladn Hor ci vzduch nesmie pr di smerom k o iam ruk m alebo...

Page 13: ...ste ich dobre roz esali Zapnutie 1 Zasu te z str ku do sie ovej z suvky 2 Stla te tla idlo a pridr te ho cez 2 sek nd 3 Rozsvieti sa displej a uk e 150 C 4 Pre zmenu teploty stla te pr slu n tla idl...

Page 14: ...och dostato ne r chlo aby sa vlasy vyrovnali ale d vajte pozor aby ste si vlasy nepo kodili 8 Vyrovn vanie nesmie trva dlh ie ako r tanie do p 9 Pokia je to potrebn opakujte vyrovn vanie a k m nez ska...

Page 15: ...ykla n mu stredisku patr te Tento elektrospotrebi nepatr do komun lneho odpadu Spotrebite prispieva na ekologick likvid ciu v robku Zelmer Slovakia s r o je zapojen do syst mu ekologickej likvid cie e...

Page 16: ...uh ra A k sz l ket kiz r lag csak h ll fel letre tegye A hajvasal t a h l zati k belt vagy a csatlakoz dug t sohasem mer tse v zbe Sohasem tegye le a hajvasal t olyan helyzetben hogy az m g bekapcsolt...

Page 17: ...sz l knek ki kell h lnie A forr leveg t ne ir ny tsa a szem k z vagy m s h rz keny testr sz fel A k sz l ket ne haszn lja alv szem lyeken A h l zati dug t mindig a dug n l fogva h zza ki a konnektorb...

Page 18: ...szes gubancot kif s lje bel le zembehelyez s 1 Dugja be a csatlakoz dug t a konnekorba 2 Nyomja meg a gombot s tartsa benyomva 2 m sodpercig 3 Felgyullad a kijelz s megjelenik a 150 C 4 A h m rs klet...

Page 19: ...n kell cs szk lnia 6 A haj egyenes t se sor n ne ny ljon a s gombokhoz 7 A lapokat a hajon olyan gyorsan h zza v gig hogy kiegyenesedjenek de ne annyira hogy megs r ljenek 8 Az eg sz m veletnek csak...

Page 20: ...z l kben a k rnyezetre vesz lyes anyagok tal lhat k Nem dobhat ki h ztart si hullad kkal egy tt A gy rt nem v llal mag ra felel ss get a k sz l k nem rendeltet sszer haszn lat b l vagy a haszn lati ut...

Page 21: ...a ATEN IE Pericol de arsuri Nu atinge i suprafe ele fierbin i ale aparatului Nu l sa i niciodat placa pentru ndreptat p rul n func iune f r supraveghere Exist riscul de producere a incendiilor n timp...

Page 22: ...grij s nu apropia i cablul de alimentare de suprafe e fierbin i i fi i atent s nu at rne s nu se poat cineva ag a sau mpiedica de el n timpul utiliz rii sale placa pentru ndreptat p rul se nfierb nt...

Page 23: ...ndreptarea p rului 2 Display pentru temperatur 3 Reglarea temperaturii cre terea temperaturii mic orarea temperaturii 4 Buton de Pornire Oprire 5 Cablu de alimentare Modalitatea de utilizare i func i...

Page 24: ...cazul p rului cre trece i degetele prin p r n timp ce l usca i sau folosi i o perie plat ceea ce l va face mai neted nainte de nceperea ndrept rii sale 5 mp r i i p rul n uvi e ncep nd de la ceaf ridi...

Page 25: ...rijeasc de ap rarea mediului Nu este nici greu nici costisitor n acest scop Ambalajul de carton trebuie predat la maculatur Sacii de polietilen PE trebuie du i la containerele pentru plastic Aparatura...

Page 26: ...26 RU 26 28 28 28 29 30...

Page 27: ...27 ZELMER...

Page 28: ...28 5 3 4 1 2 ZELMER LVD 2006 95 EC EMC 2004 108 EC CE 1 2 3 4 5 1 2 a 3 1 2 2 3 150 o 4 200 C 150 C 5 2 1 2 1 1...

Page 29: ...29 3 1 2 3 4 1 1 2 3 4 5 6 7 8 9 10 11 12 1 2 2 3 4 1 2 3...

Page 30: ...30 4 5 6 K PE...

Page 31: ...31 BG 31 33 33 33 34 35...

Page 32: ...32 ZELMER...

Page 33: ...33 5 3 4 1 2 ZELMER LVD 2006 95 EC EMC 2004 108 CE 1 2 3 4 5 1 2 Prost 3 1 2 2 3 150 C 4 200 C 150 C 5 2 1 2 1...

Page 34: ...34 3 1 2 3 4 1 2 3 4 5 6 7 8 9 10 11 12 1 2 2 3 4 1 2...

Page 35: ...35 3 4 5 6 E PE...

Page 36: ...36 UA 36 38 38 38 39 40 ZELMER...

Page 37: ...37...

Page 38: ...38 5 3 4 1 2 ZELMER LVD 2006 95 EC EMC 2004 108 EC CE 1 2 3 4 5 1 i a 2 Prost 3 1 2 i 2 3 150 C 4 200 C 150 C 5 2 1 2 1...

Page 39: ...39 3 1 2 3 4 e 1 2 3 4 5 6 i 7 8 9 10 11 12 1 i 2 2 3 4 1 i 2...

Page 40: ...40 3 4 5 6 c...

Page 41: ...ng Place the appliance only on a heat resistant surface Do not immense the hair straightener cord or plug into water Never put away the hair straightener downwards so that it can fall into water while...

Page 42: ...s Allow the hair straightener to cool before putting it away Allow to cool before storing Do not use the appliance with a voltage converter Do not direct hot air toward eyes hands or other heat sensit...

Page 43: ...3 The display will light and it will show 150 C 4 In order to change the temperature press the button to increase the temperature and the to decrease the temperature The maximum temperature is 200 C...

Page 44: ...tening 7 Run the straightener down the hair fast enough to straighten it but not to damage it 8 The whole activity should not last longer than the time that is needed to count to five 9 If necessary r...

Page 45: ...ce to an appropriate collecting point as the components of the appliance may pose a threat to the environment Do not dispose of with household waste The manufacturer does not accept any liability for...

Page 46: ...46...

Page 47: ...47...

Page 48: ...48 GW 33 025...

Reviews: