CAP-en-US_32_022_0126I
Pri
nted i
n the United S
tates.
CZ
-VII/2021
United S
tates Ed
ition: Only for sale i
n selected cou
ntries.
The contents of the br
ochu
re may d
iffer fr
om the cu
rrent status of appr
oval of the pr
oduct or service offeri
ng i
n you
r cou
ntry
. Please contact ou
r
reg
ional r
epr
esentatives for mor
e i
nformation. Su
bject to change i
n desig
n and scope of del
ivery and due to ongoi
ng technical development. C
T L
UCIA
is either a tr
ademark or r
eg
ister
ed tr
ademark of Carl Zeiss Med
itec A
G or other companies of the ZEISS Gr
ou
p i
n Germany and/or other cou
ntries.
© Carl Zeiss Med
itec USA, Inc., 2021. Al
l rig
hts r
eserved.
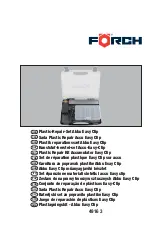
The cartridges are equipped with guide rails. Use forceps to push the lens onto
the guide rails from the rear and position it in the middle of the loading chamber.
Position the trailing haptic of the lens into the notched area of the cartridge.
Close the cartridge until the click-lock mechanism engages.
IMPORTANT
: The
lens should be injected within two minutes after loading. Viscoelastic materials
may lose their lubricity if allowed to stand too long while exposed to air.
Carefully advance the plunger forward and guide its tip into the loading
chamber of the cartridge.
IMPORTANT
: Retract the plunger back approximately
2 millimeters and then push forward again. This step ensures that the lens is
always engaged correctly with the plunger tip.
To commence implantation, when the tip is inside the incision, first turn the
injector clockwise so that the leading haptic points left in a flat manner as it
starts to exit the tip.
Apply a small amount of viscoelastic directly to the opening of the cartridge
tunnel, as well as a generous amount into the loading chamber.
While closing the cartridge, use canula or forceps to press down gently on the
lens optic.
Guide the cartridge into the opening at the front end of the injector and push it
to the very front position.
As the IOL optic leaves the injector and starts to unfold, slowly turn the injector
counter clockwise.
2
4
6
7
1
3
5
8
Preparing the ZEISS CT LUCIA 602
(Formerly EC-3 PAL)
Carl Zeiss Meditec USA, Inc.
5300 Central Parkway
Dublin, CA 94568
USA
www.zeiss.com/us/med
Carl Zeiss Meditec Production, LLC.
1040 S. Vintage Avenue, Bldg. A
Ontario, CA 91761-3631
USA
IMPORTANT
: The CT LUCIA 602 and Z Cartridges are for single-use only. However, the ZEISS R28 injector can be cleaned and re-sterilized for repeated use.
Instructions for cleaning and sterilizing the injector can be found in the Instructions For Use packaged with the Injector.