CIRRUS HD-OCT User Manual
2660021169012 Rev. A 2017-12
Specialized and Integrative Visualization Tools
8-71
Function Buttons in Advanced Visualization
The buttons shown on the left appear from left to right in the Advanced Visualization
analysis, above the scan images at right. If you mouse over them, their function appears in
the form of a tooltip.
•
Caliper button: Click Caliper and then click and drag in a scan image or the
fundus image to draw a straight line that measures distance between the start and
stop points. The resulting measurement appears next to the line in micrometers.
• You can select and adjust the lines you draw: click and drag an endpoint to adjust
its placement (and the line length), or click and drag the middle of the line to
move it as a whole.
• Click CaliperCaliper again to create additional measurement lines.
• These measurements are saved
after you close the analysis and will appear on
reports (printouts) you make while they are present.
•
Delete Measurements button: Click Delete to delete the currently selected
measurement lines. You can select lines in more than one image at a time. To
deselect a line, click anywhere on the same image but off the line.
•
Show/Hide Layers button: Click Layers to hide or show the colored lines
indicating the layers (ILM, RPE, and RPEfit).
•
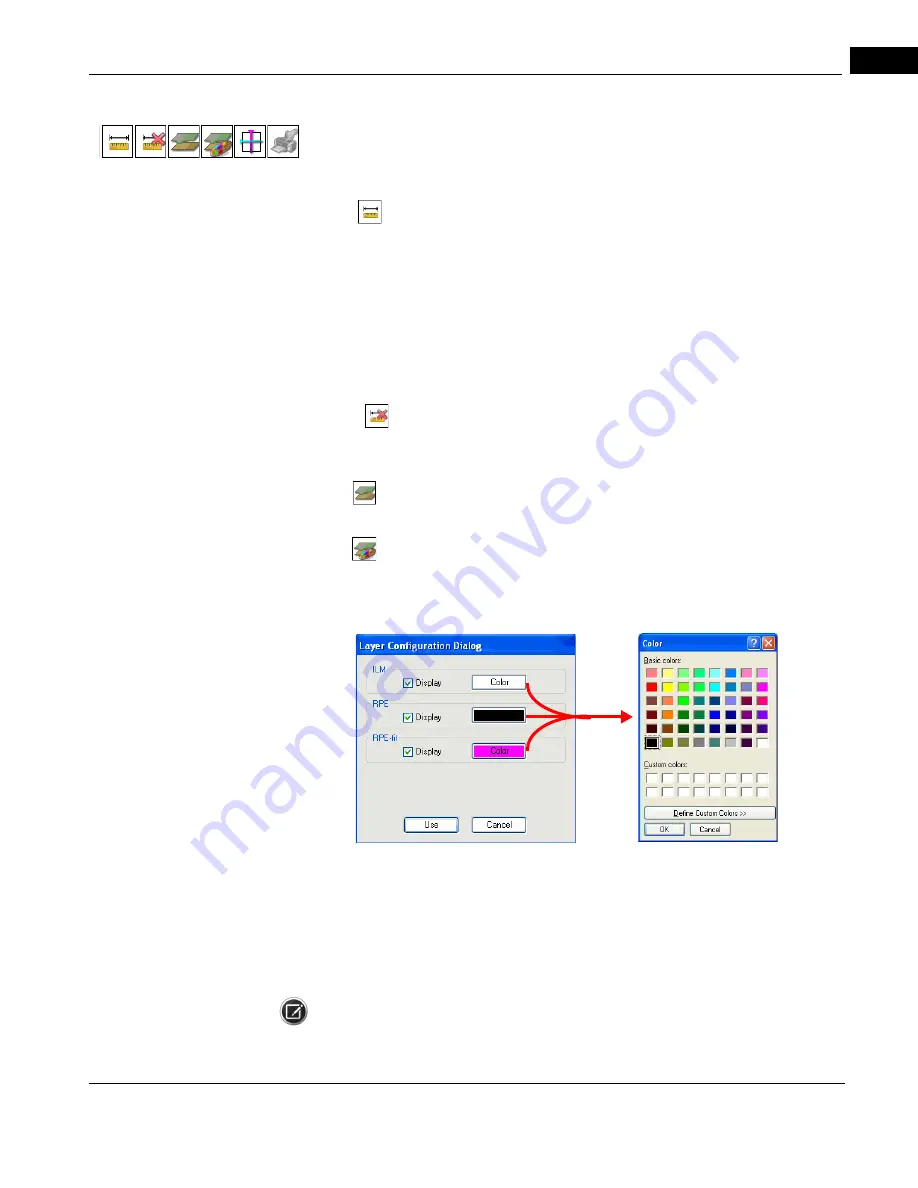
Configure Layers button: Click Configure Layers to open the Layer Configuration
Dialog,
, where you can select the colors of the layers for ILM, RPE, and
RPEfit, and whether to display them or not.
cáÖìêÉ=UJRP=i~óÉê=`çåÑáÖìê~íáçå=aá~äçÖ=~åÇ=`çäçê=máÅâÉê
• Click a Color button for ILM, RPE, or RPE–fit to open a standard color picker, where
you can select a new color for that layer, or even define a custom color.
• The layers with their Display checkbox selected appear in scan images for Advanced
Visualization and Macular Thickness analyses for the scan you are viewing. Click
to select or clear Display checkboxes as desired.
NOTE: Switching to a different scan or leaving the analysis screen causes the selected
segmentation colors to default to the original colors.
Summary of Contents for CIRRUS HD-OCT 500
Page 1: ...2660021156446 B2660021156446 B CIRRUS HD OCT User Manual Models 500 5000 ...
Page 32: ...User Documentation 2660021169012 Rev A 2017 12 CIRRUS HD OCT User Manual 2 6 ...
Page 44: ...Software 2660021169012 Rev A 2017 12 CIRRUS HD OCT User Manual 3 12 ...
Page 58: ...User Login Logout 2660021169012 Rev A 2017 12 CIRRUS HD OCT User Manual 4 14 ...
Page 72: ...Patient Preparation 2660021169012 Rev A 2017 12 CIRRUS HD OCT User Manual 5 14 ...
Page 110: ...Tracking and Repeat Scans 2660021169012 Rev A 2017 12 CIRRUS HD OCT User Manual 6 38 ...
Page 122: ...Criteria for Image Acceptance 2660021169012 Rev A 2017 12 CIRRUS HD OCT User Manual 7 12 ...
Page 222: ...Overview 2660021169012 Rev A 2017 12 CIRRUS HD OCT User Manual 9 28 ...
Page 256: ...Log Files 2660021169012 Rev A 2017 12 CIRRUS HD OCT User Manual 11 18 ...
Page 308: ...Appendix 2660021169012 Rev A 2017 12 CIRRUS HD OCT User Manual A 34 ...
Page 350: ...CIRRUS HD OCT User Manual 2660021169012 Rev A 2017 12 I 8 ...
Page 351: ...CIRRUS HD OCT User Manual 2660021169012 Rev A 2017 12 ...


