Stereo Zoom Light Microscopy - ZEISS Axio Zoom.V16
Page 1: ...Stereo Zoom Light Microscopy ZEISS Axio Zoom V16...
Page 2: ...Initial Set Up 9 Final Set Up 12 ZEN 2 1 blue edition Guidelines 13 Single Image Acquisition or Visualization 14 Multidimensional Image Acquisition Multi Channel Images 18 Channel Combine or Image Ove...
Page 3: ...omated for large field visualization having a motorized zoom from 0 7x to 11 2x motorized Z focus and easy to use system control panel Reference Zeiss Axio Zoom V16 Location Room 5 25 Microscopy Clust...
Page 4: ...peu de Desenvolvimento Regional People and Contacts Adriano O Henriques Microbial Development Group aoh itqb unl pt M nica Serrano Microbial Development Group serrano itqb unl pt Carolina Cassona Micr...
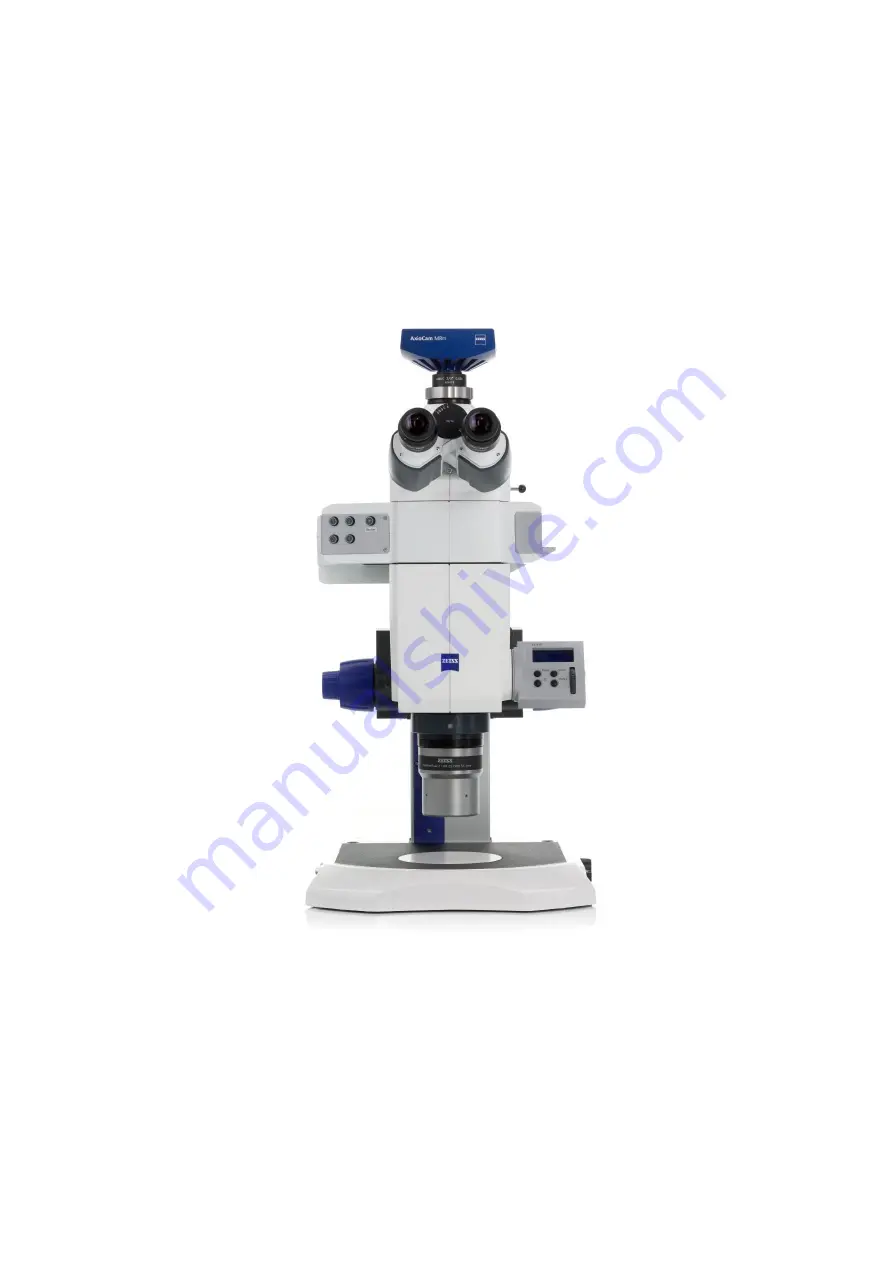
Page 5: ...trol Panel SYCOP 3 joystick scroll wheels buttons and a touchscreen into a handy mobile control unit Electronic Module EMS 3 for connecting SYCOP3 Objective nosepiece Z Eyepieces PL 10x 23 Br foc Obje...
Page 6: ...extremely high transmittances BP stands for bandpass filter Additional Equipment Camera Brand Zeiss Type CCD Cameras Model Axiocam 503 mono D Adaptor 60N C1 1x magnification Features Sensor CCD 2 8 me...
Page 7: ...ing the microscope in the next few hours In order to avoid unnecessary working hours or usage constraints please inform the next user about the microscope occupancy You must turn ON THE LAMP FIRST and...
Page 8: ...ckground e g for fluorescence illumination Slight careful deflection of the joystick results in fine focusing while full deflection produces faster focusing movements as a course screw would produce I...
Page 9: ...media Simply place the plate in the centre of the transillumination base Do not remove the cover Initial Set Up 1 Before you start ensure the lamp has been off for more than one hour 2 Switch on the d...
Page 10: ...System Control Panel 4 Meanwhile in the computer s desktop directory run ZEN blue edition and select ZEN Pro 5 Place the specimen in the centre of the round insert plate 6 Ensure that the aperture di...
Page 11: ...he eyepieces for visualization please consult other guidelines See Operating Manually 8 Although you can operate the microscope in manual mode without using ZEN 2 1 See Operating Manually we strongly...
Page 12: ...4 When the safety query is answered by pressing the YES button the system will be shut down while the remaining devices will be in the standby mode 5 Then switch off the devices in the following order...
Page 13: ...ZEN 2 pro on the computer The ZEN 2 1 user interface is divided into three main areas Via the tabs in the Left Tool Area 4 you can access all the main tools for microscope control Locate tab acquisiti...
Page 14: ...like to acquire or visualize The FL off mode activates the transmitted light and closes the shutter of incident light switching off fluorescence optics To fully activate the transmitted light you shou...
Page 15: ...ee Other Guidelines Contrast Methods and Filter Sets Finally once you finished the visualization in the FL off mode transmitted light illumination do not forget to close the transmitted light by movin...
Page 16: ...arefully to find interesting and prominent detail With the minimum magnification use the joystick and side wheels to swipe the motorized focusing down or up Repeat the process for consecutive magnific...
Page 17: ...tly the diaphragm slide in order to obtain greater detail and contrast Hint If you are getting problems focusing the sample use the Min Max button in the Histogram Centre Screen Area Display Histogram...
Page 18: ...useful for your experiment In this way we can keep the workspace organized and without redundancy You can use and alter the available pre set experiments as long as those alterations are not saved at...
Page 19: ...periment was modified and not saved Save your experiments from time to time to ensure that your settings are not lost 6 Start focusing the sample See above ZEN 2 1 blue edition Guidelines Single Image...
Page 20: ...to combine two images at a time into one using ZEN 2 1 See ZEN 2 1 blue edition Guidelines Channel Combine or Image Overlay b Alternatively you can add only one block This approach will generate a mul...
Page 21: ...ransitions of transmitted and incident light e g from bright field to fluorescence GFP the Wait block will make a pause during the experiment At the pause you should set the diaphragm slide in agreeme...
Page 22: ...Select the first block in the timeline of events 12 Now in the Acquisition Parameter group click in the blue header of the Channels tool 13 Click in the button to open the Add Dye or Contrast Method d...
Page 23: ...in the Add button at the bottom of the dialog or simply double click an entry IF you have previously selected one single channel image per block click in the Close button of the Add Dye or Contrast Me...
Page 24: ...Time for each channel just right beneath the channels list There will be more than one channel in a multichannel block Thus the Exposure Time should be set one channel at a time 18 Repeat the steps 1...
Page 25: ...elf made experiments Do not save previously pre set experiments unless they are yours 20 Finally select the first block of the timeline of events in the Experiment Designer tool and click in the Start...
Page 26: ...26 Channel Combine or Image Overlay 1 Go to the Processing tab 2 Click in the Single button 3 Click in the blue header of the Method tool...
Page 27: ...27 4 Click in the Utilities group to display the dropdown list of tools included in this category 5 Search for the Add Channel tool and click in it...
Page 28: ...ct images of channels you would like to combine To do so click in the small preview image within the Input tool You will see a preview of all open images To select an image just click in it 8 Yet in t...
Page 29: ...tput tool and select the Create New Output option only Additionally you can name the new image as you like by clicking in the Naming button 10 Finally click in the Apply button The image combined will...
Page 30: ...mage Subset 2 In the Image Parameters group open the Input tool and select the multichannel image as input 3 In the Method Parameters group open the Parameters tool and click in the Channels entry For...
Page 31: ...program bar Note If you haven t saved your files the Save Keep Documents dialog will open before the program closes Select files you want to save or unselect files you don t want to save Save only do...
Page 32: ...personal computer for downstream image analysis Open 1 Go to File Open 2 Search for the czi files previously saved in the directory dialog 3 The selected files will be displayed in the Centre Screen...
Page 33: ...mum colour presentation If you do not see this button activate the Show all mode 3 Move the controls left and right under the multiple curves in order to directly adjust the values for Brightness Whit...
Page 34: ...ar directly in the image and in the Annotations Measurements as an entry To set an arrow the button will turn blue and then you can draw an arrow over the image You can access to numerous formatting p...
Page 35: ...er Screen Area select the Graphics tab An entry of the Line type will appear together with the positions and sizes these measurements are not the distance length between the two point edges of the lin...
Page 36: ...region over the region of interest 3 Right click in the drawn region This will open the context menu Select Create Subset Images from ROI in this dialog 4 The selected region will be displayed as a ne...
Page 37: ...37 Export 1 Go to the Processing tab 2 Click in the Single button 3 Click in the blue header of the Method tool...
Page 38: ...xport Import group and select the Image Export method 5 Under Method Parameters group select the Parameters tool and set the desired export settings such as file type quality export folder 6 Click in...
Page 39: ...rt To do so click in the small preview image within the Input tool You will see a preview of all open images To select an image just click in it 8 Yet in the Input tool select only the Switch to Outpu...
Page 40: ...unlocked to restart the focusing drive Operating Manually 1 Place a specimen in the centre of the round insert plate 2 Pay attention to the following operation modes a To use only the incident light...
Page 41: ...dot stand for 0 without eyepiece reticule 5 Check that the eyepieces are completely housed in the tube 6 Adjust the tube towards eyepiece visualization by pushing in the control bar 7 Adjust the inter...
Page 42: ...rds the position marked with BF Open the diaphragm slide Dark Field DF 4 Setting Wheel Fluar Illuminator Z mot Diaphragm Slide In the Fluar Illuminator Z mot press the number 4 Next turn the setting w...
Page 43: ...responsible people to acquire the following tutorials and instruction manuals Zeiss Zen 2 lite SYCOP 3 System Control Panel Operating Manual ZEN 2 1 blue edition User Guide Axio Zoom V16 Operating Man...