Zehnder Rittling AA 05 Manual Download Page 9


9


Operation Notes: 


In areas with low or too high reception-field strength, interference-free 
reception is not always guaranteed. If the signal level is too low, a directional 
antenna should be placed outside the building. 


In the immediate vicinity of the transmitter, reception may be impaired by a 
too high reception level. In this case, you should avoid setting up the antenna 
near a window. 


Indoor radio reception can also be impaired by other factors: 
- rooms in reinforced concrete buildings 
- rooms with vapour-plated windows 
- in positions directly beside transmitting electronic devices (e.g. mobile 
phones) 


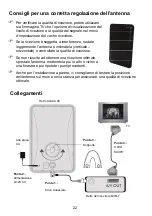
Installation (Please refer to illustration):   


 Step 1.

 Take the IEC cable attached, and then connect one end to the IEC port, 

                and the other end to your DVB-T receiver shown in illustration 
               

Attention! Don´t connect to a Satellite-Receiver!


 Step 2.

 Take the power adaptor attached and Insert the end of DC connector into 

                DC jack on the back of AA 05, and then plug in the A/C end. 


*****    If your DVB-T receiver (e.g. from Zehnder) supplies with 5 VDC from   

              IEC connector, then it is not necessary to use the power adaptor.


 Step 3.

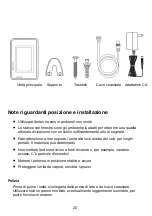
 Take the standing unit attached , and then plug into the hole shown in   

                illustration to keep it standing. Before, check the position of rotating hole   
        for either vertical or horizontal direction.


 Step 4.

 Connect your receiver and your TV by Scart Cable (see receiver manual)   

        and switch them on. 

*****    If your DVB-T receiver supplies with 5 VDC, ensure in the set-up menu   

of the receiver, that the power supply to the antenna via the coax cable   
is switched on. 


Summary of Contents for AA 05

Page 1: ...ein Merkmale Aktive Antenne mit Verst rker Variabel f r horizontale vertikale Aufstellung oder f r die Wandmontage Kompletter VHF UHF Breitband Empfangsfrequenzbereich 47 860 MHz Kanal 02 bis 69 gerin...

Page 2: ...erze Brandgefahr Das Ger t sollte auf einem sicheren festen Untergrund aufgestellt werden Der Standort darf nicht in R umen mit hoher Luftfeuchtigkeit gew hlt werden da Kondenswasserniederschl ge zu F...

Page 3: ...Receiver Achtung Nicht an einen Sat Receiver anschlie en Schritt 2 Verbinden Sie das mitgelieferte Steckernetzteil mit der Antennenbuchse auf der Ger ter ckseite und stecken Sie es anschlie end in die...

Page 4: ...sationsausrichtung und kontrollieren Sie die Empfangsqualit t Sollte kein optimaler Empfang m glich sein stellen Sie die Antenne an einem anderen Ort auf Empfehlung Fenstern he und wiederholen Sie die...

Page 5: ...hr 35mm in die Wand Bei Befestigung auf einem Holzuntergrund ben tigen Sie keine Bohrungen und D bel 3 Schlagen Sie mit einem Hammer die beiden D bel in die Bohrungen ein 4 Drehen Sie die Schrauben mi...

Page 6: ...hnder sat de http www zehnder sat de Dieses Produkt ist mit einer Energiesparschaltung nach der EU Verordnung 278 2009 f r externe Netzteile und nach der Richtlinie 2005 32 EG zur umweltgerechten Gest...

Page 7: ...fier Friendly Advanced design for either Horizontal or Vertical position For Desktop or wall mounting installation complete VHF UHF wide band range reception 47 860 MHz CH 02 69 Low noise figure by us...

Page 8: ...riods because material can change for the worse Do not place the antenna close to heaters or naked lights e g candles There might be a danger of fire Place the antenna on a safe and firm ground Protec...

Page 9: ...ched and then connect one end to the IEC port and the other end to your DVB T receiver shown in illustration Attention Don t connect to a Satellite Receiver Step 2 Take the power adaptor attached and...

Page 10: ...eways horizontal vertical and check the quality of reception If it is impossible to get optimum reception set the antenna up in a different place we recommend a position close to a window and repeat t...

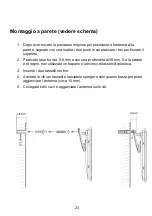
Page 11: ...two wholes into the depth of about 35mm If you install to a wooden wall you do not need to drill and use the plastic poles 3 Hammer the two plastic poles with a hammer into the wholes 4 Screw the scr...

Page 12: ...DC 12V 250mA 0 4W no load 0 9W operation Weight 210g Size L x W x H mm 139 x 209 x 23 Disposal Electronic equipment is not household waste In accordance with directive 2002 96 EC OF THE EUROPEAN PARL...

Page 13: ...active avec l amplificateur incorpor Conception volu e pour utilisation horizontale ou verticale Pour mise sur pied ou montage mural R ception 47 860 MHz canaux 02 69 des bandes VHF UHF Filtre int gr...

Page 14: ...Placez l antenne sur un meuble stable Utilisez exclusivement le bloc secteur fourni raccordez celui ci sur le secteur conform ment aux indications port es sur l tiquette d identification appos e sur c...

Page 15: ...uipement transmission radio par ex t l phone portable t l phone domestique sans fil etc Installation r f rez vous au sch ma de raccordement Etape 1 Prenez le prolongateur d antenne reliez l extr mit c...

Page 16: ...en orientant l antenne et v rifiez la qualit de la r ception S il est impossible d obtenir une r ception optimale d placez votre antenne et installez la en hauteur ou pr s d une fen tre R p tez les ta...

Page 17: ...rous sur une profondeur d environ 35 mm avec une m che de 5 8 mm dans le mur sur un mur en bois ni des per ages ni de chevilles sont n cessaires 3 Enfoncez les deux chevilles dans les trous 4 Visser l...

Page 18: ...axial me tresse Bloc secteur AC 230V 50Hz DC 12V 250mA 0 4W no load 0 9W operation Poids 210g Taille L x W x H mm 139 x 209 x 23 Elimination Les appareils lectroniques ne font pas partie des d chets d...

Page 19: ...ione evoluta per utilizzo sia in verticale che in orizzontale Pu essere utilizzata sia da tavolo che fissata alla parete Ricezione in banda larga VHF UHF 47 860 MHz CH 02 69 I componenti di alta quali...

Page 20: ...del sole per lunghi periodi Il materiale pu deteriorarsi Non mettere l antenna vicino a fonti di calore o per esempio candele accese C pericolo d incendio Mettere l antenna in posizione stabile e sic...

Page 21: ...ss ecc Installazione riferitevi alle immagini Punto 1 prendere il cavo coassiale IEC e collegare un estremit alla porta IEC e l altra al vostro ricevitore DVB T come da illustrazione Attenzione Non co...

Page 22: ...ntenna o inclinatela verticale orizzontale e controllate la qualit di ricezione Se non riuscite ad ottenere una ricezione ottimale spostate l antenna mettendola pi in alto o vicino a una finestra e po...

Page 23: ...r fissare il supporto 2 Praticate i due fori da 5 8 mm e con una profondit di 35 mm Se la parete di legno non utilizzate un trapano e servitevi di tasselli di plastica 3 Inserite i due tasselli nei fo...

Page 24: ...ita utile deve essere raccolto separatamente dagli altri rifiuti L utente dovr pertanto conferire l apparecchiatura integra dei componenti essenziali giunta a fine vita agli idonei centri di raccolta...

Reviews: