Page 6
|
HDbridge 2500/2600-EU Configuration Guide
www.zeevee.com
HDbridge 2500/2600-EU Configuration Guide
|
Page 7
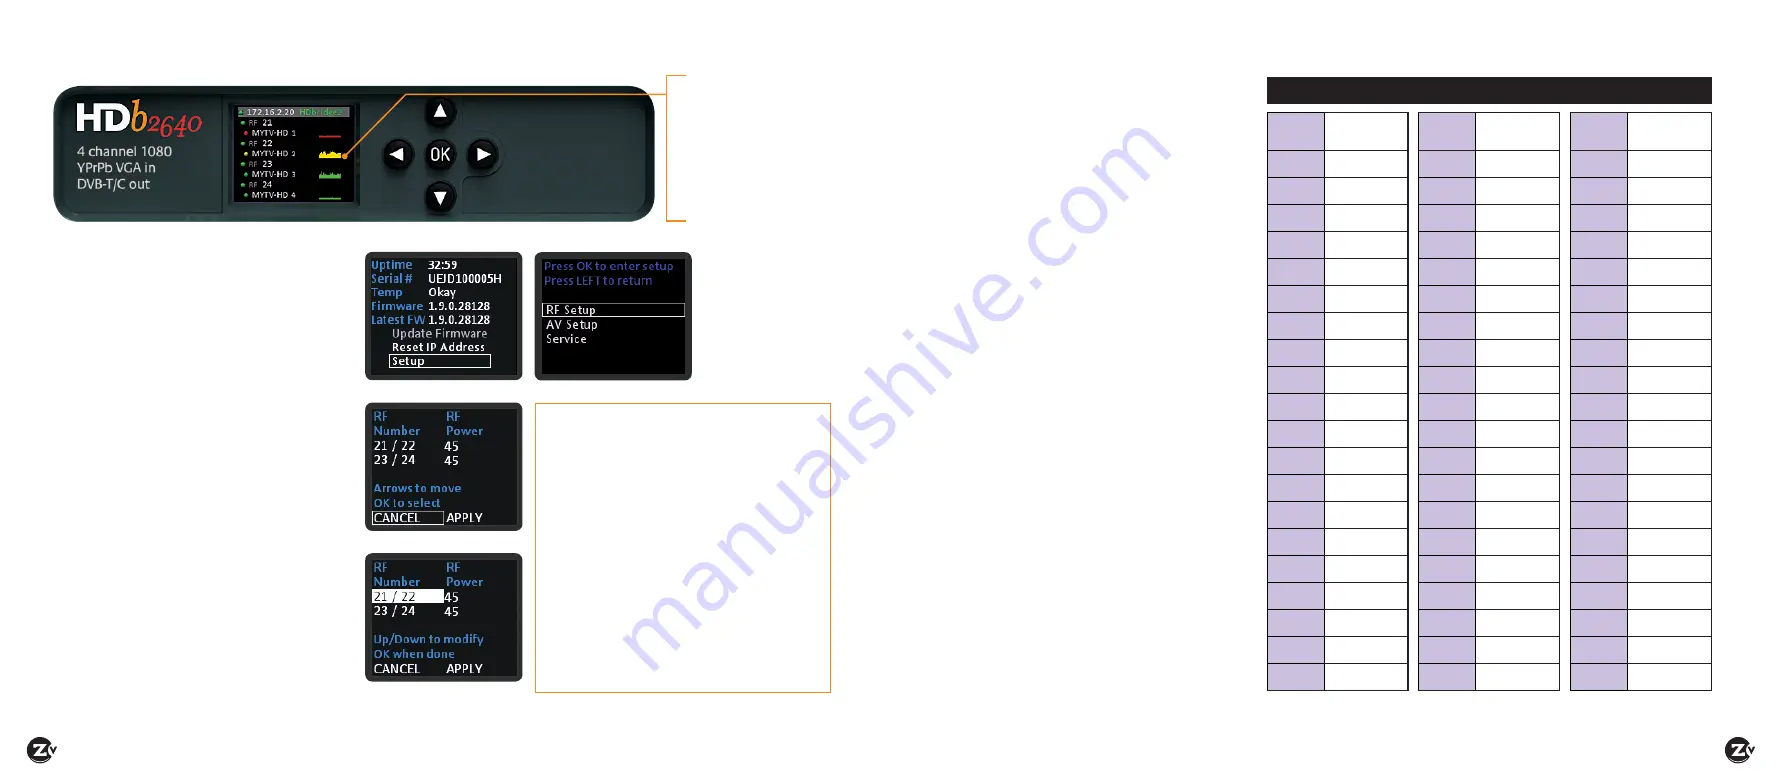
Front Panel Configuration
SETUP SCREEN
CONFIGURATION SCREEN
ACTIVE CONFIGURATION SCREEN
IMPORTANT NOTES
•
RF Channel numbers are applied
in pairs based on the frequency
map. For instance, if you enter RF
Channel # “21” then RF Channel
# “22” automatically populates.
•
ZV channels can be set directly
adjacent to any other well-formed
channel and will not cause
interference. No channel spacing
is required.
•
DVB-T defaults to using specific
channels and frequency bands on
the CCIR table. You can change
those settings from CCIR to None
and enter a frequency directly
using Maestro. For instance,
instead of entering RF channel
21, you could enter a frequency
such as “474 MHz.”
Shows audio/video being
encoded
Green — Both audio and
video are detected
Yellow — Video, but no
audio detected
Red — No video detected
RF
Channel
Band (MHz)
21
470-478
22
478-486
23
486-494
24
494-502
25
502-510
26
510-518
27
518-526
28
526-534
29
534-542
30
542-550
31
550-558
32
558-566
33
566-574
34
574-582
35
582-590
36
590-598
37
598-606
38
606-614
39
614-622
40
622-630
RF
Channel
Band (MHz)
41
630-638
42
638-646
43
646-654
44
654-662
45
662-670
46
670-678
47
678-686
48
686-694
49
694-702
50
702-710
51
710-718
52
718-726
53
726-734
54
734-742
55
742-750
56
750-758
57
758-766
58
766-774
59
774-782
60
782-790
RF
Channel
Band (MHz)
61
790-798
62
798-806
63
806-814
64
814-822
65
822-830
66
830-838
67
838-846
68
846-854
69
854-862
70
862-870
71
870-878
72
878-886
73
886-894
74
894-902
75
902-910
76
910-918
77
918-926
78
926-934
79
934-942
80
942-950
CCIR Table vs Frequency Map
CONFIGURATION SCREEN
You can set the RF broadcast channels using the
front panel controls. In many cases, your ZeeVee
modulator will require only these configurations.
Setting the RF broadcast channels
or power
1.
Unlock the panel by pressing/holding together
the left and right arrow buttons (
) until
“Setup” lights up.
2.
Press “OK” to enter the Configuration screen.
3.
Press “OK” to select “RF Setup”.
4.
Use the arrow buttons (
) to go to
each item you want to configure (such as RF
Number or RF Power), then press “OK” to edit
the highlighted field. Use the up and down
(
) arrow buttons to scroll through the
options for that field.
5.
Once you’ve made changes, press “OK” to
accept. You can then select the next item for
configuration.
6.
When finished making changes, use the
arrow buttons to scroll down and select
“Apply,” then click “OK” to save your changes.
Note: The front panel locks automatically after
a few seconds. To make more changes, press/
hold the left and right arrow buttons again to
unlock front panel capabilities.
To update firmware:
• If unit is connected to the internet and can
communicate with our servers, select Update
Firmware from the Setup screen and press “OK”.
To reset IP address:
• When using DCHP, select Reset IP Address to
force a release/renew of your IP address, and
press “OK”.
To restore factory defaults or
revert firmware:
1.
Power down the unit.
2.
Hold the left and right arrows down and
reapply power. You will be prompted with
options: PRESS
• UP to reset config
• DOWN to revert FW
• OK to boot normally
RF SETUP


