background image

Solo documento principale.


Ident

ific

at

ion:

 M

D

-AL

-GI

-00


R

ev

. 4

.0

 of

 31.

01.

18

 –

 A

ppl

ic

at

ion:

 G

ID


Pile Reg. IT12110P00002965 - 

Share Capital € 100,000.00 fully paid up 

AR Bus. Reg. no. 03225010481 

– AR REA no. 94189 

ISO 9001 Certified company - Certificate no. 9151 - CNS0 - IT-17778 


Zucchetti Centro Sistemi S.p.A. - Green Innovation Division 
Via Lungarno, 248 - 52028 Terranuova Bracciolini - Arezzo, Italy  
tel. +39 055 91971 - fax. +39 055 9197515 
[email protected] - [email protected] - 

zcsazzurro.com


Manual of 25/05/2020 Rev. 1.0 “User Manual 22K-BE-24” 

37/44 

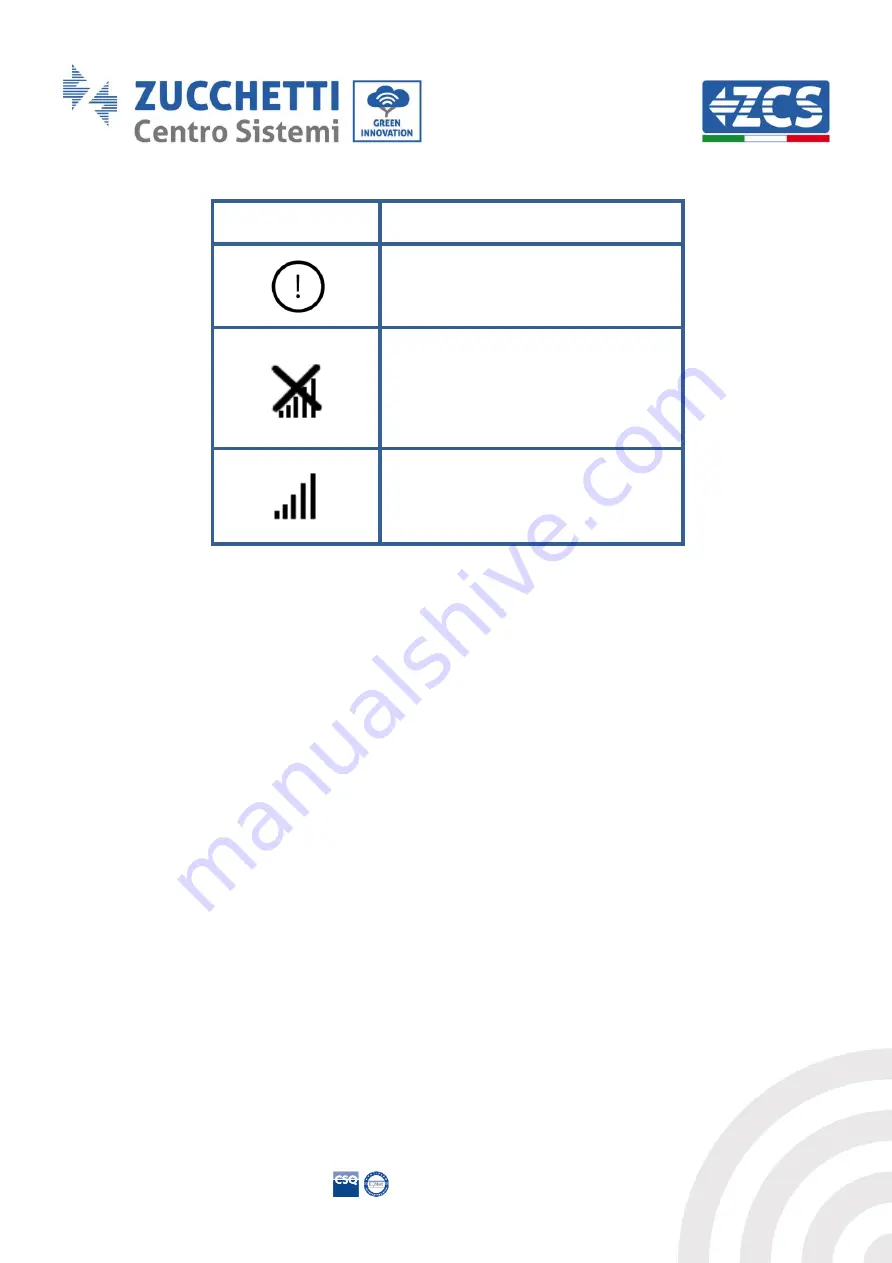
Icon 

Description 


Incorrect connection to ENGATE - 

check LAN cable 


ENGATE connected correctly and not 

connected to the portal - check 

ENGATE configuration 


ENGATE connected correctly and 

connected to the portal 

Table 6 - Icons for connection to ENGATE 


7.2.


Offline 

This working mode allows the charger to operate without any connection to the portal; the charging is 
authorised through RFID cards, which can be configured locally via the display. Each pack includes two 
RFID cards which can be configured to activate the charging. 
 
No billing system is implemented in this configuration. The ZCS Connext connection can be used, which 
only allows the charger to be monitored via the Azzurro portal. 
 

Summary of Contents for ZUCCHETTI 22K-BE-24

Page 1: ...O 9001 Certified company Certificate no 9151 CNS0 IT 17778 Zucchetti Centro Sistemi S p A Green Innovation Division Via Lungarno 248 52028 Terranuova Bracciolini Arezzo Italy tel 39 055 91971 fax 39 055 9197515 innovation zcscompany com zcs pec it zcsazzurro com Manual of 25 05 2020 Rev 1 0 User Manual 22K BE 24 1 44 AC charging station for electric vehicles 22K BE 24 User Manual V1 00 25 05 2020 ...

Page 2: ...ese instructions This manual must be considered an integral part of the equipment and must be available at all times to everyone who interacts with the equipment The manual must always accompany the equipment even when it is transferred to another user or plant Copyright statement Copyright of this manual belongs to Zucchetti Centro Sistemi S p A No part of this manual may be copied including the ...

Page 3: ...ary safety instructions 7 1 1 Safety instructions 7 1 2 Symbols and icons 11 1 3 Labels 12 1 Product features 12 1 4 Product presentation 12 1 5 Operating diagram 14 2 Installation 15 2 1 Checks before installation 16 2 1 1 Installation tools 17 2 2 Installation process 19 2 2 1 Installation position 19 2 2 2 Movement of the charger 19 2 3 Materials and cables 20 3 Electrical connections 20 3 1 Co...

Page 4: ...ovation zcscompany com zcs pec it zcsazzurro com Manual of 25 05 2020 Rev 1 0 User Manual 22K BE 24 4 44 6 2 Password setting mode of use and power limitation 31 6 3 Menu for repairs or maintenance 33 6 4 Configuration of RFID card to enable charging in online and offline mode 34 7 Working mode 36 7 1 Online 36 7 2 Offline 37 7 3 Plug Play 38 8 Operation 39 8 1 Connecting the charger to the electr...

Page 5: ...rging stations 22K BE 24 Keep this manual so that it is accessible at all times Recipients This manual is intended for qualified technical personnel installers technicians electricians technical support personnel or anyone who is qualified and certified to work on an electrical system responsible for installing starting up and operating the charging station Symbols used This manual provides inform...

Page 6: ...i S p A Green Innovation Division Via Lungarno 248 52028 Terranuova Bracciolini Arezzo Italy tel 39 055 91971 fax 39 055 9197515 innovation zcscompany com zcs pec it zcsazzurro com Manual of 25 05 2020 Rev 1 0 User Manual 22K BE 24 6 44 Caution Attention indicates a potentially hazardous situation which if not resolved or avoided could result in damage to the system or other property Attention Not...

Page 7: ...an Contact the nearest authorised service centre for any repairs or maintenance Contact your distributor for information on the nearest authorised service centre DO NOT carry out repairs yourself as this may result in injury or damage Qualified personnel Ensure that the operator has the necessary skills and training to operate the equipment Personnel responsible for use and maintenance of the equi...

Page 8: ... place the charging station near explosive flammable materials chemical vapours or potentially hazardous materials Danger Figure 1 Do not lose or damage this manual Transport requirements If you encounter problems with the packaging that could damage the charging station or if you find any visible damage immediately notify the transport company If necessary request assistance from an installer or ...

Page 9: ...allation operations must be carried out by a professional electrician who has carefully read this manual and understands its contents Warning Before connecting the charging station to the grid make sure that all the necessary permits have been obtained from the local grid operator and that all the electrical connections have been completed by a professional electrician Attention Do not remove the ...

Page 10: ... button located on the right side Disconnect the input and output power supply Warning Take special care when charging in thunderstorms or in rain Attention Figure 2 Position of STOP button Maintenance and repair Keep the charging station clean and dry if you need to clean it use a clean dry cloth It is very dangerous to touch the inside of the charging station therefore it is strictly forbidden t...

Page 11: ... been fixed For repairs contact your local authorised service centre Do not disassemble the internal components of the charging station without permission this will void the warranty Attention 1 2 Symbols and icons Introduces the main safety symbols on the charging station Some safety symbols are located on the charging station Read and understand the contents of the symbols before installation Be...

Page 12: ... Manual of 25 05 2020 Rev 1 0 User Manual 22K BE 24 12 44 1 3 Labels Figure 3 Labels present on the charging station 1 Product features 1 4 Product presentation The AC charging stations of the 22K BE 24 series are electric vehicle battery chargers that can communicate with the Battery Management System BMS of vehicles and provide them with the power needed for charging thus guaranteeing the protec...

Page 13: ...rgy needed from the photovoltaic system if present or from the grid depending on availability The figure below shows a typical installation the photovoltaic system inside the barred box Figure 4 Example of a charging station connected to a PV system optional and grid The charging stations can only be connected to grids with voltage and frequency values within the range specified in the technical d...

Page 14: ...55 9197515 innovation zcscompany com zcs pec it zcsazzurro com Manual of 25 05 2020 Rev 1 0 User Manual 22K BE 24 14 44 Figure 5 Front and side view of the charging station 1 5 Operating diagram Figure 6 Operating diagram of the charging station The charging station connects to an electric vehicle via a Type2 connector the cable is optional According to the standards the charging station is identi...

Page 15: ...vehicle The possible connection with an external communication gate also allows remote control of the station invoicing of the energy and other functions It is compatible with all types of cables and power sockets in order to ensure safe charging It is designed according to the EN 61851 1 2011 and EN 61851 22 2002 international standards which makes it compatible with industry standards It can be ...

Page 16: ...is recommended to check the materials of the outer packaging before installing the charging station Check the surface of the box for external damage such as holes or tears If any type of damage is detected do not open the box containing the charging station and contact the supplier and the courier as soon as possible It is also recommended that you check the contents of the packaging and make sure...

Page 17: ... 52028 Terranuova Bracciolini Arezzo Italy tel 39 055 91971 fax 39 055 9197515 innovation zcscompany com zcs pec it zcsazzurro com Manual of 25 05 2020 Rev 1 0 User Manual 22K BE 24 17 44 5 Expansion plug 4 6 Self tapping screw 4 7 Wire ferrules 4 8 Wall support 1 9 Declaration of Conformity 1 10 User Manual 1 11 Warranty 1 Table 2 Package contents 2 1 1 Installation tools The following tools are ...

Page 18: ...novation zcscompany com zcs pec it zcsazzurro com Manual of 25 05 2020 Rev 1 0 User Manual 22K BE 24 18 44 No Tool Function 1 Screwdriver To screw and unscrew screws for the various connections 2 Drill To drill holes in the wall for fixing 3 Diagonal pliers To cut and tighten the cable ends 4 Crimping tool To crimp the power cables 5 Wire stripping tool To remove the outer sheath of the cables 6 R...

Page 19: ...on for the charging station Follow the requirements below to determine the installation position The installation location chosen should allow easy access to the charging station for normal operation and maintenance For safety reasons ZCS and or its authorised partners may not perform repairs maintenance or move the chargers from and to the ground if they are installed at a height of more than 180...

Page 20: ...ase Second requirement Mains cable STP CAT5E 8 cores Second requirement Connector for mains cable RJ45 Second requirement Insulating tape 0 15 mm 18mm 0 600V 0 C 80 C Second requirement Cable tie 4 200mm Second requirement Table 4 Electrical equipment It is important that all cables used are suitable for outdoor use NOTE For safety reasons make sure to use suitably sized cables otherwise the curre...

Page 21: ...llation must be carried out by a qualified professional with the skills and knowledge to build install and operate electrical systems and who has been trained on how to identify and prevent potential risks Attention The charging station must be installed and serviced by professional technicians or electricians Attention The charging station must be installed and serviced by professional technician...

Page 22: ...es into the OT terminal and crimp them using a crimping tool as shown in Figure 11 Note 1 L3 is the length between the insulation layer of the ground cable and the crimped part L4 is the distance between the crimped part and the conductor wires protruding from the crimped part Note 2 The cavity formed after the conductor has been crimped must completely wrap the conductor wires The core of the wir...

Page 23: ...harging station must be three pole outdoor cables For easier installation use flexible cables The specific section recommended for connections is at least 6mm2 For safety reasons make sure to use suitably sized cables otherwise the current may cause overheating or overloading which could result in a fire Note Cable connection procedure 1 Remove a suitable length of the protective sleeve as shown i...

Page 24: ... current faults It is also equipped with a detection system for DC components above 6mA It is recommended to install a magnetothermal device with a suitable capacity on the AC connection cables for installation uninstallation maintenance and disconnections caused by other reasons 3 4 Communication systems The charging stations are equipped with CAN bus communication systems The charging station ca...

Page 25: ...xt can be found in the specific manual For more information and instructions on how to connect the cables contact ZCS technical service The connection is possible using the CAN ports shown in the figure There are two connectors as it is possible to connect up to 12 charging stations to the same external device Figure 15 Communication system When grouping chargers together for example in public car...

Page 26: ...vation zcscompany com zcs pec it zcsazzurro com Manual of 25 05 2020 Rev 1 0 User Manual 22K BE 24 26 44 4 Mounting 4 1 Wall mounting 1 Identify the installation position and mark the two holes for the wall screws which will be inserted in the top rear of the charging station You can use the hole jig found in the package 2 Insert the plugs horizontally into the holes made paying attention to the f...

Page 27: ...ova Bracciolini Arezzo Italy tel 39 055 91971 fax 39 055 9197515 innovation zcscompany com zcs pec it zcsazzurro com Manual of 25 05 2020 Rev 1 0 User Manual 22K BE 24 27 44 4 2 Mounting on metal support 1 Place the ground support in the centre of the parking area 2 Bury the connection cables with at least 150 cm of the cables protruding above the surface 3 The communication and power cables run i...

Page 28: ...y tel 39 055 91971 fax 39 055 9197515 innovation zcscompany com zcs pec it zcsazzurro com Manual of 25 05 2020 Rev 1 0 User Manual 22K BE 24 28 44 4 3 Locking The locking of the charger housing does not depend on the type of mounting Turn on the switch inside and close the front cover of the charger with the wrench supplied The locks are located on the right side under the STOP button Figure 19 Lo...

Page 29: ...front of the device is properly closed by the side locks Also check that the emergency button is not pressed if necessary turn it slightly to release it 3 Protection set appropriate values for the protection switch of the AC input current leakage 4 Other components make sure no components or other objects remain on top of the charger 5 2 Starting the charging station After checking all the points ...

Page 30: ... 3 4 and 5 power it up and check that the display doesn t show any faults or errors and that the LED line is not flashing green The keypad consists of 4 keys indicated in Figure 1 Back Next Cancel Back Confirm Enter Figure 21 Control keypad 2 Press the Confirm Enter key for at least 10 seconds 3 The page in Figure 22 appears use the Next Back and Confirm Enter keys to write the password Password 1...

Page 31: ...any com zcs pec it zcsazzurro com Manual of 25 05 2020 Rev 1 0 User Manual 22K BE 24 31 44 Figure 23 Main configuration screen 6 2 Password setting mode of use and power limitation 1 From the screen shown in Figure 23 select point 1 Settings and press the Confirm Enter key Wait for the page shown in 2 Figure 24 to appear Figure 24 Password mode of use and power configuration screen 3 To change the...

Page 32: ... To set the mode of use select Set Mode from the screen shown in 5 Figure 24 Two screens Figure 26a and Figure 26b will open in sequence within seconds of each other Do not press any keys while waiting for the screen shown in Figure 26b to appear Figure 26 Screen for setting working mode 6 Select the desired working mode Please note that the charging station can be used in the following ways Onlin...

Page 33: ...g the current limit 9 Select the desired current limit The following power limits can be set 32A corresponds to the maximum limit of 7kW for single phase and 22kW for three phase 16A corresponds to the limit of 3 5kW for single phase and 11kW for three phase 10A corresponds to the limit of 2 3 kW for single phase and 6 6kW for three phase Wait for the device to restart automatically 6 3 Menu for r...

Page 34: ...ev 1 0 User Manual 22K BE 24 34 44 Figure 29 Restart screen 3 Select Clear log from the screen shown in Figure 28 to clear the list of events on the device Confirm in the screen shown below Figure 30 Clear Log screen 4 Select 3 Firmware from the screen shown in Figure 28 to view the software version of the device 6 4 Configuration of RFID card to enable charging in online and offline mode 1 From t...

Page 35: ...anual 22K BE 24 35 44 2 To add a card for activating the charging select 1 Add Card and wait for the screen shown in Figure 32 to appear Figure 32 Add Card screen Swipe the card to be added on the device reader the reader is recognisable by the symbol shown in Figure 33 present on the front of the device Figure 33 RFID Card Reader Symbol 3 To remove a charging card select 2 Remove card from the sc...

Page 36: ...only be set if the ENGATE is connected for managing authorisations invoices and other configurations the RFID cards are optional If the customer wants to check the authorisations and invoices by using the ONLINE configuration by connecting to the ENGATE in order to use the portal that has already been developed Up to 12 chargers can be connected to the same ENGATE via the CAN port the ENGATE is po...

Page 37: ...ual 22K BE 24 37 44 Icon Description Incorrect connection to ENGATE check LAN cable ENGATE connected correctly and not connected to the portal check ENGATE configuration ENGATE connected correctly and connected to the portal Table 6 Icons for connection to ENGATE 7 2 Offline This working mode allows the charger to operate without any connection to the portal the charging is authorised through RFID...

Page 38: ...ode allows the charger to operate simply by connecting the gun of the charger to the car there is no need for authorisations cards payments or any other devices Whenever the customer does not need to request authorisations charging limits blocks monitoring or specific configurations the simplest configuration is Plug Play mode the charging is activated by the car s BMS by physically connecting the...

Page 39: ...he charger making sure the cable is not taut 1 Pull out the battery charger cable from the electric vehicle and connect the charger and electric vehicle connectors 2 Check that the connectors are positioned correctly and secured properly When properly connected the LED on the charger should flash yellow indicating that the charger is ready to charge the vehicle 8 2 Start of charging After the conn...

Page 40: ...V 10 400V 10 AC input frequency 50Hz 50Hz AC Output data AC output voltage 230V 10 400V 10 Maximum AC output current 32A 32A Maximum Power 7kW can be limited via software 22kW can be limited via software General data Housing material Plastic PC940 Galvanised steel Front panel Tempered glass Tempered glass Installation To wall On support To wall On support Connector Charging socket Type 2 cable not...

Page 41: ... not display any errors perform the following checks Is the device located in a clean dry and properly ventilated place Are the cables correctly sized and as short as possible Are the connections in good condition Are the configuration settings correct for the type of installation Information on the event list Problems Possible causes Solutions 1 Input overvoltage The input voltage on the AC side ...

Page 42: ...uate value 6 Temperature too high The temperature inside the charger may be too high 1 Check the ambient conditions around the charger and make sure there is no heat source nearby Make sure that the temperature is below 60 C 7 Leakage overcurrent The current discharged to the ground may be too high 1 Immediately switch off the circuit breaker for the leakage current of the power distribution 2 Che...

Page 43: ...t the AC power of the device before cleaning 11 Dismantling and disposal The packaging materials are compatible with the environment and can be recycled Therefore they can be disposed of in special recycling containers in accordance with the local waste disposal regulations However the charger cannot be disposed of as household waste but must be treated as special waste It must be disposed of at f...

Page 44: ...tion subject to registration on the website https www zcsazzurro com it estensione garanzia During the warranty period Zucchetti Centro Sistemi S p A guarantees the normal operation of the charging station If the device is defective or faulty during the warranty period contact your installer or supplier If the fault falls within the responsibility of the manufacturer Zucchetti Centro Sistemi S p A...

Reviews: