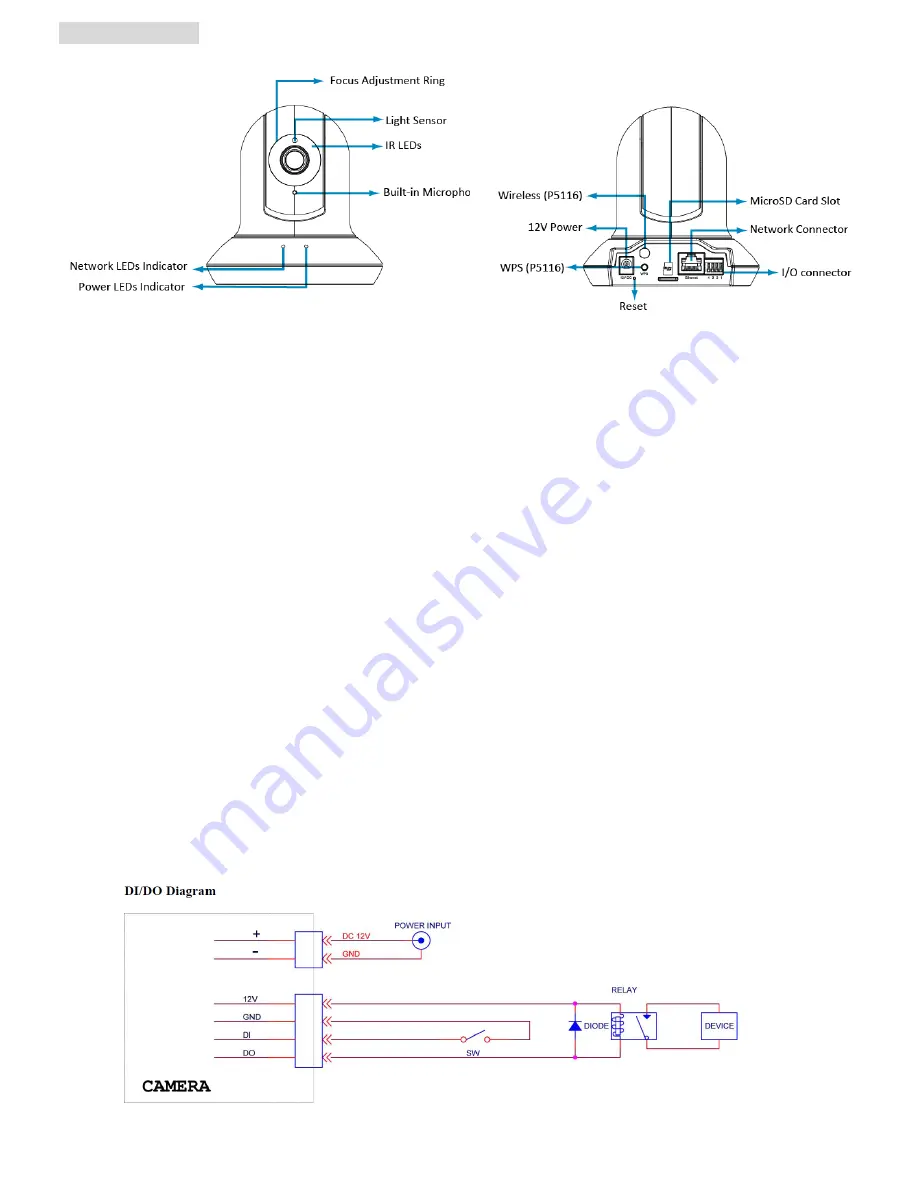
background image


Physical overview 


Focus Adjustment Ring - 

Adjust focus manually to achieve the best image quality   


Infrared LEDs


-

 Infrared LEDs for night use up to 10m working distance


Wireless Antenna (for P5116) - 

For connection of IEEE 802.11 b / g / n wireless network. 


Built-In Microphone - 

Built-In Microphone for one-way Audio 


Network LED indicator - 

Network LED will light up after connecting with network.   


Power LED indicator - 

Power LED will light up after completing the boot process. 


Power Connector -

 For connection of 12V DC input. 


Reset - 

When the device is empowered, press the Reset Button to reboot the device, or hold the Reset Button for 10 

seconds to set the device settings back to factory default 


WPS (for P5116) –

Enable the wireless function. 


MicroSD Card – 

For IP camera local storage. 


Network Connector - 

For connection to the Ethernet via RJ-45 standard with PoE 


I / O Terminal Connector -

 1Input / 1Output to support External Alarm and Sensor used for motion detection, event 

triggering and alarm notification…etc. 


DI / DO Terminal connector diagram - 

Please refer the following illustration below for connection method:   


Summary of Contents for P5111

Page 1: ...86085M2000010...

Page 2: ...ghting environment setting See P 6 Change the Web Interface into your preferred language See P 7 Wireless Setting P5116 Model See P 7 Application of IP Camera See P 8 For more information please check...

Page 3: ...the boot process Power Connector For connection of 12V DC input Reset When the device is empowered press the Reset Button to reboot the device or hold the Reset Button for 10 seconds to set the device...

Page 4: ...b Switch Router b2 Power over Ethernet PoE P5111 P5210 Model Using a standard RJ 45 network cable connect the IP Camera to a PoE enabled Hub Switch Router b3 Wireless connection P5116 Model Connect th...

Page 5: ...wo settings before using Intelligent IP Installer Select Intelligent IP Installer and follow the installation process to complete the installation b Browser s Internet Properties Privacy Uncheck Pop u...

Page 6: ...IP Camera for the first time a yellow information bar appears below the address bar This website wants to install the following add on AxvideoView cab from Zavio Inc 5 Click the information bar and s...

Page 7: ...the lighting environment of your country Go to Setting Live View Camera Setting Image Setting select the environment setting you wish 1 Select Safari icon 2 Click Bonjour function and select the came...

Page 8: ...IP Camera s LAN port then insert the USB Wi Fi dongle at the rear Using Intelligent IP Installer and entering the camera s setting page Please go to Setting Basic Setup Network WLAN set the wireless o...

Page 9: ...Application of IP Camera 8...

Page 10: ...Memo 9...

Page 11: ...Memo 10...

Page 12: ......

Reviews: