background image

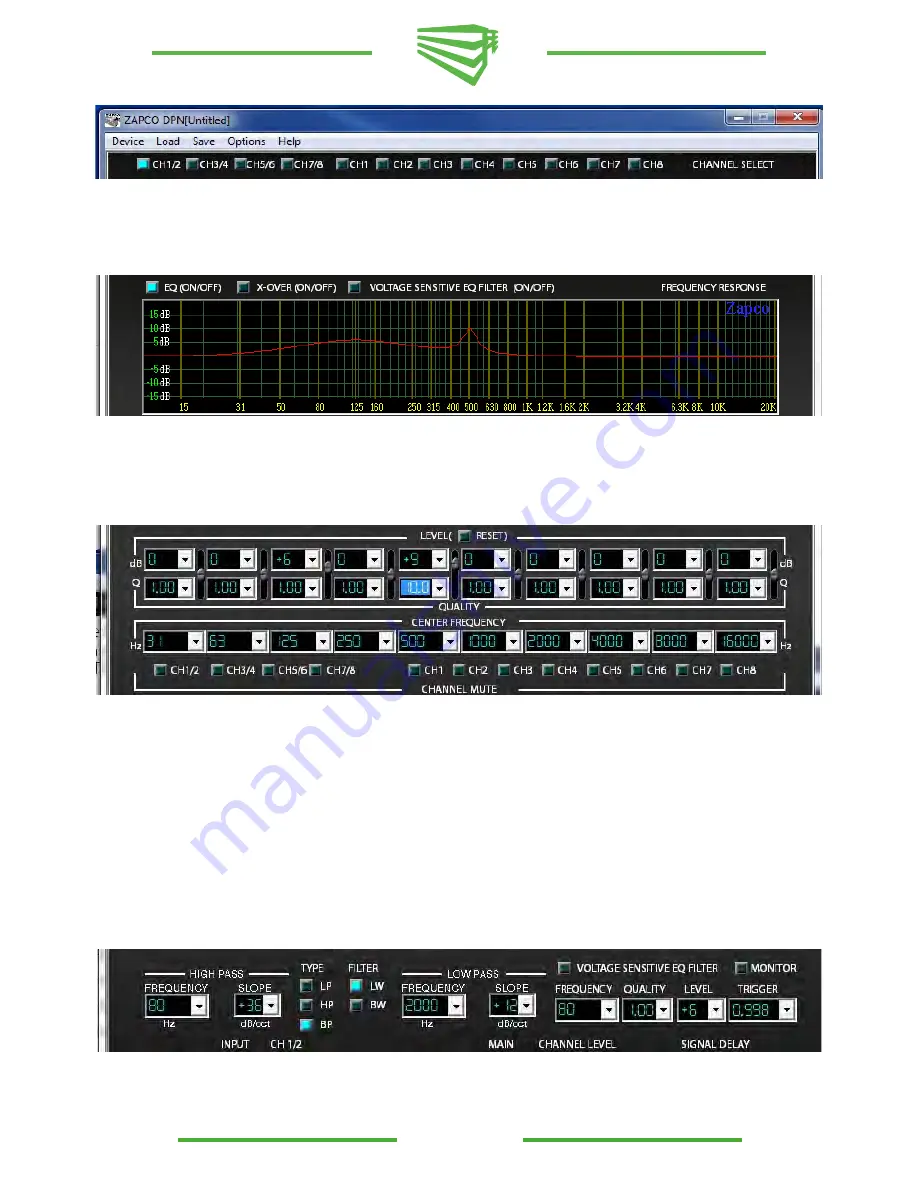
1)  Channel Select: 

  The top section of the PC screen allows you to determine which channels you 

will be programming. You can adjust the channels individually, or in stereo pairs as required. Simply 
move the mouse to your choice and click it on. The active channels will light up.

2)  Function/Graph:

   In this section you can turn the processing functions on or off to compare the 

sound of your modified response to the unprocessed sound by clicking the buttons above the graph on 
of off with your mouse. You can also monitor the graph to see, in real time, how your adjustments will 
affect the input signal.

3)  Equalizer: 

 In this section you can make the adjustments to the parametric equalizer. The top row 

sets the level of boost or cut at the center frequency, up to ±15dB.  The next row sets the Q (shape) of 
the equalization. A low Q affects a wide range of frequencies while a high Q affects a narrow range of 
frequencies. The Graph screen will let you see how the value of Q will affect your response. Note in the 
graph section the wide boost at 125Hz (Q1) and the narrow sharp boost at 500Hz (Q10).  The bottom 
row of the EQ screen sets the center frequencies. The EQ section is a true parametric EQ. We have set 
factory defaults at about 1 octave intervals. However you can alter the center frequencies to fit the 
requirements of your car. with the drop-down menu or by typing in the frequency you want. 
     

 Mute: 

  Under the EQ controls are the mute buttons which allow you to temporarily turn off some of 

the active channels. This is very handy in tuning when you want to hear the response of an individual 
channel. you can mute by Channel pairs or by individual Channel.

4)  Crossover:  

 For each channel, when you have turned on the crossover function, you can choose to 

run a High pass, a Low pass, or a Band pass crossover.  You can also choose a crossover slope of 6dB,                    

13

Summary of Contents for DSP-Z6 III

Page 1: ...DSP and OEM Integration Owner s Manual Before operating the unit please read this manual throughly and retain it for future reference...

Page 2: ...Owner s Manual Contents 1 Mission Statement 2 Introduction 4 DSP Z8 6 DPN Network 8 DSP Z8 III 10 DSP Z6 III 12 DPN PC Program 16 Z8 R Dash Remote 18 Things You Should Know 21 Speci cations...

Page 3: ...of life Another simple fact is that for over 30 years Zapco has been the leader in de ning quality standards for the car audio industry These years of experience have led to a thorough understanding...

Page 4: ...erformance to car sound In the 90 s the name was changedtoSEQandtheunitisstillsoughtafter todayafterintheusedaudiomarket In the 80 s we took processing to another new level with the PX This was the rs...

Page 5: ...s ampli ers Thetwonewmodelsuseasmallercompactchassisthat sharesalookwiththeZ seriesamps The di erence between the two new models is simply the number of channels The DSP Z8 III has 6 channels of input...

Page 6: ...add high end sound to factory stereos The Zapco Digital functions include Input Sensitivity Gain Output Crossover Parametric Equalization and Time Delay Each Reference Digital piece also has an Input...

Page 7: ...o RG connectors provide Data in out for network cables and for a dash remote 7 Power Connector 4 Pin Provides Power Ground 12V RemTurn On and Aux 12 volt out 8 Input Low High Choose Low level for prea...

Page 8: ...he amp s DIP Switch allows you to address each ampli er to it s own location on the network Then when you call up the amp for programming it will even identify itself by its location and its model num...

Page 9: ...within the network Note Turn all amps o before setting address switches 0 4 8 1 2 3 5 6 7 9 Binary numbering for nodes on the programming network Up to 10 devices can be addressed using the DIP switc...

Page 10: ...will also accept balanced speaker level signals from a factory ampli ed system to add high end sound to factory stereos The Zapco Digital functions include Input Sensitivity Gain Output Crossover Par...

Page 11: ...r 4 Pin Provides Power Ground 12V RemTurn On and Aux 12 volt out 7 Input Level selector The Low level for preamp or digital input or Hi level for OEM speaker level input 8 Optical input Digital Input...

Page 12: ...I will also accept balanced speaker level signals from a factory ampli ed system to add high end sound to factory stereos The Zapco Digital functions include Input Sensitivity Gain Output Crossover Pa...

Page 13: ...urn On and Aux 12 volt out 7 Input Level selector The Low level for preamp or digital input or Hi level for OEM speaker level input 8 Optical input Digital Input for SPDIF optical connector Toss Link...

Page 14: ...on then is to click on Options at the top and choose Login The password is Zapco spelled with a capital Z The PC programming screen has 5 sections They are top to bottom Channel Select Function Graph...

Page 15: ...a ects a wide range of frequencies while a high Q a ects a narrow range of frequencies The Graph screen will let you see how the value of Q will a ect your response Note in the graph section the wide...

Page 16: ...er signals into a single full range stereo signal that all can share This lets you combine highs mids and lows from a factory system into a single stereo output and eliminate the factory crossover Sen...

Page 17: ...e new Zapco DPN Install le and follow the directions to install the new program version Wait at the end for DOS to nish installing the drivers B Update the DSP with a new Hex le to match the PC progra...

Page 18: ...hould set your head unit to maximum unclipped output usually about 3 4 volume and use the Z8 R as your main volume control This way switching from Main input to Aux D input will not cause severe volum...

Page 19: ...the Zapco Z8 R to the DSP Z8 using the supplied 6 conductor RG Phone cable 4 Open the DPN and note the number of the COM port that the DSP is using 5 Close the DPN program and open the Zapco Updater 6...

Page 20: ...gn the COM Port a Open USB Serial Port COM b Choose at the top Port Settings c Choose in the lower portion Advanced d At the top of Advanced you will see the port assignment and a drop down list e Ope...

Page 21: ...For OEM Integration this can be a huge blessing More and more car makers each year are using active equalization in their sound systems The most common type of active equalization is the roll o of bas...

Page 22: ...sound like it s coming from the back of the car The villain here is the wavelength of the bass notes from the woofer Bass notes are very long often longer than the car and it can be di cult to get th...

Page 23: ...180x55x220 250 120x41x200 230 120x41x200 230 Size mm W H L L w feet 21...

Page 24: ...Modesto California USA Since 1974 zapco com...

Reviews: