background image

• Set the hottest cotton wash programme

• Use a correct quantity of powder detergent

with biological properties.

After each wash, keep the door open for a
while to prevent mould and to let unpleasant
smells go out.

Drum

Regularly examine the drum to prevent lime-
scale and rust particles.
Only use special products to remove rust parti-
cles from the drum.
To do this:

• Clean the drum with special product for

stainless steel.

• Start a short programme for cotton at the

maximum temperature with a small quantity
of detergent.

Door seal

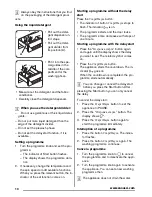
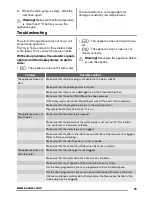
Regularly examine the
seal and remove all
objects from the inner
part.

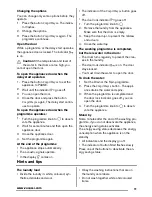
Cleaning the detergent dispenser

1.

2.

3.

4.

5.

6.

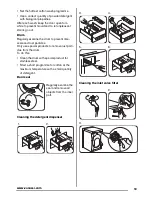
Cleaning the inlet valve filter

1.

2.

3.


13

www.zanussi.com

Summary of Contents for ZWG 7102 V

Page 1: ...EN User manual Washing Machine ZWG 7102 V ...

Page 2: ...he appliance carefully read the supplied instructions The manufacturer is not responsible if an in correct installation and use causes injuries and damages Always keep the instructions with the appliance for future reference Children and vulnerable people safety Warning Risk of suffocation injury or permanent disability This appliance can be used by children aged from 8 years and above and persons...

Page 3: ...s less than 0 C or where it is exposed to the weather Obey the installation instruction supplied with the appliance Make sure that the floor where you install the appliance is flat stable heat resistant and clean Do not install the appliance where the appli ance door can not be fully opened Always be careful when you move the appli ance because it is heavy Always wear safety gloves Make sure that ...

Page 4: ...e to ensure which accessories can be used Care and Cleaning Warning Risk of injury or damage to the appliance Before maintenance deactivate the appli ance and disconnect the mains plug from the mains socket Do not use water spray and steam to clean the appliance Clean the appliance with a moist soft cloth Only use neutral detergents Do not use abrasive products abrasive cleaning pads solvents or m...

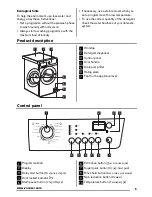
Page 5: ...5 Drain pump filter 6 Rating plate 7 Feet for the appliance level Control panel 90 1000 700 500 60 40 30 Температура Отжим Без слива и отжима Cупер быстрый Доп полоскание Старт Пауза Отсрочка старта Хлопок Хлопок Предв стирка Полоскание Слив Отжим Хлопок Синтетика Смешанные ткани Тонкие ткани Шерсть Ручная стирка 5 рубашек Mини 30 Легкая глажка Джинсы Скидки 3 4 6 5 7 8 9 10 1 2 Хлопoк Eco 1 Progr...

Page 6: ...vy soil and normal soil 6 kg 1000 rpm Хлопoк Eco1 60 C 40 C White cotton and colour fast cotton Normal soil 6 kg 1000 rpm Синтетика 60 C Cold Synthetic items or mixed fabric items Normal soil 3 kg 1000 rpm Смешанные ткани Cold Very energy efficient cold wash programme Light soil 3 kg 1000 rpm Тонкие ткани 40 C Cold Delicate fabrics as acrylics viscose polyester items Normal soil 3 kg 700 rpm Шерст...

Page 7: ...nd type of laundry the water and ambient temperature Programmes Load Kg Energy con sumption kWh Water con sumption litre Programme dura tion minutes Хлопок 60 C 6 0 94 64 For the duration of the programmes please refer to the display on the control panel Хлопoк Eco 60 C1 6 0 90 45 Хлопок 40 C 6 0 76 57 Синтетика 40 C 3 0 50 47 Тонкие ткани 40 C 3 0 50 49 Шерсть Ручная стирка 30 C 1 5 0 30 50 1 Cot...

Page 8: ...s button to add rinsing phases to a programme Use this function for persons allergic to deter gents and in areas where the water is soft Delay start button Отсрочка старта Press this button to delay the start of a pro gramme from 30 minutes to 20 hours Child lock function This function prevents the children to play with the control panel To activate the function press the button Температура and th...

Page 9: ... laundry in the appliance 4 Use the correct quantity of detergent and additives 5 Set and start the correct programme for the type of laundry and soil Loading the laundry 1 Open the appliance door 2 Put the laundry in the drum one item at a time Shake the items before you put them in the appliance Make sure not to put too much laundry in the drum 3 Close the door Caution Make sure that no laundry ...

Page 10: ...or of button Старт Пауза stops to flash The indicator is on The programme starts and the door locks The programme time decreases with steps of one minute Starting a programme with the delay start Press the Отсрочка старта button again and again until the display shows the delay you want to set The related symbol comes on Press the Старт Пауза button The appliance starts the countdown The in dicato...

Page 11: ...r goes off 1 Turn the programme knob to 2 Remove the laundry from the appliance Make sure that the drum is empty 3 Keep the door ajar to prevent the mildew and odours 4 Close the water tap The washing programme is completed but there is water in the drum The drum turns regularly to prevent the crea ses in the laundry The door lock indicator is on The door stays locked You must drain the water to o...

Page 12: ...uctions that you find on the on packaging of these products Use the correct products for the type and colour of the fabric the programme tempera ture and the level of soil If you use liquid detergents do not set the prewash phase If your appliance has not the detergent dis penser with the flap device add the liquid detergents with a dosing ball Water hardness If the water hardness in your area is ...

Page 13: ...event lime scale and rust particles Only use special products to remove rust parti cles from the drum To do this Clean the drum with special product for stainless steel Start a short programme for cotton at the maximum temperature with a small quantity of detergent Door seal Regularly examine the seal and remove all objects from the inner part Cleaning the detergent dispenser 1 2 3 4 5 6 Cleaning ...

Page 14: ... the drain system 1 Put 2 litres of water in the main wash com partment of the detergent dispenser 2 Start the programme to drain the water Frost precautions If the appliance is installed in an area where the temperature can be less than 0 C remove the remaining water from the inlet hose and the drain pump 1 Disconnect the mains plug from the mains socket 2 Close the water tap 3 Remove the water i...

Page 15: ...en pressed If the delay start is set cancel the setting or wait for the end of the countdown Make sure that the programme knob is in the correct position Deactivate the Child Lock function if it is on The appliance does not fill with water Make sure that the water tap is opened Make sure that the pressure of the water supply is not too low For this informa tion contact your local water authority M...

Page 16: ...ake sure that the packaging and or the transit bolts are removed Refer to Instal lation instruction Add more laundry in the drum The load may be too small The appliance fills with water and drain immedi ately Make sure that the drain hose is in the correct position The end of the hose may be is too low Refer to Installation instruction The washing results are not satisfactory Increase the detergen...

Page 17: ...cy 230 V 2200 W 10 A 50 Hz Water supply pressure Minimum 0 5 bar 0 05 MPa Maximum 8 bar 0 8 MPa Water supply 1 Cold water Maximum load Cotton 6 kg Spin speed Maximum 1000 rpm 1 Connect the water inlet hose to a water tap with a 3 4 thread 17 www zanussi com ...

Page 18: ...18 www zanussi com ...

Page 19: ...19 www zanussi com ...

Page 20: ...www zanussi com shop 155219890 A 462012 ...

Reviews: