background image

- 12 -

Using the appliance

Have you removed all the transit locking devices?
The very first time the machine is used, you should
run a wash programme without any load, to clear any
residues which may have been left by the manufac-
turing process. Pour approx. 100 ml of detergent
straight into the drum and run a programme at 60°C.
When the programme is finished, the machine will be
ready for use.

Starting a wash programme

Before starting up the machine, check that:

the door is properly closed

the appliance is plugged in

the water supply tap is turned on

To start the machine, proceed as follows:

1. Pull the door latch gently to open the door.

2. Fill the drum evenly with the laundry. Large and 

small items can be mixed.

Always try to wash full loads: for maximum load
weights see the programme charts. You should
only reduce the load weight for heavily soiled items
and sensitive materials.

3. Close the door.

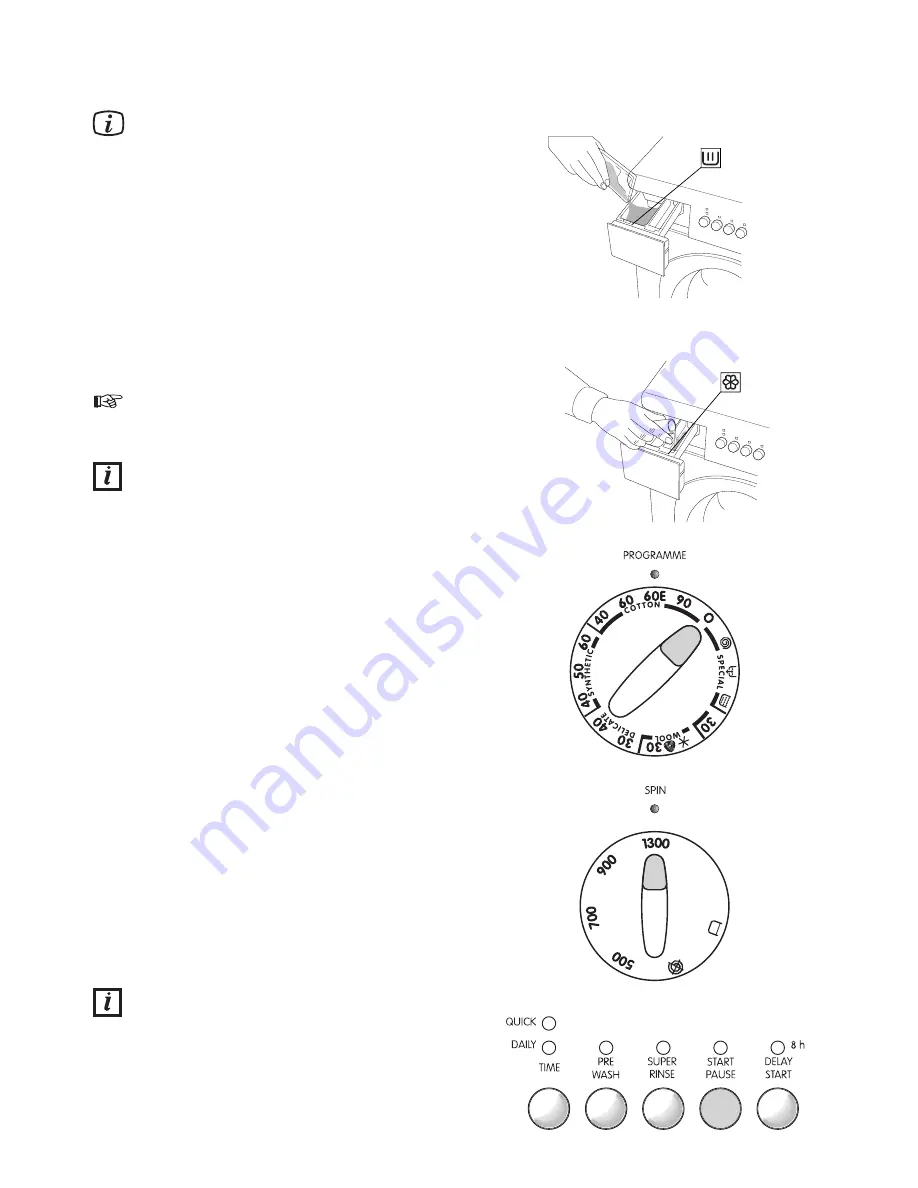
4. Pull out the dispenser drawer.

5. Measure out the amount of detergent required and 

pour it into the larger compartment on the left (fig 1).

6. Pour fabric softener into the smaller compartment 

on the right without exceeding the max. level (fig. 2).

7. Close the drawer.

8. Select the required programme (fig. 3).

9. Turn the spin speed selector to the required 

position (fig. 4).

10. Select the required option. The corresponding 

light illuminates (fig. 5).

11. Press the Start/Pause button to start the required 

wash programme. The indicator lights ”Washing”
and ”Door” comes on and the programme starts. 

Changing a wash programme

The programme can be changed as long as the Start/Pause
button hasn’t been depressed. If the programme has started,
you can only change it by turning the programme selector to
the ”Reset” position and cancel the programme. Select a new
programme and press the Start/Pause button. 

If you turn the programme selector to another 
programme when the machine is running, the 
lights in the programme progress display start to
flash. The machine will not perform the new
selected programme.

1

2

3

4

5

Summary of Contents for ZWC 1300W

Page 1: ...INSTRUCTION BOOKLET WASHING MACHINE ZWC 1300W 822 61 16 03 ...

Page 2: ...et The detergent drawer Inside the recess for the detergent drawer Cleaning inside the machine Descaling Protecting the machine against freezing Something Not Working 15 Service 16 Service and spare parts Customer care Guarantee Conditions 17 For the installer Technical specifications 18 Unpacking the machine 19 If the machine is damaged When lifting the machine Transit locking bolts Installation ...

Page 3: ... to the machine Make sure that all pockets have been emptied before putting garments into the machine Remove or pre treat stains such as rust dye ink and grass before machine washing Avoid washing clothes which are frayed or excessively worn Items which have been treated with chemicals such as stain removal products liquid domestic cleaning products and similar must be rinsed thoroughly by hand be...

Page 4: ...nergy saving tips To save water energy and help protect the environment we recommend that you follow these hints The washing machine is especially economical when you fully utilise the stated filling quantities Adjust the quantity of washing detergent according to the hardness of the water the amount of laundry and the degree of soiling A programme without pre wash is sufficient for normally soile...

Page 5: ... 5 Machine front Description of the appliance Control panel Door All feet adjustable Door latch Machine rear Transit locking bolts Discharge hose Electrical lead Inlet hose cold fill ...

Page 6: ... approx 30 minutes for cotton and by 20 minutes for synthetics The machine will perform 1 rinse less These options can not be choosen together with the economy programme 60E The washing time will be reduced depending on the type of material and the selected temperature Recommended load for cotton is 2 kg 3 Button Pre wash If the laundry is heavily soiled you can choose a programme with pre wash Be...

Page 7: ... spin speed or select the No spin option The speeds are applied for the white and coloured programmes The position 1300 is equivalent to 900 rpm min for the synthetic and wool programmes and 700 rpm min for the delicate wash programme The position 500 is equivalent to 500 rpm min for the synthetic and wool programmes and 450 rpm min for the delicate wash programme No spin by selecting this option ...

Page 8: ...tems such as socks laces hand kerchiefs etc in a washing bag or pillow case as it is possible for such items to slip down between the tub and the inner drum Items that should not be put in the machine Underwired bras Garments which have been in contact with volatile or petroleum based products Some duvets and eiderdowns should be washed in large commercial machines Check with the manu facturer of ...

Page 9: ...form is down to personal choice Traditional Powders Pour the powder directly into the dispenser drawer Do not sprinkle powder onto clothes in the machine drum Traditional Liquids Liquid can be placed in the main wash compartment of the detergent drawer marked with the symbol start the machine immediately upon placing the detergent in the dispenser drawer Alternatively the detergent is measured int...

Page 10: ... programme 40 60 C without pre wash 3 rinses and spin max 1300 rpm min Wash programme 60 C without pre wash 3 rinses and spin max 1300 rpm min Wash programme 40 50 without pre wash 3 rinses and spin max 900 rpm min Wash programme 30 40 C without pre wash 3 rinses and spin max 700 rpm min Temperature C Option buttons Consumption Programme content Synthetic heavily soiled underwear anti crease shirt...

Page 11: ...nd spin max 900 rpm min Spin separate spin for hand washed items Reset Draining and spin max 1300 rpm min Reset the programme Switches the machine off 3 rinses and spin max 1300 rpm min Temperature C Option buttons Programme content Drain emptying the last rinse water in pro grammes with the rinse hold option Draining 0 20 45 45 Mini for lightly soiled laundry or for laundry which needs freshening...

Page 12: ... door 4 Pull out the dispenser drawer 5 Measure out the amount of detergent required and pour it into the larger compartment on the left fig 1 6 Pour fabric softener into the smaller compartment on the right without exceeding the max level fig 2 7 Close the drawer 8 Select the required programme fig 3 9 Turn the spin speed selector to the required position fig 4 10 Select the required option The c...

Page 13: ...hat there can be remaining water in the machine This could spill out and be hot At the end of the programme The machine stops automatically When the End light is lit the programme is finished The Door light goes out the door can be opened and the laundry can be removed If the Rinse hold option has been selected the lights End and Door continue to be lit to indicate that the water must be drained b...

Page 14: ...wder such as Ariel Futur and run a wash programme at the highest temperature with no wash load in the machine Descaling If your water supply is harder than 7 dH you should descale your washing machine at least once every three months Use approx 150 ml of citric acid instead of detergent and run a wash programme at the highest temperature with no wash load in the machine Limescale deposits on compo...

Page 15: ...tre Fault Check Spinning starts late or the machine does not spin The electronic unbalance detection system has cut in be cause the laundry is not evenly distributed in the drum The laundry is redistributed by reverse rotation of the drum This may happen several times before the unbalance disap pears and normal spinning can resume If after 10 minutes the laundry is still not evenly distributed in ...

Page 16: ...u have read the details under the heading Something Not Working When you contact the Service Force Centre you will need to give the following details 1 Your name address and post code 2 Your telephone number 3 Clear and concise details of the fault 4 The model and serial number of the appliance found on the rating plate 5 The purchase date Please note that a valid purchase receipt or guarantee doc...

Page 17: ...astic Costs incurred for calls to put right an appliance which is improperly installed or calls to appliances outside the United Kingdom Appliances found to be in use within a commercial environment plus those which are the subject to rental agreements Products of Zanussi Electrolux manufacture which are not marketed by Zanussi Electrolux European Guarantee If you should move to another country wi...

Page 18: ...30 V 50 Hz Fuse 13 A Power rating 1600 W Technical specifications Any electrical work required to install this appliance should be carried out by a qualified electrician or competent person Any plumbing work required to install this appliance should be carried out by a qualified plumber or competent person This appliance complies with the requirements of the following EU directives 73 23 EEC dated...

Page 19: ...ine top to lift this machine Never lift the machine by gripping its control panel the door itself or its detergent drawer Fig 1 Transit locking bolts When supplied the washing machine is packed using a number of locking devices packing pieces to prevent drum and motor from damage in transit These must all be removed before the washing machine is installed 1 Spread some of the polystyrene packaging...

Page 20: ...a solid floor When the appliance location is on carpet floors attention must be paid so as to ensure that there is no obstruction to the bottom vents Water inlet Connect the inlet hose to a tap with a 3 4 pipe thread Fig 2 The inlet hose must not be joined onto any form of extension hose If it is too short the entire hose must be replaced with a longer high pressure hose specially designed for the...

Page 21: ... new pipework or to pipework that has not been used for some time run off a reasonable amount of water to flush out any debris that may have collected in the pipes Whether discharging into a sink or a standpipe check that the end of the drain hose is neither too high or too low The top of the curve in the hose s end should be no more than 800 mm 31 5 and no less than 650 mm 25 6 above floor level ...

Page 22: ...posed of to prevent the hazard of shocks in case it should be plugged into a 13 amp socket in another part of your home Important The wires in the mains lead are coloured in accordance with the following code Green and Yellow Earth Blue Neutral Brown Live If you fit your own plug the colours of the wires in the mains lead of your appliance may not correspond with the markings identifying the termi...

Page 23: ... 23 ...

Page 24: ... Electrolux plc 2004 ...

Reviews: