background image

22

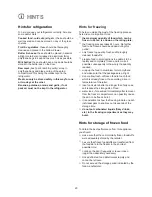
1. Remove the plinth (1), then the ventilation grid (2);
2. Carefully pull the air deflector out (3), checking that

there is no water left from the defrosting.

Periodic cleaning

Never use metal objects for cleaning your appliance
as it may get damaged. Clean the inside with warm
water and bicarbonate of soda. Rinse and dry
thoroughly.
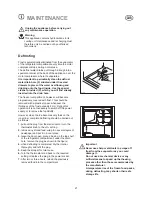
The appliance is equipped with an air inlet filter (1)
and an air outlet duct (2) on the ventilation grid. Keep
clean to guarantee good ventilation and good working
order of the appliance.

The filter can be removed and washed with water, as
follows:
1. Pinch flaps (a) and (b) with fingers
2. Pull the filter down.
3. Pull the filter out.
To replace the filter reverse the process.

An accumulation of dust will affect the performance of
the appliance and cause excessive electricity
consumption.
The structure of the appliance permits cleaning of the
rear zone close to the wall, using a vacuum cleaner.

S.I.012

2

1

a

b

S.I.013

3

2

1

Periods of non-operation

When the appliance is not in use for long periods,
take the following precautions:
remove the plug from the wall socket;
remove all food:
defrost and clean the interior and all accessories;
leave the door ajar to allow air to circulate to prevent
unpleasant smells.

Interior light

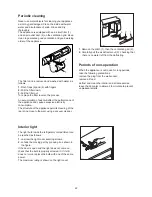
The light bulb inside the refrigerator compartment can
be reached as follows:

1. unscrew the light cover securing screws;

2. unhook the moving part by pressing it as shown in 

the figure.

If the door is open and the light does not come on,
check that the bulb is properly screwed in; if it still
does not work, replace the bulb with one of the same
power.
The maximum rating is shown on the light cover.

D411

Summary of Contents for ZU 9144

Page 1: ...KÜHLSCHRANK REFRIGERATOR REFRIGERADOR D t E BEDIENUNGSANLEITUNG INSTRUCTION BOOKLET LIBRO DE INSTRUCCIONES 2222681 99 ZU 9144 ...

Page 2: ...ure reference Should the appliance be sold or transferred to another owner or should you move house and leave the appliance always ensure that the book is supplied with the appliance in order that the new owner can be acquainted with the functioning of the appliance and the relevant warnings These warnings are provided in the interest of safety You must read them carefully before installing or usi...

Page 3: ...ailure and possible food loss See installation instructions Parts which heat up should not be exposed Wherever possible the back of the product should be against a wall If the appliance has been transported horizontally it is possible that the oil contained in the compressor flows in the refrigerant circuit It is advisable to wait at least two hours before connecting the appliance to allow the oil...

Page 4: ...allow automatic defrosting and so a saving in electricity consumption Fresh food refrigeration The refrigerator compartment is suitable for cooling drinks and for normal food storing To obtain the best performance do not store warm food or evaporating liquids in the refrigerator and do cover or wrap up the food particularly if it has a strong smell Cleaning the interior Before using the appliance ...

Page 5: ...th a series of runners so that the shelves can be positioned as desired D040 Positioning the door shelves To permit storage of food packages of various sizes the central door shelf can be adjusted in height To make these adjustments proceed as follows Gradually pull the shelf in the direction of the arrows until it comes free then reposition as required For more thorough cleaning the top and botto...

Page 6: ...Hints for refrigeration To help you use your refrigerator correctly here are some useful hints Cooked food cold cuts jelly etc these should be well covered and can be stored on any of the glass shelves Fruit vegetables these should be thoroughly cleaned and placed in the bottom drawer Butter cheese these should be placed in special airtight containers or wrapped in aluminium foil or polythene bags...

Page 7: ... prevent the water overflowing and dripping onto the food inside Use the special cleaner provided P which you will find already inserted into the drain hole The freezer compartment however will become progressively covered with frost This should be removed with a plastic scraper whenever the thickness of the frost exceeds 4 mm During this operation it is not necessary to switch off the power suppl...

Page 8: ... affect the performance of the appliance and cause excessive electricity consumption The structure of the appliance permits cleaning of the rear zone close to the wall using a vacuum cleaner S I 012 2 1 a b S I 013 3 2 1 Periods of non operation When the appliance is not in use for long periods take the following precautions remove the plug from the wall socket remove all food defrost and clean th...

Page 9: ...e rating plate located inside the appliance on the bottom right hand side TECHNICAL SPECIFICATIONS The technical data is indicated in the rating plate on the right side inside the appliance Height 815 mm Width 560 mm Depth 538 mm lf this appliance featuring magnetic door seals is to replace an older appliance having a spring lock latch on the door or lid be sure to make that spring lock unusable b...

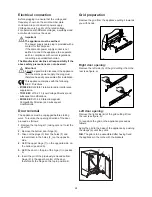
Page 10: ...Electromagnetic Compatibility Directive and subsequent modifications Grid preparation Remove the grid from the appliance pulling it towards you with hands Right door opening Remove the left side A of the grid cutting it from the rear see figure a Left door opening Remove the right side B of the grid cutting it from the rear see figure b To reposition the grid on the appliance proceed as follows Ap...

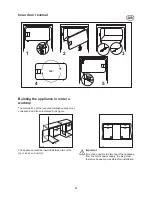
Page 11: ...orrespond with those indicated in the figure The appliance could be inserted between two units a or as an end unit b S I 004 600 550 600 600 820 870 b a Important It must be possible to disconnect the appliance from the mains power supply the plug must therefore be easily accessible after installation S I 005 180 1 2 3 4 5 ...

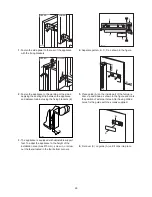
Page 12: ...is equipped with adjustable support feet To adapt the appliance to the height of the installation area max 870 mm screw in or screw out the feet situated in the four bottom corners PR266 A B C D 4 Separate parts A B C D as shown in the figure 5 Place guide A on the inside part of the furniture door up and down as shown in the figure and mark the position of external holes After having drilled hole...

Page 13: ...en units Important The plinth must be positioned at a minimun distance of 25 mm from the door 8 Should the lining up of the furniture door be necessary use the clearance of slots At the end of operations it is necessary to check if the door of the furniture closes properly 8mm PR167 A B 7 Open the appliance door and the furniture door at 90 Insert the small square B into guide A Put together the a...

Page 14: ......

Reviews: