background image

11

DIMENSIONS

Height

81,5

cm

Width

59,6

cm

Depth

55

cm

POWER SUPPLY VOLTAGE AND FREQUENCY

220-240 V / 50 Hz

TOTAL POWER ABSORBED

90 W

AVERAGE DAILY UNITS ELECTRICITY(*)

0,57

kWh

GROSS CAPACITY

108 l

NET CAPACITY

98 l

STAR RATING

(*)This figure is based on standard test results in accordance with European Standard EN153 (Actual

consumption will depend on how the appliance is used and where it is located).

Technical specifications

Positioning

The appliance should only be installed at a location
where the ambient temperature corresponds to the
climate classification indicated on the rating plate,
which is located on the inside left of the appliance.
The following table shows which ambient
temperature is correct for each climate classification.

SN

+10°C   to   +32°C

ST

+18°C   to   +38°C

The appliance should be located in a dry
atmosphere, out of direct sunlight and away from
continuous heat and extreme temperature, e.g. not
next to a boiler or radiator or in a very cold room e.g.
an outhouse. If these temperatures are exceeded i.e.
warmer or colder, then the appliance may not
operate correctly.
For building-in and door reversal instructions please
refer to the relevant instructions on the following
pages.

Warning

IF  YOU ARE  DISCARDING AN  OLD
APPLIANCE THAT HAS A LOCK OR CATCH
ON THE DOOR, YOU MUST ENSURE THAT
IT IS MADE UNUSABLE TO PREVENT
YOUNG CHILDREN BEING TRAPPED
INSIDE.

Depending upon the position which you choose for
your appliance, you may wish to reverse the way in
which the door opens. To do this, refer to instructions
under “Door reversal”.

Installation

Important

It must be possible to disconnect the appliance

from the mains power supply; the plug must
therefore be easily accessible after installation.

Summary of Contents for ZQF 6114

Page 1: ...FREEZER ZQF 6114 2222740 67 INSTRUCTION BOOKLET ...

Page 2: ...er Installation This appliance is heavy Care should be taken when moving it It is dangerous to alter the specifications or attempt to modify this product in any way Ensure that the appliance does not stand on the electrical supply cable Important if the supply cable is damaged it must be replaced by authorized service or qualified personnel using a special cable of the same type Any electrical wor...

Page 3: ...erwise be caused by inappropriate waste handling of this product For more detailed information about recycling of this product please contact your local council your household waste disposal service or the shop where you purchased the product At the end of the appliance s life remove the plug and ensure that any locks or catches are removed to prevent young children being trapped inside Contents I...

Page 4: ...all coin The internal temperature of the freezer is automatically adjusted by the thermostat to ensure safe food storage However if the appliance is working in unfavourable room conditions such as high temperature and frequent door openings it may be necessary to select a more suitable setting To obtain a lower temperature turn the thermostat contol knob towards high numbers to obtain a higher tem...

Page 5: ...able Small food items may even be cooked from frozen in this case cooking will take longer Any frozen food which is allowed to thaw accidentally should either be eaten as soon as possible or thrown away Alternatively if the food is uncooked and has not been completely defrosted it can be cooked and then refrozen Defrosted cooked food must never be refrozen Internal thermometer This indicates the i...

Page 6: ...rfaces clean and avoid cross contamination by not using the same work surface or knife without washing them thoroughly in between The foods to be frozen must be fresh and of the best quality The size of each pack should be small enough to ensure that it is used in one go Small packs freeze more quickly and uniformly and give better results Frozen food once thawed must not be refrozen Lean food kee...

Page 7: ...3 S I 013 3 2 1 The freezer compartment will become progressively covered with frost This should be removed with the special plastic scraper provided whenever the thickness of the frost exceeds 1 4 During this operation it is not necessary to switch off the power supply or to remove the foodstuffs However when the ice becomes very thick on the inner liner complete defrosting should be carried out ...

Page 8: ...nces operating limits of 10 C to 38 C Relocate the appliance if necessary Has door just been opened If so leave for a few minutes to allow the air pressure to equalise Adjust the thermostat control knob to give correct temperature control See page 4 Check that the door is closed Large quantities of food have recently been placed in the cabinet and or door is frequently opened Check that air ventil...

Page 9: ...Your telephone number 3 Clear and concise details of the fault 4 The model and serial number of the appliance found on the rating plate 5 The purchase date Please note that a valid purchase receipt or guarantee documentation is required for in guarantee service calls For Customer Service in Ireland please contact us at the address below Zanussi Electrolux Group Irl Ltd Long Mile Road Dublin 12 Rep...

Page 10: ...ls to put right an appliance which is improperly installed or calls to appliances outside the United Kingdom Appliances found to be in use within a commercial environment plus those which are subject to rental agreements Products of Zanussi manufacture which are not marketed by Zanussi European Guarantee If you should move to another country within Europe then your guarantee moves with you to your...

Page 11: ...o 32 C ST 18 C to 38 C The appliance should be located in a dry atmosphere out of direct sunlight and away from continuous heat and extreme temperature e g not next to a boiler or radiator or in a very cold room e g an outhouse If these temperatures are exceeded i e warmer or colder then the appliance may not operate correctly For building in and door reversal instructions please refer to the rele...

Page 12: ...ion check that the door gasket adheres to the cabinet If the ambient temperature is cold i e in Winter the gasket may not fit perfectly to the cabinet In that case wait for the natural fitting of the gasket or accelerate this process by heating up the part involved with a normal hairdryer on a low setting 1 2 3 4 5 6 6 1 10 11 9 12 13 6 6 3 6 8 7 2 ...

Page 13: ...ies with the following E E C Directive 73 23 EEC of 19 2 73 Low Voltage Directive and subsequent amendments 87 308 of 2 6 87 Radio Interference Suppression and subsequent amendments 89 336 EEC of 3 5 89 Electromagnetic Compatibility Directive and subsequent amendments Please ensure that when the appliance is installed it is easily accessible for the engineer in the event of breakdown Electrical Co...

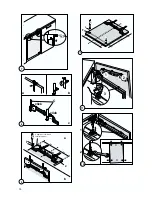
Page 14: ...ick Building in the appliance under a worktop The dimensions of the recessed installation area must correspond with those indicated in the figure DO002 2 A B DO001 a a DO013 600 T B H Installation kit 1 Two cabinet securing brackets are supplied with the installation pack They need to be assembled onto the cabinet prior to cabinet being pushed into the Kitchen aperture To fit these brackets remove...

Page 15: ...he appliance into place The plug socket necessary for connection of the appliance to the electricity supply should be positioned so that the plug is not placed in the recess 3 To adjust the height proceed as follows Loosen or tighten the two front feet The rear feet are adjusted by turning the screw in the front kick plate to the left or right 596 555 max 3 max 890 mm 5 I 6 To mount the furniture ...

Page 16: ...16 7 a b c C click click 8 b 9 I c Möbeltür Innenseite a Upper part of kitchen furniture panel I 27 5 cm 27 5 cm 55 cm 10 F 1 2 3 45 11 10 12 1 2 ...

Page 17: ...opening height dimension B 890 mm and a plinth height dimension b 170 mm For plinth heights greater than a 100 mm b 170 mm a cut should be made in the plinth 580 mm wide in the centre of the appliance position leaving a remaining height of a 100 mm b 170 mm Attach plinth to the kitchen units 7 Refit the covering strip A 8 mm 13 G K I F 14 A 90 115 L L 15 Important The plinth must be positioned at ...

Page 18: ......

Page 19: ......

Page 20: ... Electrolux plc 2008 www electrolux com www zanussi electrolux co uk ...

Reviews: