background image

821 04 18-00

2B tecknare ab                                                       Printed on environmentally sound paper                                                         © MO-STK 2000-10-17

Summary of Contents for ZL 65

Page 1: ...Cooker ZL 65 INSTRUCTION BOOK C ...

Page 2: ...eat the oven empty 7 The control panel 7 The indicator light bulbs 7 The hob 8 Using the hob 8 Cleaning the hotplates 11 Functions for safety 11 The oven 13 The functions of the oven 13 Practical use 14 Cleaning and maintenance 15 Installation 18 To adjust plinth height and depth 18 Levelling the cooker 19 Electrical connection 19 Service 20 Technical data 21 Practical tips and advice 22 Problems ...

Page 3: ... after use TOUCHING THESE CAN CAUSE BURNS Installation Work on the cooker must be carried out by a qualified electrician Work performed by unqualified persons can damage the cooker and may also lead to personal injury and or damage to property The cooker is heavy Certain edges and corners which will not normally be exposed may be sharp Use gloves when moving the cooker The NON TIP DEVICE should be...

Page 4: ...ll 2 4 5 6 1 3 C Unpacking Check that the cooker is undamaged and in perfect condition Any damage occurred during transportation should be reported to the retailer immediately The packaging materials can be recycled Contact your local council to find out where to take them The accessories THE FOLLOWING ACCESSORIES ARE SUPPLIED WITH THE COOKER Enamelled baking trays and oven dish Oven shelf Non tip...

Page 5: ...rements shown can be applied whether the non tip device is fitted on the left or the right see illustration Measure and mark where the non tip device is to be placed then screw it onto a solid material or a suitable rein forcement or fixings NOTE If the space between kitchen units is wider than the cooker you will need to alter the measurements shown in the illustration if the cooker is to be cent...

Page 6: ...ore thoroughly Don t forget to clean underneath the oven vent cover This can be washed in a dishwasher Remember that the non tip device does not work when the cooker has been pulled forward to clean behind it Wash the accessories Wash the baking tray oven dish etc in hot water and washing up liquid Rinse and dry Heat the hotplates When supplied the hotplates have been pretreated with an anti corro...

Page 7: ... the oven once the new smell and fumes have ceased 3 Use hot water and washing up liquid to wipe the oven side racks and the inside of the door Then wipe all of these parts dry The control panel 1a COOKER indicator light 1b OVEN indicator light 2 OVEN function control 3 OVEN temperature control 4 HOTPLATE controls 5 Cooker function lock The indicator light bulbs These are neon indicator lights whi...

Page 8: ...ces In the event of a fire turn off all the controls and the cooker hood fan SMOTHER THE FIRE WITH A PAN LID never use water The controls can be turned clockwise as well as anti clockwise The control setting you choose will depend on your pans what you are cooking and the quantity Use the recommendations given below as a guide and you will soon learn the correct control settings The thermostatical...

Page 9: ...in carbonated water Suitable for cooking rice fish and vegetables such as sugar peas and broccoli Settings 2 5 Medium heat Gently boiling with larger bubbles Suitable for boiling most foods such as meat root vegetables and potatoes Setting 12 Hot The sound disappears before the water starts bubbling vigorously Suitable for boiling water for pasta and rice Then turn the heat down for more gentle co...

Page 10: ...f saucepans and frying pans should be at least as large as the hotplate If the base is smaller than the hotplate any spillages are quite likely to burn onto the hob be flat It takes longer to heat a pan with a base which curves in or outwards too much When you are buying new pans it is advisable to choose stainless steel ones with sandwich type bases i e layers of different metals Save energy Putt...

Page 11: ...d on the cooker enamel Functions for safety The cooker function lock There is a lock built in to the oven s thermostat control with two safety positions You can choose whether to use the lock with single or double safety or not at all NOTE The main power supply to the cooker is still connected LOCK ONE The power to the hotplates and oven is disconnected when the thermostat control is turned to OFF...

Page 12: ...the control set at zero Next time you will only need to turn the thermostat control anti clockwise to OFF to lock the cooker see illustration A WHEN YOU WANT TO USE THE COOKER see illustration C 1 Press down the lock button and keep it pressed in 2 Turn the control clockwise to zero i e turn the control back to the 12 o clock position 3 The cooker can be used as normal Make sure no functions other...

Page 13: ...se to the symbol for the desired function see below THE OVEN FUNCTIONS ARE Oven light The oven light comes on automatically for all settings You can also have just the light on without any of the other functions being turned on Top bottom heat Using both top and bottom elements Top element Using the element at the top of the oven Bottom element Using the element at the bottom of the oven Grill Usi...

Page 14: ...s well as the recipe can affect results TOP BOTTOM HEAT gives an even colour Cooking TOP BOTTOM HEAT is normally best when using an oven shelf Roasting Roasting is a practical and convenient method of cooking Joints of beef such as topside and sirloin retain their natural juices best if roasted at 125 C but this does take longer than at a higher temperature Choose an ovenproof dish which is only j...

Page 15: ...lined with foil underneath the shelf to catch the fat etc which runs off Pork chops steaks and fish should be grilled high up in the oven while meats such as thick spare ribs are better lower down Set the function control to and the temperature control to the temperature required preheat the grill for 3 to 5 minutes Keep an eye on the food and turn it at least once Grilling for too long makes food...

Page 16: ...ning use a window cleaning product slot the the door front back into the bracket SEE PICTURE Make sure the door is properly secured on both sides 5 Press the two springs on the top edge of the door and press the door front into place 6 Remove the oven cloths To change the oven light bulb 1 Turn all controls to off and check that the oven is not hot 2 Unscrew the glass cover see illustration 3 Unsc...

Page 17: ...and lift upwards gently This frees the drawer from the catch at the back 3 Pull the drawer out completely and lift it out After cleaning place the drawer wheels on the brack ets SEE PICTURE Lift the drawer slightly as you first push it in so as to prevent the wheels from fastening in the front catch ...

Page 18: ...g the cooker To adjust plinth height and depth 53 cm is the minimum plinth depth for this cooker Setting a smaller plinth depth can cause the cooker to tip if a heavy weight is placed on the door If you wish to alter both dimensions you should adjust both at the same time But make sure you read through the full instructions before starting work 1 Carefully lay the cooker on its back SEE ILLU STRAT...

Page 19: ...o back and then side to side If necessary you can lower 6 mm or raise 12 mm the wheels and feet working from the front of the cooker Use a Phillips screwdriver to adjust the rear wheels and adjustable pliers for the front feet Once the cooker is properly level you need to lock these feet with the nut Turn it anticlockwise using the spanner supplied Electrical connection Repairs and work on the coo...

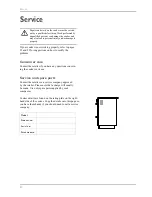
Page 20: ...y the problem Consumer care Contact the retailer if you have any questions concern ing the cooker or its use Service and spare parts Contact the retailer or a service company approved by the retailer Please note that a charge will usually be made Use only spare parts supplied by such companies Cooker details are found on the rating plate on the right hand side of the cooker Copy the details onto t...

Page 21: ... 73 23 EEC IEC class Y INDICATOR LIGHT BULBS neon type OVEN LIGHT BULB E 14 screw fitting marked 230 240V 15W and 300ºC ZL 65 Width mm 600 Height when delivered mm 900 Depth mm 600 Oven volume litres 48 Total wattage 230V model W 9015 HOTPLATES SIZE mm WATTAGE W Rear left 145 1000 Rear right 180 1500 Front left 220 2000 Front right 145 1500 ...

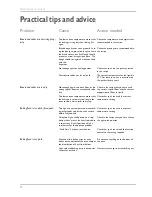
Page 22: ...be dry Check in the recipe that you have used the correct type of flour and the correct proportions of flour to liquid Too low an oven temperature means that the baking has to remain too long in the oven to cook which leads to drying Check that you have used the correct temperature setting Baking food is too dark browned Too high an oven temperature makes bak ing other foods too dark on the surfac...

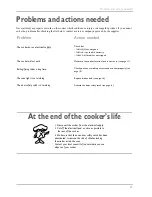
Page 23: ...fety catch has been deactivated to remove the risk of children locking themselves inside the oven Contact your local council to find out where you can dispose of your cooker Problem Action needed The cooker has no electrical supply Check that THE FUSE S has not gone THE PLUG is pushed in correctly THE RCD if fitted has not tripped The cooker will not work Make sure the cooker function lock is not ...

Page 24: ...821 04 18 00 2B tecknare ab Printed on environmentally sound paper MO STK 2000 10 17 ...

Reviews: