background image

37

Guarantee Conditions

Standard guarantee conditions

We undertake that if within 12 months of the date of the

purchase this appliance or any part thereof is proved

to be defective by reason only of fault workmanship or

materials, we will, at our option repair or replace the

same FREE OF CHARGE for labour, materials or car-

riage on condition that:

D

The appliance has been correctly installed and used

only on the electricity supply stated on the rating

plate.

D

The appliance has been used for normal domestic

purposes only, and in accordance with the manu-

facturer’s instructions.

D

The appliance has not been serviced, maintained

repared, taken apart or tampered with any person

not authorised by us.

D

All service work under this guarantee must be

undertaken by a Service Force Centre.

D

Any appliance or defective part replaced shall

become to Company’s property.

D

This guarantee is in addition to your statutory and

other legal rights.

Home visits are made between 8.30 am and 5.30 pm

Monday to Friday. Visits may be available outside

these hours in which case a premium will be charged.

Exclusions

This guarantee does not cover:

D

Damage or calls resulting from transportation,

improper use or neglect, the replacement of any

light bulbs or removable parts of glass or plastic.

D

Coasts incurred for calls to put right an appliance

which is improperly installed or calls to appliances

outside the United Kingdom.

D

Appliances found to be in use within a commercial

environment, plus those which are subjected to ren-

tal agreements.

D

Products of Electrolux manufacture which are not

marketed by Electrolux.

European Guarantee

If you should move to another country within Europe

then your guarantee moves with you to your new home

subject to the following qualifications:

D

The guarantee starts from the date you first purcha-

sed your product.

D

The guarantee is for the same period and to the

same extent for labour and parts as exists in the

new country of use for this brand or range of pro-

ducts.

D

This guarantee relates to you and cannot be trans-

ferred to another user.

D

Your new home is within the European community

(EC) or European Free Trade Area.

D

The product is installed and used in accordance

with our instructions and is only used domestically,

i.e. a normal household.

D

The product is installed taking into account regula-

tions in your new country.

Before you move please contact your nearest Custo-

mer Care Department, listed below, to give them

details of your new home. They will then ensure that the

local Service Organisation is aware of your move and

able to look after your appliances.

France

Senlis

+33 (0)3 44 62 22 22

Germany Nü49 (0)911 3232 2600

Italy

Por39 (0)1678 47053

Sweden Stockholm

+46 (0)20 78 77 50

UK

Slough

+44 (0)1753 219 897

Customer Care

For general enquiries or for further information on Elec-

trolux products, please contact our

Customer Care Department

.

Electrolux

55--77 High Street

Slough

Berkshire

SL1 1DZ

Tel: 08705 950 950

European:

+44 (0) 1753 219898

Summary of Contents for ZKT 623 LN

Page 1: ...ating and Installation Instructions Instrucciones para la installación uso y mantenimiento Brugs og montageanvisning Bruksanvisning Elektro Glaskeramikkochfeld Elektric Ceramic Glass Hob Encimeras Vitroceramicas Electricas Elektrisk Glaskeramiske Kogeplade Elektrisk Glaskeramik Häll GB ...

Page 2: ...ortant are used to highlight in formation that is important for your safety or the functioning of the appliance After this symbol you will find supplementary information on operating and practical use of the appliance Tips and instructions for the economical and en vironmentally sound use of the appliance are marked with this symbol These instructions contain informations on how to rec tify faults...

Page 3: ...ne switch off 9 Residual heat indicator 9 Child safety device 10 Safety cut off after time 11 Safety cut off due to a spillage 11 Application charts tips 12 Cooking and frying utensils 12 General hints 12 Energyconsumption 12 Chart boiling and frying 13 Cleaning and care 14 Ceramic glass surface 14 Light soilage 14 Stubborn soilage 14 Special soilage 15 Sugar 15 Dark spots and decor damages 15 Scr...

Page 4: ...ing there is danger of burning one self at the heating zones D Do not use the cooking zones to heat the room D Take care when plugging electrical items into mains sockets near the hob Connecting leads must not come into connection with the hot surface or vessels D Hot oils can ignite very quickly Do not leave the hob unattended when preparing foods in pans of oil i e frying chips D The sensor tech...

Page 5: ...he material marking material separation refuse collection waste disposal sites Hints on disposal The appliance must not be disposed of with the household rubbish Please contact your local council or Environmental Health Office to see if there are facilities in your area to recycle the appliance Before the first use Cleaning for the first time The hob has to be cleaned thouroughly before it is firs...

Page 6: ...one Cooking zone Cooking zone selector rear left front left Heat Setting selection Main switch ON OFF Cooking zone selector rear right front right Digital indicators Four display fields one for each cooking zones show up as follows after switch on and with automatic switch off by the safety function when selecting a cooking zone depending on heat setting selected with residual heat with malfunctio...

Page 7: ...cooking zone D Dual cooking zone The appliance is fitted with a dual cooking zone This means you may use this cooking zone in two sizes for smaller and larger pots A chance for saving energy D Warm keeping setting this setting allows you to keep dishes warm D Residual heat indicator A hot for residual heat indication will come on in the display in case of a cooking zone tempe rature that implies t...

Page 8: ...fields put your finger flat from top onto the desired field until corresponding indicators will come on or go out respectively until the desired function will be carried out Switching on the appliance The entire appliance is switched on by means of the touch control ON OFF D Keep the control ON OFF touched for about two seconds The digital indicators show and the digital point flashes Once the app...

Page 9: ...ng responding touch control on the cera mic glass cooking area The outer zone can be switched on at any time du ring the use of the inner zone The control lamp iluminates after the outer zone has been switched on D 1 Touch the control for the dual cooking zone The outer heating circuit is switched on the con trol lamp beside the touch control for the dual coo king zone lights up D 2 For switching ...

Page 10: ...vice The child safety device prevents the cooking zones being switched on accidentally The child safety device can only be activated when the hob is switched on D 1 Touch the ON OFF control D 2 Immediately after within 10 seconds touch the and controls at the same time for about two seconds and then release D 3 Touch the control again will be indicated in the digital displays for about 10 seconds ...

Page 11: ...ng cooking zone will switch off automatically appears in the cooking zone display and after cooling down D The cooking zones switch off as follows S setting 1 2 after 6 hours S setting 3 4 after 5 hours S setting 5 after 4 hours S setting 6 9 after 1 5 hours To re set the cooking zones if required the appliance must be switched back on using the main switch ON OFF Safety cut off due to a spillage ...

Page 12: ... to the base diameter Manufacturers often state the upper diameter of the edge of a dish D If you are using special cooking utensils like pres sure cookers or a WOK follow the manufacturer s instructions D Follow any guidelines provided by the saucepan manufacturer Ensure they are recommended for use on ceramic hobs General hints D The bases should always be clean and dry D To avoid scratching or ...

Page 13: ...es of liquid then switch back to appropriate setting 7 9 Frying Deep fat frying French fries pan cakes Fillet of pork and beef steaks goulash 6 7 Roasting Frying without crust Frying of meat schnitzel cutlets meat balls sausages liver fish fillet in deep fat Frying eggs or chops 4 5 Boiling Braising Boiled potatoes stews soups hot pot sauces in large quantities 3 4 Simmering Stewing Simmering of v...

Page 14: ...ss surface D Clean the ceramic glass surface after every use when it is hand warm or cold This will avoid spills becoming burnt on D Remove scale and water marks fat spots and metallic shimmering discoloration with a commer cial ceramic glass cleaner such as Vitroclen Light soilage D Wipe the ceramic glass surface with a damp cloth and a little washing up liquid D Then rub dry with a clean cloth N...

Page 15: ... cleaners or pans with abrasive ba ses are used then the decor will take on an abra ded appearence and dark spots will appear over time These marks cannot be removed However they do impair the fuctionability of the hob Scratches in the ceramic glass surface Scratches in the ceramic glass surface resulting from burrs on a pan base or sand grains cannot be removed However they do impair the fuction ...

Page 16: ...an be operated again if the display flashes If the hob has been used at a high setting for a long period of time the overheating protection of the electronic control will become active and the front left cooking zone will become inoperable This occurs to prevent damage to the electronic controls The front left cooking zone will operate again once the appliance has cooled down and is no longer in t...

Page 17: ... United Kingdom D Appliances found to be in use within a commercial environment plus those which are subjected to ren tal agreements D Products of Electrolux manufacture which are not marketed by Electrolux European Guarantee If you should move to another country within Europe then your guarantee moves with you to your new home subject to the following qualifications D The guarantee starts from th...

Page 18: ...ion of the appliances The same refers to the back of the appliance which even in case of built in solutions away from the wall must not be freely accessible Built in cupboards have to be located and faste ned in a way that they are stable D Note down the data from the rating plate of your appliance in the printed rating plate form in this manual These numbers are needed in case of service calls In...

Page 19: ...utting D Clean the worktop in the cut out section D With tiled worktops the grooves within the contact area of the cooking area must completely be filled up with groove material D Then fasten the catch springs with screws in the cut out at the marked position The distortion of the springs serves as a stop on the worktop D With natural artificial stone or ceramic plates the springs can be glued in ...

Page 20: ...cted as shown and the terminal screws be firmly tightened D Afterwards the supply cable has to be secured by strain relief device and the covering slide must be closed by firmly pressing down until it engages Prior to first use remove any existing labels and protective film from the ceramic glass plate or the frame of the hob After connecting the electrical supply all cooking zones should be brief...

Page 21: ...demands for electromagnetic compatibility EMC This appliance corresponds to EC guidelines D 73 23 EC dt 19 02 1973 low voltage guideline D 89 336 EC dt 03 05 1989 EMC guideline inclusive of amendment guideline 92 31 EC Rating plate Note down here the data from the rating plate of your appliance The rating plate is on the base of the hob The rating plate is not visible after the hob has been built ...

Page 22: ...42 ...

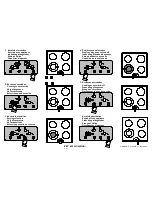
Page 23: ...Kochstufe einstellen Setting selection Valg af varmetrin Val av kokeffekt Selección potencia de cocción Kochfeld ausschalten Switch off the appliance Frakobling af kogefeltet Stänga av hällen Desconectar el aparato 5 Kochzone ausschalten Cooking zone switch off Frakobling af kogezone Stänga av värmezon Desconetar la zone de cocción 4 Zweikreiszone einstellen Dual cooking zone switch off Indkobling...

Reviews: