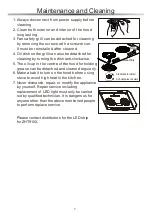
Zanussi ZHT910X Operating	 Instruction Download Page 4

36

1

2

3

4

19

20

21

22

23

24

25

26

27

28

34

35

5

6
7
8
9

10

11

12

13
14

15
16
17

18

29

30

31

32

33

ZHT910X

機箱

電源線

風管圈

螺絲包

橡膠墊

6#1 1/2" 木螺釘

3/16 

x

 1/4華司頭螺絲

3/16 x 1/

2

華司頭螺絲

收縮管

加熱器組合

掀式水箱蓋

加熱器固定片

水箱(旋轉)螺栓

水位開關組

水箱

噴水接頭

防水塞

水箱固定板
蠕動泵浦組
泵浦固定座
開關固定板

電容器

觸控開關組

量杯

矽膠管組

 T型管組

溢水管壓簧

LED條燈

六溫控迫(左)

六溫控迫(右)

風葉

風葉

反轉牙風葉心

正轉牙風葉心

蒸氣油槽組合

集水座

黑白油杯

煙罩

油杯座保護網

三腳小油杯

2

Summary of Contents for ZHT910X

Page 1: ...XP022572 1 Before using this range hood please read these instructions completely MODEL ZHT910X...

Page 2: ...Index Safety Notice Part List Installation Guidelines P1 P3 P5 P2 Operation Instruction Maintenance and Cleaning Hood Measurement P8 P7 P6 P1 P3 P5 P2 P8 P7 P6 P9 Speci cation Wiring Diagram P9...

Page 3: ...1 1 2 3 4 5 6 7 8 9 10 11 12 13 14 15 16 17 65 75 18 19...

Page 4: ...36 1 2 3 4 19 20 21 22 23 24 25 26 27 28 34 35 5 6 7 8 9 10 11 12 13 14 15 16 17 18 29 30 31 32 33 ZHT910X 6 1 1 2 3 16 x 1 4 3 16 x 1 2 T LED 2...

Page 5: ...3 1 2 3 4 5 ZHT910X a 6 6 x 1 6 5 x 1 b 2 1 c 1 d 1 x 2 3 16 x 1 4 x 2 3 16 x 1 2 x 4 6 1 1 2 x 6 5 x 12 x 1T x 6 x 2...

Page 6: ...4 1 25 2 700 50 3 6 5 1 2 ZHT910X 700mm 50mm...

Page 7: ...1 2 3 4 5 6 3 7 8 9 2 4 2 4mm 3 5...

Page 8: ...6 ZHT910X 1 5 LED 2 3 1 1 2 3 4 1 2 1 2 1 2 5 1 2 3 4 6...

Page 9: ...1 2 3 4 5 6 7 LED ZHT910X 7...

Page 10: ...8 ZHT910X 228 710 135 134 5 155 530 664 365 40 mm...

Page 11: ...9 ZHT910X 12 6 14 9 220V 50Hz 5W LED 710 x 530 x 135 mm 800 x 600 x 220 mm ZHT910X CIRCUIT DIAGRAM FUSE 15A M3 LIGHT BAR WHITE BLACK F 450V AC X 2...

Page 12: ...he kitchen to avoid hazard 10 Do not flame under the range hood 17 The appliance should be positioned 65 75 cm above the cooking range 18 The range hood must be earthed 19 To prevent re hazard in case...

Page 13: ...an Blade right Fan blade cap Fan blade cap Residual pan Water collector Oil cup Shell cover Safety grill Oil dish Heating block Water tank cap Water tank screw Water sensor Water tank Nozzle Plug Wate...

Page 14: ...onds to the voltage in your home 4 Connect the power and switch on the motors and lighting system to check the operation 5 Check the following accessories before installation ZHT910X a Exhaust duct ad...

Page 15: ...glue to the collar and securely attach it to the top of the cooker hood s vent lid Install the cooker hood and exhaust duct to the plastic collar and seal with fast drying glue 6 inch diameter exhaus...

Page 16: ...d and hang the hood on the steel nails and then adjust the hood from side to side and from front and back to a horizontal position 7 Follow the instruction print on the enclosed exhaust duct adapter a...

Page 17: ...and light level it was last turned off at 4 Speed down 1 Press to start steam cleaning process the indication light is illuminate when the range hood is cleaning 2 When steam cleaning process is oper...

Page 18: ...epair or modify the appliance by yourself Repair service including replacement of LED light must only be carried out by qualified technician It is dangerous for anyone other than the above mentioned p...

Page 19: ...8 ZHT910X 228 710 135 134 5 155 530 664 365 40 Unit mm Hood Measurement...

Page 20: ...el Net Weights Gross Weights Hood Size Packing Size Voltage Light Bulb ZHT910X Specification Wiring Diagram GREEN BLACK WHITE REMARKS CAPACITOR 2 5 2 5 f 450V AC FIT AC220V 50Hz CIRCUIT DIAGRAM FUSE 1...

Reviews: