background image

CONTROL KNOB

Symbol

Description

no gas supply / off position

ignition position / maximum

gas supply

Symbol

Description

minimum gas supply

1 - 9

power levels

DAILY USE

WARNING! Refer to Safety chapters.

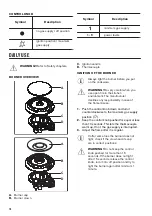
BURNER OVERVIEW

$

%

'

&

$

%

'

&

A. Burner cap

B. Burner crown

C. Ignition candle

D. Thermocouple

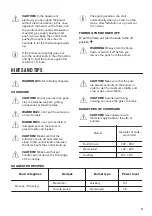
IGNITION OF THE BURNER

Always light the burner before you put

on the cookware.

WARNING! Be very careful when you

use open fire in the kitchen

environment. The manufacturer

declines any responsibility in case of

the flame misuse.

1. Push the control knob down and turn it

counterclockwise to the maximum gas supply
position ( ).

2. Keep the control knob pushed for equal or less

than 10 seconds. This lets the thermocouple

warm up. If not, the gas supply is interrupted.

3. Adjust the flame after it is regular.

If after some tries the burner does not

light, check if the crown and its cap

are in correct positions.

WARNING! Do not keep the control

knob pushed for more than 15

seconds. If the burner does not light

after 15 seconds, release the control

knob, turn it into off position and try to

light the burner again after minimum 1

minute.

10

Summary of Contents for ZGO68332BA

Page 1: ...GETTING STARTED EASY User Manual ZGO68332BA EN User Manual Hob PT ES ...

Page 2: ...or instruction concerning the use of the appliance in a safe way and understand the hazards involved Children of less than 8 years of age and persons with very extensive and complex disabilities shall be kept away from the appliance unless continuously supervised Children should be supervised to ensure that they do not play with the appliance Keep all packaging away from children and dispose of it...

Page 3: ...e supervised continuously WARNING Danger of fire Do not store items on the cooking surfaces Metallic objects such as knives forks spoons and lids should not be placed on the hob surface since they can get hot Do not use the appliance before installing it in the built in structure Do not use a steam cleaner to clean the appliance If the glass ceramic surface glass surface is cracked switch off the ...

Page 4: ...wear Seal the cut surfaces with a sealant to prevent moisture from causing swelling Protect the bottom of the appliance from steam and moisture Do not install the appliance next to a door or under a window This prevents hot cookware from falling from the appliance when the door or the window is opened If the appliance is installed above drawers make sure that the space between the bottom of the ap...

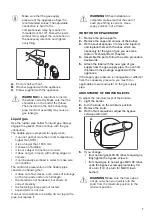
Page 5: ...for adequate ventilation USE WARNING Risk of injury burns and electric shock CAUTION The use of a gas cooking appliance results in the production of heat moisture and products of combustion in the room in which it is installed Ensure that the kitchen is well ventilated especially when the appliance is in use Prolonged intensive use of the appliance may require additional ventilation for example th...

Page 6: ...rly to prevent the deterioration of the surface material Switch off the appliance and let it cool down before cleaning Do not use water spray and steam to clean the appliance Clean the appliance with a moist soft cloth Use only neutral detergents Do not use abrasive products abrasive cleaning pads solvents or metal objects Do not clean the burners in the dishwasher SERVICE To repair the appliance ...

Page 7: ...sticity the fastening clamps are not rusted expired term is not due If one or more defects are visible do not repair the pipe but replace it WARNING When installation is complete make sure that the seal of each pipe fitting is correct Use a soapy solution not a flame INJECTORS REPLACEMENT 1 Remove the pan supports 2 Remove the caps and crowns of the burner 3 With a socket spanner 7 remove the inje...

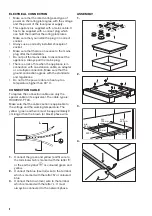
Page 8: ...he ground connection agrees with the standards and regulations Do not let the power cable to heat up to a temperature higher than 90 C CONNECTION CABLE To replace the connection cable use only the special cable or its equivalent The cable type is H03V2V2 F T90 Make sure that the cable section is applicable to the voltage and the working temperature The yellow green earth wire must be approximately...

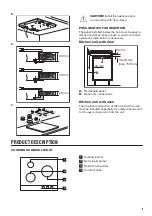
Page 9: ...tance intervention is necessary Kitchen unit with door min 20 mm max 150 mm 30 mm 60 mm B A A Removable panel B Space for connections Kitchen unit with oven The electrical connection of the hob and the oven must be installed separately for safety reasons and to let easy remove oven from the unit PRODUCT DESCRIPTION COOKING SURFACE LAYOUT 4 2 1 3 1 Auxiliary burner 2 Semi rapid burner 3 Multi Crown...

Page 10: ...nes any responsibility in case of the flame misuse 1 Push the control knob down and turn it counterclockwise to the maximum gas supply position 2 Keep the control knob pushed for equal or less than 10 seconds This lets the thermocouple warm up If not the gas supply is interrupted 3 Adjust the flame after it is regular If after some tries the burner does not light check if the crown and its cap are...

Page 11: ...fety chapters COOKWARE CAUTION Do not use cast iron pans clay or earthenware pots grilling accessories or toaster plates WARNING Do not put the same pan on two burners WARNING Do not put unstable or damaged pots on the burner to prevent spills and injuries CAUTION Make sure that the bottoms of pots do not stand too close to the control knob otherwise the flame heats the control knob up CAUTION Mak...

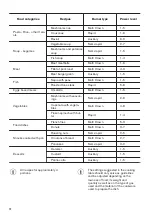
Page 12: ... Vegetables Mushrooms with season ings Semi rapid 2 6 Caponata with vegeta bles Multi Crown 4 8 Frozen spinach with but ter Rapid 1 4 Fried dishes French fries Multi Crown 5 9 Donuts Multi Crown 3 7 Snacks cooked with pan Roasting nuts Semi rapid 2 5 Croutons of bread Multi Crown 2 7 Pancakes Semi rapid 3 9 Desserts Caramel Auxiliary 1 5 Custard Auxiliary 1 5 Panna cotta Auxiliary 1 5 All recipes ...

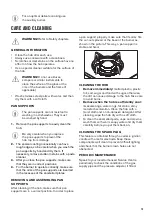
Page 13: ...e that the arms of the pan supports are inserted in the recesses of the enamelled plates REMOVING AND ASSEMBLING PAN SUPPORTS After cleaning of the hob make sure that pan supports are in a correct position In order to place a pan support properly make sure that its arms fits the cut outs placed at the base of the burner as shown in the picture This way a pan support is stable and fixed CLEANING TH...

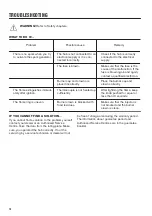
Page 14: ...ame extinguishes immedi ately after ignition Thermocouple is not heated up sufficiently After lightning the flame keep the knob pushed for equal or less than 10 seconds The flame ring is uneven Burner crown is blocked with food residues Make sure that the injector is not blocked and the burner crown is clean IF YOU CANNOT FIND A SOLUTION If you cannot find a solution to the problem yourself contac...

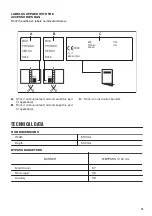
Page 15: ...SER NO 03 IT MADE IN ITALY TYPE IP20 0049 A B C A Stick it on Guarantee Card and send this part if applicable B Stick it on Guarantee Card and keep this part if applicable C Stick it on instruction booklet TECHNICAL DATA HOB DIMENSIONS Width 590 mm Depth 520 mm BYPASS DIAMETERS BURNER Ø BYPASS 1 100 mm Multi Crown 57 Semi rapid 35 Auxiliary 28 15 ...

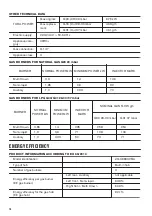
Page 16: ...ry 1 0 0 33 70 GAS BURNERS FOR LPG G30 G31 28 30 37 mbar BURNER NORMAL POWER kW MINIMUM POWER kW INJECTOR MARK NOMINAL GAS FLOW g h G30 28 30 mbar G31 37 mbar Multi Crown 3 55 1 4 095 258 254 Semi rapid 1 9 0 6 71 138 136 Auxiliary 1 0 0 33 50 73 71 ENERGY EFFICIENCY PRODUCT INFORMATION ACCORDING TO EU 66 2014 Model identification ZGO68332BA Type of hob Built in hob Number of gas burners 3 Energy ...

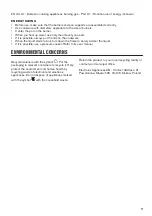
Page 17: ...starts to boil turn down the flame to barely simmer the liquid If it is possible use a pressure cooker Refer to its user manual ENVIRONMENTAL CONCERNS Recycle materials with the symbol Put the packaging in relevant containers to recycle it Help protect the environment and human health by recycling waste of electrical and electronic appliances Do not dispose of appliances marked with the symbol wit...

Page 18: ......

Page 19: ......
Page 20: ...WWW ZANUSSI COM SHOP 867367668 A 132022 ...

Reviews: